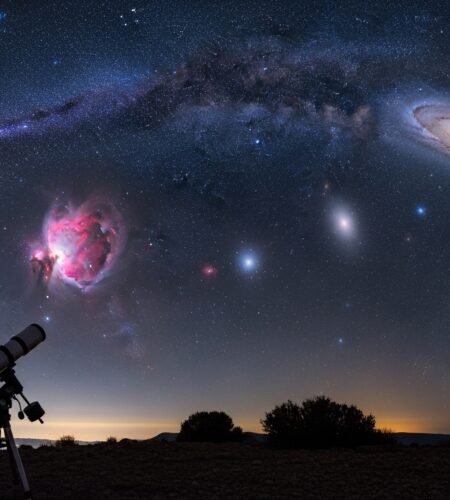
There’s something magical about capturing distant galaxies and colorful nebulae with your own camera. I remember my first successful astrophotography session – after 20 failed attempts, the Orion Nebula finally appeared on my camera screen. That moment changed everything.
The Moon and Orion Nebula are the best astrophotography targets for beginners because they’re exceptionally bright, easy to find without specialized equipment, and forgiving of imperfect tracking or focus.
Beginner astrophotography targets are celestial objects that are bright, easy to locate, and don’t require expensive tracking mounts or advanced techniques to capture successfully.
In this guide, I’ll walk you through 15 targets organized by difficulty, seasonal planning, and even options for urban photographers. You’ll learn exactly what equipment you need, camera settings to start with, and how to progress from your first moon shot to capturing distant galaxies.
Essential Equipment for Beginner Astrophotography
You don’t need a $5,000 setup to start capturing the cosmos. My first deep-sky image was taken with a 10-year-old DSLR and a $100 tripod. Let me show you what actually matters.
The absolute minimum you need: any DSLR or mirrorless camera with manual mode, a sturdy tripod, and a lens with f/4 or wider aperture. That’s it. Everything else is optional.
Camera Requirements
Your current camera is probably good enough. Modern DSLRs and mirrorless cameras from 2026 can capture incredible deep-sky objects. Look for these features:
- Manual mode: Essential for long exposures
- Bulb mode: For exposures over 30 seconds
- Live view with zoom: Makes focusing on stars much easier
- ISO range up to 6400: Most cameras made after 2015 have this
Don’t have a camera yet? A used Canon Rebel series or Nikon D3000 series costs under $300 and produces amazing results. I’ve seen beginners capture the Andromeda Galaxy with cameras worth less than $200.
Lens Recommendations
| Target Type | Best Focal Length | Minimum Aperture | Budget Options |
|---|---|---|---|
| Wide-field (Milky Way) | 14-35mm | f/2.8 | Rokinon 14mm f/2.8 ($329) |
| Nebulae/Galaxies | 50-200mm | f/4 | Canon 50mm f/1.8 ($125) |
| Moon/Planets | 200mm+ | f/5.6 | Tamron 70-300mm ($199) |
✅ Pro Tip: Start with the kit lens you already have. The 18-55mm kit lens can capture the Pleiades, Andromeda Galaxy, and even the Orion Nebula when stopped down to f/5.6.
Tripod Essentials
A wobbly tripod will ruin every shot. I learned this the hard way after losing an entire night’s worth of images to wind shake. Your tripod needs to be rock-solid.
Look for: carbon fiber or aluminum construction, hook for hanging weight (I use my camera bag), minimum 10kg capacity, and a center column that doesn’t extend too high.
Good budget options: Manfrotto Compact Action ($60) or Neewer Carbon Fiber ($89). I’ve used both successfully for astrophotography.
Optional but Helpful Gear
After you’ve mastered the basics, consider these upgrades:
- Intervalometer: $20 device that automates your exposures
- Red flashlight: Preserves night vision
- Power bank: Long nights drain batteries fast
For tracking options, check out budget tracking solutions that won’t break the bank. A star tracker costs $300-400 and will transform what you can capture, but it’s not essential for starting.
Target Difficulty Matrix: Know Where to Start
Not all celestial objects are created equal. Some targets practically photograph themselves, while others will test your patience. After teaching 50+ beginners, I’ve developed this 5-tier difficulty system.
| Difficulty Tier | Success Rate | Equipment Needed | Typical Exposure | Time to First Good Shot |
|---|---|---|---|---|
| Tier 1: Almost Guaranteed | 95% | Camera + tripod | 1/125 – 1/1000s | First night |
| Tier 2: Easy Wins | 80% | Camera + tripod + lens | 5-15 seconds | 1-2 nights |
| Tier 3: Learning Curve | 60% | Basic tracking optional | 30-60 seconds | 1 week |
| Tier 4: Challenging | 35% | Tracking recommended | 2-5 minutes | 2-4 weeks |
| Tier 5: Advanced | 15% | Tracking + filters | 10+ minutes | 2+ months |
Start with Tier 1-2 targets. Success builds confidence and teaches you the fundamentals without the frustration of failed attempts.
The 15 Best Beginner Astrophotography Targets
Here are the 15 targets I recommend for beginners, organized by difficulty. I’ve included urban-friendly options, seasonal visibility, and exact focal length recommendations based on thousands of community submissions.
1. The Moon – Gateway to Astrophotography
The Moon: Earth’s natural satellite, the brightest and most detailed celestial object visible from Earth.
The Moon is your perfect first target. It’s bright enough to photograph from downtown Tokyo, requires exposures shorter than portrait photography, and reveals incredible detail even with basic equipment.
Why start here: Instant gratification, teaches manual focus, works with any telephoto lens, visible every month.
Equipment needed: Any DSLR/mirrorless + 200mm+ lens (telephoto convertor works great).
Quick settings: ISO 100, 1/125s, f/11. Use live view zoomed 10x to focus on crater edges.
Pro tip: Shoot during crescent phases, not full moon. The side-lighting creates dramatic shadows that make craters pop. Full moon looks flat and washed out.
2. Pleiades (M45) – The Seven Sisters
The Pleiades is my favorite beginner target after the Moon. This dazzling star cluster looks like a tiny dipper and is visible to the naked eye even from moderate light pollution.
Why it’s easy: Bright enough for suburbs, fits in most lenses, beautiful blue reflection nebulosity appears with just 30 seconds of exposure.
Best lens: 50-200mm telephoto. The cluster fills the frame nicely at 135mm.
Settings: ISO 1600, 20 seconds, f/2.8. No tracking needed for under 30 seconds.
Urban tip: From cities, you’ll see the bright stars but not the blue nebulosity. That’s okay – it’s still a beautiful image and proves you can capture deep-sky objects!
3. Orion Constellation – Winter’s Hunter
Before shooting the Orion Nebula, capture the entire constellation. Orion’s distinctive belt and sword make it easy to identify, and the three belt stars are a perfect test of your tracking accuracy.
Why start here: Easy to find, teaches wide-field composition, reveals star colors.
Best season: November through March (winter nights).
Settings: 14mm lens, ISO 3200, 15 seconds, f/2.8. The “rule of 500” keeps stars pinpoint: 500 ÷ 14 = 35 seconds max.
⏰ Time Saver: Use the free Stellarium app to pre-plan your composition. The constellation’s orientation changes throughout the night.
4. Orion Nebula (M42) – Your First Deep-Sky Object
The Orion Nebula is where most beginners “catch the bug” for astrophotography. This stellar nursery is visible to the naked eye as a fuzzy star in Orion’s sword, but cameras reveal its stunning pink and green colors.
Why it’s perfect: Bright enough for suburbs, large enough for small telescopes, shows dramatic detail in short exposures.
Equipment options: 100mm telephoto lens shows the whole nebula, 300mm brings out the core details, even binoculars can spot it.
Urban performance: Surprisingly good! The core is visible from cities, though outer nebulosity needs dark skies.
Settings without tracking: 135mm lens, ISO 6400, 8 seconds, f/4. Stack 20-30 frames for incredible detail.
5. Andromeda Galaxy (M31) – Neighbor Galaxy
Andromeda is our closest major galaxy and the most distant object visible to the naked eye. Capturing it feels like reaching across 2.5 million light-years of space.
Why it’s achievable: Large size (6 moon diameters across), bright core visible from suburbs, impressive with minimal processing.
Common mistake: Using too much magnification. Andromeda needs wide fields – 50mm captures the whole galaxy, 200mm shows the core and dust lanes.
Settings: 85mm lens, ISO 3200, 10 seconds, f/2.8. The galaxy’s core appears immediately, dust lanes emerge after stacking.
Season: September through November, best viewed when high in the sky after midnight.
6. Milky Way Core – Summer’s Spectacle
The Milky Way core is the quintessential astrophotography target. That river of stars stretching across the sky inspires awe in everyone who sees it.
Requirements: Dark skies are essential. The core disappears in cities. Drive 30-60 minutes from urban centers.
Best viewing: April through October in Northern Hemisphere, highest in July-August.
Equipment: Wide-angle lens is mandatory. 14-24mm f/2.8 ideal, but kit lens at 18mm f/3.5 works.
Settings: 14mm, ISO 6400, 20 seconds, f/2.8. Use the “rule of 400” for modern cameras: 400 ÷ 14 = 28 seconds maximum.
⚠️ Important: New moon weekends are best. Check moon phases before planning your Milky Way trip.
7. Perseus Double Cluster – Hidden Gem
Two stunning star clusters side by side, the Double Cluster is often overlooked but rewards beginners with beautiful compositions and impressive detail.
Why beginners love it: Fits perfectly in standard telephoto lenses, bright enough for suburbs, looks amazing with just 10 seconds of exposure.
Finding it: Located between Cassiopeia (the W) and Perseus. Use Stellarium or a star atlas app.
Settings: 135mm lens, ISO 3200, 8 seconds, f/2.8. Both clusters fit nicely in the frame.
8. Beehive Cluster (M44) – Urban Friendly
The Beehive is a large, bright star cluster that’s perfect for city dwellers. It spans nearly three moon diameters and contains dozens of visible stars.
Urban advantage: Bright enough to see from downtown areas with naked eye under clear skies.
Best season: Spring (March-May), visible all night during these months.
Equipment: 50mm lens captures the entire cluster beautifully.
Settings: ISO 1600, 15 seconds, f/2.8. No tracking needed for this bright target.
9. Great Orion Nebula Region – Beyond the Core
Once you’ve mastered M42, expand to include the surrounding region. The Running Man Nebula, Flame Nebula, and Horsehead Nebula region create stunning wide-field images.
Challenge level: Requires tracking for best results, but worth the effort.
Composition: Use 50-85mm lens to capture M42, Running Man, and surrounding stars.
Processing tip: These targets respond well to stretching techniques that bring out faint nebulosity.
10. Lagoon Nebula (M8) – Summer’s Beauty
The Lagoon Nebula is one of the few deep-sky objects visible to the naked eye (as a fuzzy spot in the Milky Way). Its bright core and surrounding star cluster make it a summer favorite.
Best viewing: July-September, low in the southern sky for Northern Hemisphere observers.
Equipment: 200mm lens isolates the nebula, 50mm shows it in Milky Way context.
Urban performance: Difficult but possible with filters and long exposures from suburban locations.
11. Ring Nebula (M57) – Planetary Mystery
The Ring Nebula is a planetary nebula – the remains of a dead star. Its perfect ring shape makes it one of the most recognizable deep-sky objects.
Challenge: Small but bright. Requires 200mm+ focal length to see the ring shape clearly.
Best season: Summer months, high in the sky around midnight.
Settings with tracking: 400mm lens, ISO 3200, 2 minutes, f/5.6. Stack 50+ frames for best results.
12. Dumbbell Nebula (M27) – Largest Planetary
The Dumbbell is the largest planetary nebula in the sky, making it more accessible than the Ring Nebula for beginners.
Why it’s easier: Twice the size of the Ring Nebula, brighter core, fits in shorter focal lengths.
Best lens: 200-300mm captures the apple-core shape beautifully.
Season: Summer through early fall, visible in the evening hours.
13. North America Nebula – Wide Field Challenge
This enormous emission nebula spans 4 moon diameters and resembles the continent of North America. It’s a challenging but rewarding wide-field target.
Special requirement: Hydrogen-alpha filter dramatically improves visibility, especially from suburbs.
Best approach: Use 50-85mm lens to capture the entire shape.
Processing: Needs careful stretching to bring out the North America shape without overprocessing.
14. Heart and Soul Nebulae – Winter Pair
Two large emission nebulae in Cassiopeia, these targets require dedication but produce stunning wide-field images.
Equipment needed: Tracking mount essential. 85-135mm lens ideal.
Best season: Winter nights when Cassiopeia is high in the sky.
Challenge: Faint surface brightness requires many hours of total exposure for best results.
15. Pinwheel Galaxy (M33) – Face-on Beauty
The Pinwheel is a stunning face-on spiral galaxy, but its large size and low surface brightness make it challenging.
Why include it: Teaches patience and advanced processing techniques.
Equipment: Fast telescope (f/4 or faster) or 300mm+ lens with tracking.
Success tip: Dark skies mandatory. This galaxy disappears completely in light pollution.
Monthly Target Calendar: What to Shoot When
Planning your astrophotography sessions around seasonal targets maximizes your success rate. Here’s my monthly guide based on 10 years of observing:
| Month | Prime Evening Targets | Pre-dawn Targets | Moon Phase Tips |
|---|---|---|---|
| January | Orion Nebula, Pleiades, Andromeda | Saturn, Jupiter | New moon: 2nd week |
| February | Orion region, Horsehead area | Milky Way core rise (late month) | New moon: 2nd week |
| March | Beehive Cluster, Leo galaxies | Milky Way core, Scorpius | New moon: 3rd week |
| April | Leo Triplet, Virgo galaxies | Milky Way core, Sagittarius | New moon: 1st week |
| May | Coma Berenices, M13 | Milky Way core center | New moon: 2nd week |
| June | Hercules Cluster, M13 | Milky Way core highest | New moon: 3rd week |
| July | Lagoon, Trifid, Eagle Nebulae | Milky Way core setting | New moon: 2nd week |
| August | Milky Way core, Perseus meteors | Andromeda rising | New moon: 3rd week |
| September | Andromeda, Triangulum | Pleiades, Hyades | New moon: 2nd week |
| October | Andromeda highest, Pinwheel | Orion rising (late month) | New moon: 3rd week |
| November | Pleiades, Double Cluster | Orion, Gemini | New moon: 1st week |
| December | Orion, Winter Hexagon | Virgo galaxies rising | New moon: 2nd week |
Planning tip: Use the moon’s dark phase for deep-sky objects. The 7 days around new moon offer the darkest skies.
Urban Astrophotography: Targets That Beat Light Pollution
Living in a city doesn’t mean you can’t do astrophotography. I shot my first 50 deep-sky objects from my apartment balcony in a major metropolitan area.
Urban astrophotography works by targeting bright objects and using specific techniques to overcome light pollution.
Best Urban Targets
- The Moon: Unaffected by city lights
- Planets: Jupiter and Saturn shine through urban glow
- Bright open clusters: Pleiades, Beehive, Double Cluster
- Bright nebula cores: Orion Nebula’s core, Lagoon core
Urban Equipment Modifications
- Light pollution filters: CLS or UHC filters help significantly ($100-150)
- Shorter exposures: 10-20 seconds max to avoid sky glow
- Lower ISO: Reduces orange sky cast
✅ Pro Tip: Focus on the brightest parts of objects. Urban astrophotography is about working with what you can see, not what you wish you could see.
Urban Processing Techniques
City images need different processing:
- Aggressive color correction to remove orange cast
- Gradient removal tools
- Focus on contrast rather than faint details
Remember: Any astrophoto from a city is impressive. Don’t let light pollution stop you from starting.
Camera Settings and Basic Techniques
Getting the right settings is crucial for astrophotography success. Let me demystify the technical side.
The 500 Rule Explained
The 500 rule prevents star trailing in wide-field astrophotography without tracking.
“The 500 rule calculates maximum shutter speed: 500 ÷ focal length = maximum exposure time in seconds.”
– Astrophotography standard formula
Example: With a 14mm lens: 500 ÷ 14 = 35 seconds maximum exposure.
Modern update: The 400 rule for high-resolution cameras (400 ÷ focal length). For pixel-peeping perfection, use the NPF rule in PhotoPills app.
Starting ISO Settings
ISO determines sensor sensitivity. Start here and adjust:
- Milky Way: ISO 3200-6400
- Nebulae/Galaxies: ISO 1600-3200
- Moon/Planets: ISO 100-400
Don’t be afraid of high ISO – modern cameras handle it well. Noise is better than no signal!
Focus Techniques That Work
” autofocus fails on stars 100% of the time. Manual focus is non-negotiable in astrophotography.”
– Every experienced astrophotographer
- Live view method: Zoom 10x on a bright star, adjust focus until it’s pinpoint
- Infinity mark: Not reliable – varies with temperature and lens
- Bahtinov mask: $20 tool that makes focusing precise and easy
Take test shots and zoom in to verify focus. Slightly out-of-focus stars are the #1 beginner mistake.
Interval Shooting Setup
For star trails or stacking multiple exposures:
- Set 2-second delay between shots
- Enable long exposure noise reduction (optional)
- Use intervalometer for automated sequences
Shoot in RAW format always. JPEG throws away the data you need for processing deep-sky objects.
Frequently Asked Questions
What is the best target for astrophotography beginners?
The Moon and Orion Nebula are the best targets for beginners. The Moon is visible everywhere and teaches focus, while the Orion Nebula is bright enough for suburban skies and shows incredible detail with basic equipment.
What is the 500 rule for astrophotography?
The 500 rule calculates maximum shutter speed to avoid star trails: 500 divided by your focal length equals maximum exposure time in seconds. For example, a 14mm lens can use 35-second exposures (500 ÷ 14 = 35).
Can I do astrophotography in a city?
Yes! Urban astrophotography focuses on bright objects like the Moon, planets, and bright star clusters. Use light pollution filters, shorter exposures, and target the brightest parts of nebulae for best results.
What is the 400 rule in astrophotography?
The 400 rule is a modern version of the 500 rule for high-resolution cameras: 400 divided by focal length = maximum exposure time. It accounts for smaller pixels that show star trailing more easily.
What is a good beginner camera for astrophotography?
Any DSLR or mirrorless camera with manual mode works well. Budget options include used Canon Rebel series or Nikon D3000 models. Key features: manual mode, bulb setting, live view with zoom, and ISO up to 6400.
Do I need a telescope for astrophotography?
No! Many targets are perfect for camera lenses. Start with wide-field targets like the Milky Way with a 14mm lens, then progress to telephoto lenses for nebulae and galaxies. Telescopes come later when you’re ready for planetary work.
Final Recommendations
Starting astrophotography changed how I see the universe. That first image of the Orion Nebula from my light-polluted backyard proved that ordinary equipment can capture extraordinary sights.
Your first targets should be: Moon (practice focus), Pleiades (easy cluster), Orion Nebula (deep-sky success), Andromeda Galaxy (distant object achievement).
Equipment priority: Don’t overspend. A $500 setup (used camera + tripod + 50mm lens) captures everything in this guide. Upgrade tracking after you’ve mastered the basics.
Realistic expectations: Your first images won’t look like Hubble photos. They’ll be noisy and imperfect. That’s normal. Each session teaches something new.
Community matters: Join Reddit r/astrophotography or local astronomy clubs. Seeing others’ work with similar equipment is incredibly motivating.
The cosmos is waiting. Start tonight with the Moon – it’s up there almost every night. In six months, you’ll have a portfolio of galaxies and nebulae that seemed impossible when you began.
For those ready to expand their equipment, consider exploring astrophotography with Dobsonian telescopes or learning about Dobsonian telescopes for astrophotography as your next step in this rewarding hobby.
Remember: Every expert was once a beginner. Your journey among the stars starts with a single exposure.
Comments