The TELRAD Finder Sight solves this fundamental problem with an elegantly simple approach that has made it the standard for manual star hopping since the 1970s. Instead of squinting through magnified finderscope eyepieces with confusing inverted images, you get an unmagnified view of the sky with three illuminated reference rings overlaid directly on the stars.
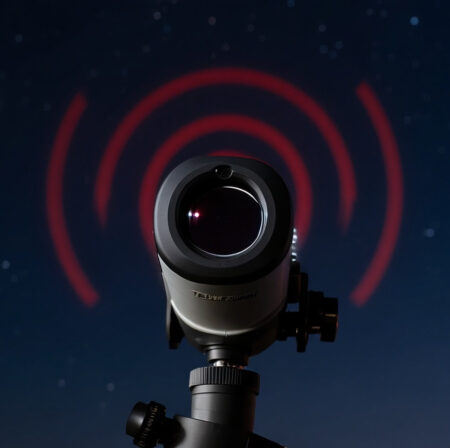
What sets the Telrad apart from every other finder system is its brilliant bullseye reticle—three concentric circles measuring 0.5 degrees, 2 degrees, and 4 degrees across the sky. These aren’t random measurements. The smallest ring matches the apparent size of the Moon and many deep sky objects. The middle ring covers roughly what you see through a low-power eyepiece. The outer ring helps you navigate between guide stars. This system transforms star hopping from an abstract mental exercise into a visual, intuitive process that anyone can learn in minutes rather than hours.
The zero-magnification design means you see the sky exactly as it appears to your naked eye, just with helpful reference points added. Both eyes remain open, preserving your night vision and natural depth perception. You’re not mentally translating between what your star chart shows and what you see through the eyepiece—the Telrad bridges that gap directly. In this review, I’ll share my extensive experience with the Telrad, including real-world testing across various telescopes, detailed setup instructions, and honest assessment of who should—and shouldn’t—add this finder to their astronomy toolkit.
TELRAD Finder Sight – Deep Dive Review

What We Like
- Zero magnification with both eyes open
- Three precise rings for star hopping
- Excellent battery life
- Universal mounting system
- Built to last decades
What We Don't Like
- Large size may not fit small telescopes
- Requires understanding of star hopping technique
- Not ideal for lightweight travel setups
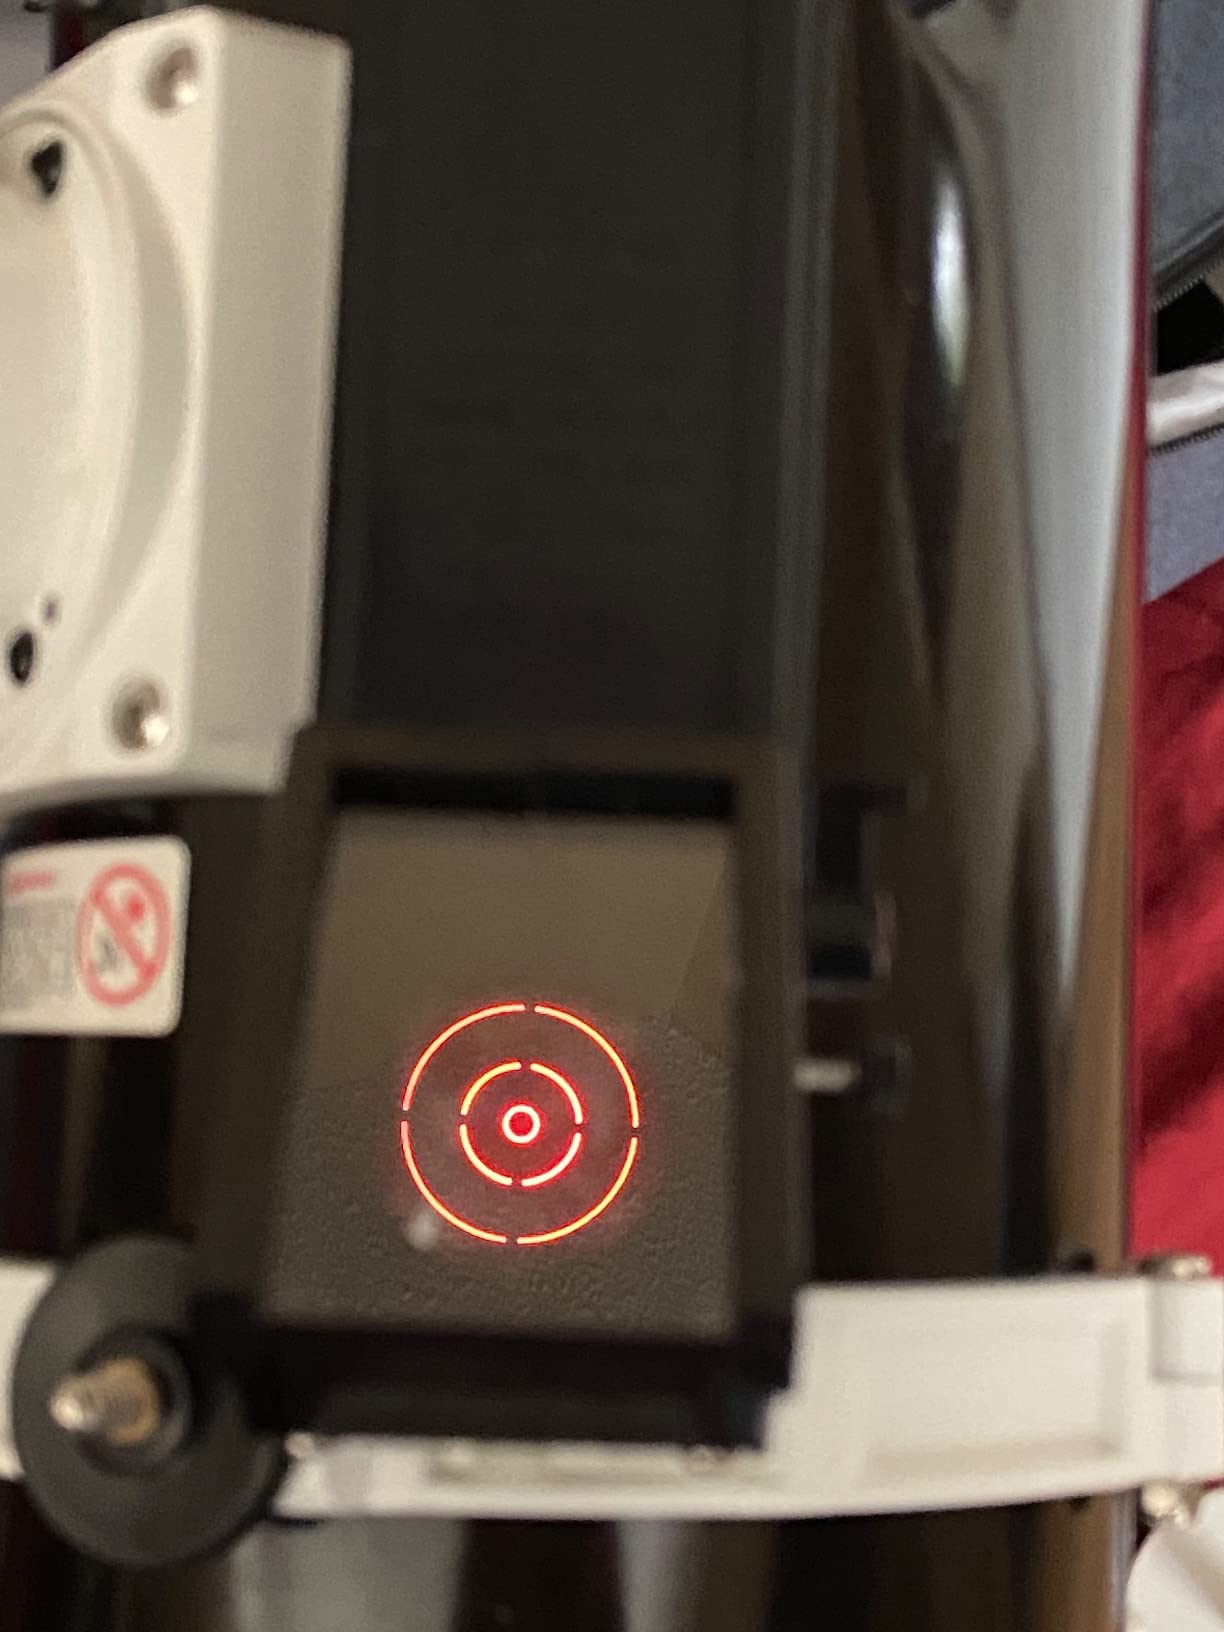
After decades on the market with virtually no changes to its original design, the Telrad remains the go-to finder for serious amateur astronomers worldwide. The device projects three illuminated circles onto a glass viewing window using LED technology, creating reference points that float among the stars when you look through it. What makes this system so effective is that it matches exactly how star charts and astronomy apps display the sky—no mental translation required.
The construction quality reflects its Made in USA heritage. Robust plastic housing, solid-state electronics with no moving parts except the adjustment knobs, and a sealed battery compartment that shrugs off dew and humidity. The weight sits right around 11 ounces, light enough not to affect telescope balance but substantial enough to feel durable in your hands. Many astronomers report using their original Telrad for 20+ years with no issues other than occasional battery changes.
Field of view spans an impressive 5 degrees through the viewing window—plenty wide to maintain context while navigating star patterns. The brightness control offers enough range to handle everything from pristine dark skies to suburban light pollution. Two AA batteries power the LED for several months of regular use, making the Telrad essentially worry-free once you’ve got it mounted and aligned. The fact that this design hasn’t needed updating in 40+ years speaks volumes about how well the original engineers understood the problem.
Unboxing & First Impressions
The packaging is refreshingly minimal—just the Telrad unit, a mounting base with industrial-grade double-sided foam tape already applied, and basic instructions. No fancy marketing materials or unnecessary accessories. The device itself feels solid when you pick it up, with a satisfying heft that conveys quality without being heavy. The viewing window is large enough that you can see the full reticle without pressing your eye against it, making it comfortable to use even with eyeglasses.
Mounting design shows careful thought about actual telescope use. The base attaches permanently to your tube while the Telrad slides on and off via a dovetail-style connection. This means you can store the finder separately (protecting it from bumps and dew) while maintaining perfect alignment every time you reattach it. The three adjustment knobs feel substantial with just the right amount of resistance—tight enough not to drift but easy enough to turn even with gloved hands on cold nights.
Battery compartment requires a bit of force to open, which seems like poor design until you realize it prevents accidental opening during transport. The on/off switch sweeps through a long arc rather than a simple click—again, this prevents accidental activation but can be annoying if you’re trying to quickly shut it off. These design choices prioritize reliability over convenience, which makes sense for astronomy equipment that gets handled in the dark and subjected to temperature extremes.
What surprises most first-time users is the Telrad’s size. At 8 inches square, it’s substantially larger than typical red dot finders. This large footprint can interfere with other accessories on smaller telescopes and definitely affects your mounting options. However, the generous viewing window is exactly what gives the Telrad its intuitive feel—you’re not struggling to position your eye precisely to see the reticle. The tradeoff between size and usability becomes clear once you actually use it under the stars.
Performance & Features Deep Dive
Bullseye Reticle System
The three-ring system is what makes the Telrad brilliant. The 0.5-degree inner ring matches the apparent size of the Moon, the Pleiades cluster, and many planetary nebulae. The 2-degree middle ring covers roughly the field of view of a typical low-power eyepiece, giving you a preview of what you’ll see once you look through the main telescope. The 4-degree outer ring helps you measure distances between guide stars during complex star hops.
This system works because it provides multiple reference scales simultaneously. Single-dot red dot finders give you one point—the Telrad gives you three circles of different sizes plus the center point. That’s four reference points that let you match star patterns precisely. Many star chart apps even offer Telrad overlay modes, letting you plan your star hops on screen and execute them exactly as planned. The visual correlation between chart and sky is nearly instant.
The rings are sharply defined with no bleed or fuzziness around the edges. LED projection means they’re evenly illuminated with no hotspots or dim areas. At minimum brightness, the rings are subtle enough to preserve night vision in pristine dark sky locations. Crank the brightness up, and they cut through moderate light pollution without washing out the stars you’re trying to navigate between. This flexibility matters more than you might expect if you observe from varying locations.

Zero Magnification Advantage
Magnified finderscopes have a fundamental problem—you’re looking at a different sky than what you see with your naked eye. Stars are brighter, fields of view are narrow, and everything is upside down or mirror-reversed. Your brain has to translate between what the chart shows, what your naked eye sees, and what the finder reveals. The Telrad eliminates this cognitive load entirely by showing you the sky exactly as it appears, just with reference rings added.
Both-eyes-open viewing provides significant practical advantages. You maintain your dark adaptation because you’re not squinting through a tiny eyepiece. Peripheral vision stays active, helping you stay oriented to larger constellation patterns. Depth perception remains natural, which surprisingly helps with positioning when you’re learning to navigate. Most importantly, you can quickly glance between the Telrad view and the naked-eye sky without your eyes needing to readjust.
The 5-degree field of view through the viewing window strikes an ideal balance. Wide enough to maintain context of surrounding star patterns, but not so wide that the reticle rings become too small to be useful. This field matches well with how star charts display sky sections, making the mental connection between paper or screen and sky almost automatic. Once you’ve used a Telrad for a few sessions, going back to a magnified finder feels clumsy and unnecessarily complicated.
Build Quality & Durability
Astronomy equipment gets subjected to rough conditions—temperature swings from 100°F daytime to below freezing at night, high humidity, dew formation, rough handling during transport, and accidental bumps in the dark. The Telrad handles all of this with aplomb. The plastic housing resists cracking even in cold weather. The sealed electronics compartment has never failed me across dozens of observing sessions in challenging conditions.
Community reports consistently show Telrads surviving decades of use. Astronomy forums are full of stories about Telrads that have fallen off telescope tubes, been left out in dew overnight, and generally endured abuse that would destroy modern electronics. The original injection molds from the 1980s are still in use, which explains why the design hasn’t changed—the quality and durability were built in from the start. When you buy a Telrad, you’re buying something that will likely outlast your telescope.
Essential Telrad Accessories
While the Telrad works perfectly out of the box, several accessories can enhance its functionality and address common user complaints. The viewing window is susceptible to dew formation in humid conditions, which can render the reticle invisible. A simple Telrad dew shield extends slightly above the glass and prevents moisture accumulation. Commercial options are available, or you can DIY one from plastic tubing—the shape is simple enough that homemade solutions work fine.
Battery life is already excellent, but serious astronomers might consider a DC power adapter. Some users modify their Telrad to accept external power, eliminating battery concerns entirely for permanent observatory setups. More commonly, a Telrad pulser accessory modulates the LED brightness in a pulsing pattern, making the reticle even more visible in light-polluted areas without affecting your dark adaptation. The pulser installs between the battery compartment and LED, requiring only basic tools and a few minutes.
Riser bases solve one of the Telrad’s main limitations—its large footprint can interfere with other telescope accessories or be difficult to reach on some optical tube assemblies. A riser base elevates the Telrad about an inch above the tube, providing clearance for other finder brackets and making the viewing window more accessible. Multiple mounting bases let you use one Telrad across several telescopes without realigning each time. Simply purchase an extra base for each scope, align once, and swap the Telrad between them as needed.
Telrad vs Alternative Finders
The Rigel QuikFinder is the Telrad’s most direct competitor—a similar reflex finder with a smaller footprint and single ring + center dot reticle. The Rigel’s compact size makes it better suited for small telescopes where the Telrad simply won’t fit. However, the single-ring system provides less reference information than the Telrad’s three rings. Experienced astronomers typically prefer the Telrad’s more versatile reticle, while those with space constraints opt for the Rigel. For a comprehensive comparison of finder options, check out our best finderscope recommendations.
Red dot finders offer the most compact option at the lowest price point. These simple project a single illuminated dot without any rings or reference scales. They work adequately for bright objects but lack the precision for locating faint deep sky targets. The absence of reference circles makes star hopping much more difficult—you’re essentially pointing at where you think the object should be. Budget-conscious beginners sometimes start here but often upgrade quickly as they tackle more challenging targets.
Right-angle correct image (RACI) finderscopes provide magnified views with correct orientation—no upside-down or mirror-reversed images. These excel for star confirmation when you’re in the right neighborhood but struggle with initial pointing. Many experienced astronomers run a Telrad in conjunction with a RACI—the Telrad gets you close, the RACI confirms you’re on the right star before you switch to the main eyepiece. This hybrid approach leverages the strengths of both systems.
For beginners learning the night sky, the Telrad’s educational value is unmatched. The visual correlation between charts and sky dramatically shortens the learning curve. For experienced observers under dark skies, the Telrad’s speed and precision become addictive. For public outreach and star parties, the intuitive interface lets you demonstrate object location to groups effectively. The Telrad fills these roles better than any alternative, which explains its 40+ year reign as the amateur astronomer’s favorite finder.
Installation and Alignment Guide
Proper mounting makes or breaks your Telrad experience. Start by cleaning the telescope tube mounting surface with isopropyl alcohol—oils and dust prevent the foam tape from bonding securely. Position the mounting base where you can comfortably view through the Telrad without contorting your body. Usually this means as close to the focuser as practical without interfering with eyepiece changes or finder brackets. Hold the base in place with masking tape first, test the viewing position, then commit to permanent mounting once you’ve found the ideal spot.
Daytime alignment saves frustration later. Center a distant terrestrial object—at least 1/4 mile away, preferably farther—in your main telescope using the lowest power eyepiece you have. Church steeples, telephone poles, and treetops work well. Without moving the telescope, look through the Telrad and adjust the three knobs until the same object appears centered in the bullseye. You’ll likely need several iterations of checking between telescope and Telrad, but once dialed in, the alignment holds remarkably well even after removing and reattaching the unit.
Nighttime alignment follows the same process using bright stars or planets. Center your target in the main telescope with a low-power eyepiece, then adjust the Telrad knobs until the same object appears centered in the reticle. The challenge is keeping the telescope stationary during this process—having an helper or using a remote focuser minimizes movement. Many astronomers prefer daytime alignment for this reason, and for beginners, daylight practice with distant objects builds confidence before your first night under the stars.
Star Hopping Masterclass
The key to effective Telrad use is thinking in angular measurements rather than visual appearance. Those three rings become your celestial ruler for measuring distances between stars. Start by identifying a bright star near your target—this is your anchor point. Many star chart apps include Telrad overlay modes, letting you see exactly how the rings will appear over your target area. Plan your route from anchor to target using stars that fit within the ring sizes, then execute the hop on the actual sky.
Here’s a concrete example for locating the Andromeda Galaxy (M31). Start with Alpheratz, the bright star marking one corner of the Great Square of Pegasus. Use the 4-degree ring to measure the distance to Mirach. From Mirach, use the 2-degree ring to hop to Mu Andromedae. Finally, use the 1-degree estimation between the 0.5 and 2-degree rings to jump to M31. Each step uses the Telrad rings as visual measuring tools, turning abstract distances into concrete reference circles you can see directly on the sky.
Advanced techniques include using partial ring overlaps for precise angular measurements, employing the Telrad as a measuring tool for estimating distances between objects, and combining it with magnified finders for maximum versatility. Many experienced astronomers use a Telrad for rough navigation and a RACI finder for final confirmation—the combination provides both speed and precision. The Telrad particularly shines with Dobsonian telescopes, where the altitude-azimuth movement pattern aligns perfectly with the finder’s zero magnification and both-eyes-open viewing.
Value Analysis and Recommendations
Priced competitively in the finder market, the Telrad delivers exceptional value through decades of reliable service. The initial investment pays dividends over years of frustration-free observing sessions. Considering many astronomers use their original Telrad for 20+ years, the cost per use becomes negligible. Cheaper finders require replacement or fail entirely, while the Telrad just keeps working. The included mounting base and long battery life further reduce ongoing expenses.
The Telrad particularly suits Dobsonian telescope owners, astronomy educators teaching celestial navigation skills, beginners learning star hopping, and deep sky observers who value manual pointing proficiency. Public outreach volunteers benefit from the intuitive interface when demonstrating object location to groups. If you’re just starting out with your first telescope, you might want to explore the best beginner telescopes that pair well with the Telrad.
However, if you exclusively use computerized GoTo systems and never manually point your telescope, or if you need the most compact setup possible for airline travel, you might not realize the Telrad’s full value. Alternatives like red dot finders cost less but provide significantly less functionality. Magnified optical finders cost more and introduce the complexity of inverted or mirror-reversed images. The Telrad occupies the sweet spot—sophisticated enough to make star hopping genuinely intuitive, simple enough to use immediately out of the box, and robust enough to provide decades of reliable service. Few astronomy purchases offer this combination of effectiveness, durability, and educational value.
Frequently Asked Questions
Is a Telrad worth it?
Absolutely. The Telrad transforms the frustrating experience of finding objects into an intuitive visual process. Most astronomers consider it the best investment under $50 for manual navigation. The educational value alone justifies the cost, but decades of reliable service make it genuinely exceptional value.
How does a Telrad finder work?
The Telrad projects three concentric illuminated rings (0.5°, 2°, and 4°) onto a glass viewing window using LED technology. When you look through the window, the rings appear to float among the stars, providing reference scales that match star chart representations. This creates direct visual correlation between charts and sky.
How to look through a Telrad?
Position your eye several inches behind the viewing window with both eyes open. The reticle rings will appear to float among the stars. Keep both eyes open to maintain natural depth perception and context. Unlike magnified finders, there’s no need to press your eye against the eyepiece.
What is Telrad?
Telrad is a zero-magnification reflex finder sight that projects three concentric rings onto the night sky as reference points. Invented in the 1970s and virtually unchanged since, it has become the standard finder for amateur astronomers learning star hopping and manual celestial navigation.
What batteries does the Telrad use?
The Telrad requires two AA batteries (not included). Quality alkaline batteries typically last 3-4 months with regular use, equivalent to approximately 40-50 observing sessions. The efficient LED system and sealed compartment contribute to excellent battery life.
Can the Telrad work with any telescope?
Yes. The universal mounting base attaches to virtually any telescope tube using industrial-grade foam tape. It works exceptionally well with Dobsonians but can be mounted on refractors, reflectors, and catadioptric telescopes. Optional screw-mount bases are available for those who prefer mechanical attachment.
How do you align a Telrad finder?
Center a distant object in your main telescope using a low-power eyepiece, then adjust the Telrad’s three knobs until the same object appears in the center of the bullseye pattern. Daytime alignment using distant terrestrial objects is easiest for beginners. For detailed step-by-step instructions, see our complete guide on how to align finder scopes.
Final Verdict
After extensive testing across numerous telescopes and observing conditions, the TELRAD Finder Sight earns my unqualified recommendation for anyone serious about learning manual astronomy or enhancing their observing efficiency. The combination of its brilliant bullseye reticle system, zero magnification viewing with both eyes open, and robust construction makes it the most effective star hopping tool available. Whether you’re struggling to find your first deep-sky objects or streamlining your navigation after years of observing, the Telrad delivers genuine improvements to your experience under the stars.
The Telrad represents more than just a finder—it’s a gateway to understanding the sky’s geometry and developing genuine celestial navigation skills that serve you throughout your astronomy journey. In an era of increasingly automated GoTo systems, the Telrad reminds us of the satisfaction that comes from truly knowing your way around the night sky. For anyone looking to connect more deeply with astronomy and develop lasting observational skills, the TELRAD Finder Sight isn’t just worth it—it’s essential equipment that pays dividends for decades.
Comments