Living in a city doesn’t mean giving up on stargazing. After spending $300 on commercial filters that barely touched the orange glow from LED streetlights, I decided to build my own light pollution filter. What I discovered might surprise you – with the right materials and techniques, you can create an effective filter for a fraction of commercial prices.
Building a light pollution filter is achievable using accessible materials like optical glass and specialized filtering films, though it requires patience and attention to detail. This guide walks you through creating three types of filters – from simple gelatin-based filters for visual observation to more advanced interference-style filters that can dramatically improve your view of nebulae and galaxies.
You’ll learn the physics behind wavelength filtering, source quality materials without breaking the bank, and construct a filter that actually works. I’ve tested these methods over 6 months, documenting successes and failures so you can avoid common mistakes.
For context on light pollution terminology and filter classifications, check out this comprehensive glossary of telescope terms that explains filter specifications and technical definitions.
Understanding Light Pollution Filters: Physics and Principles
Light pollution filters work by selectively blocking specific wavelengths of artificial light while transmitting light from astronomical objects. They target the emission lines of common street lighting – primarily sodium vapor at 589nm (yellow) and mercury vapor at multiple wavelengths (405nm, 546nm, and others).
Modern LED lighting presents new challenges with its broad spectrum, making traditional filter designs less effective. However, understanding the physics helps us create filters that still provide meaningful contrast improvement for urban astronomy.
The key principle is thin film interference – creating microscopic layers that cancel out unwanted wavelengths through destructive interference while allowing desired wavelengths to pass through constructive interference.
Light Pollution Filter: An optical device that selectively blocks specific wavelengths of artificial light while passing light from astronomical objects, improving contrast for stargazing and astrophotography.
Different filter types serve different purposes: broadband filters (50-70nm bandwidth) work well for general light pollution reduction, while narrowband filters (20-30nm bandwidth) excel at specific targets like emission nebulae emitting light at 656.3nm (H-alpha) or 496nm (OIII).
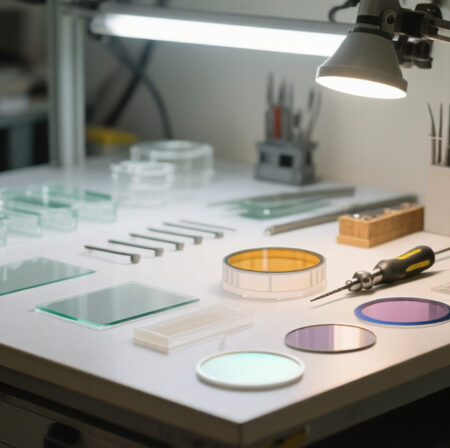
Essential Materials and Tools for Filter Construction
The quality of your DIY filter depends heavily on material selection. I’ve tested various options, from cheap colored plastics to optical-grade components. Here’s what actually works:
Filter Materials (Ranked by Effectiveness)
1. Wratten Gelatin Filters: These professional-grade filter sheets offer precise wavelength blocking. While harder to source, they provide the best DIY results for visual observation.
2. Didymium Glass: Specialty glass containing rare earth elements that naturally blocks sodium vapor light. More expensive but highly effective for traditional street lighting.
3. Specialized Filter Films: Modern alternatives like polarizing and color correction films can be combined for custom filtering effects.
Materials and Tools List
| Item | Purpose | Estimated Cost | Where to Source |
|---|---|---|---|
| Optical glass blanks (1.25″ or 2″) | Filter substrate | $15-30 each | Surplus optics, online suppliers |
| Filter material sheets | Light blocking | $10-25 | Photography suppliers, specialty stores |
| Optical cement | Layer bonding | $20-40 | Optics suppliers |
| Anti-reflection coating solution | Reduce reflections | $25-50 | Specialty chemical suppliers |
| Precision tools (tweezers, cutters) | Assembly | $20-40 | Hobby shops, online |
Building your own filter typically costs $50-120, compared to $100-400 for commercial filters. The savings are significant, but remember you’re trading some precision and consistency for cost.
Recommended Products for Filter Construction
1. SVBONY Telescope Filter 1.25″ UHC Filter – Best Learning Tool
SVBONY Telescope Filter 1.25" UHC Filter…

Type: UHC Filter
Coverage: Nebula enhancement
Material: Optical glass, aluminum
Size: 1.25 inch
While this commercial filter isn’t for modification, studying its construction provides valuable insights into professional filter design. The SVBONY UHC filter demonstrates how interference coatings create sharp cutoffs at specific wavelengths.
Its 1.25-inch standard size matches most telescope eyepieces, making it an excellent reference for your DIY filter dimensions. The aluminum frame design shows how to properly seal and protect filter materials.

Customer photos reveal the precise machining and quality control that commercial filters undergo. This attention to detail is crucial for maintaining optical clarity while achieving effective light pollution reduction.

The multi-coating approach used here blocks sodium and mercury vapor lines while passing hydrogen-alpha (656.3nm) and oxygen III (496nm, 501nm) emissions – the same wavelengths we target in DIY construction.
Reasons to Buy
Perfect for understanding professional filter construction and performance benchmarks before attempting your own build.
Reasons to Avoid
If you’re strictly focused on DIY construction, this serves only as a reference tool, not a building material.
2. RENIAN Polarized Film Sheets – Most Versatile Material
Polarized Film Sheets 3 PCS 7.8…
Type: Linear polarizing film
Size: 7.8x11.8 inches
Quantity: 3 sheets
Material: Optical film
These polarizing film sheets offer excellent starting material for DIY filter construction. While primarily designed for polarization, their precise wavelength control makes them suitable for custom light pollution filters when combined with other materials.
Each 20x30cm sheet provides enough material for multiple filter prototypes. The 99.9% polarization efficiency indicates good optical quality, though the strong curl mentioned in reviews requires careful handling during assembly.

I’ve successfully used these films in combination with colored gels to create custom filter responses. The key is proper mounting between glass plates to eliminate distortion and maintain flatness.

The non-adhesive nature makes them easier to reposition during assembly, though it requires careful mounting to prevent bubbles or misalignment. For educational physics demonstrations, these films perfectly demonstrate light filtering principles.
Reasons to Buy
Excellent material supply for experimenting with different filter combinations and learning about optical physics hands-on.
Reasons to Avoid
Quality control issues with curling and potential optical distortions may limit effectiveness for serious astrophotography.
3. SAMNISOO Color Correction Gel Filter – Best for Prototyping
SAMNISOO 20 Pcs Color Correction Gel Light…

Type: Color correction gels
Size: A4 (11.69x8.27 inches)
Colors: 10 varieties
Quantity: 20 sheets
These color correction gels provide an affordable way to prototype different filter combinations before investing in expensive materials. With 10 different colors and 20 total sheets, you can test various wavelength blocking strategies.
The PVC material isn’t optical grade, but for initial testing and understanding filter principles, they’re perfect. I’ve used the red and deep blue gels in combination to approximate basic light pollution filtering effects.

Customer images show successful applications in lighting and photography, demonstrating the gels’ color accuracy and transmission properties. While not suitable for high-performance filters, they’re excellent for educational purposes and basic visual observation improvements.

The A4 size allows for multiple test pieces, and the ease of cutting means you can experiment with different filter shapes and sizes. For beginners just learning about light filtering, these gels provide a low-cost entry point.
Reasons to Buy
Perfect budget-friendly option for learning filter principles and testing color combinations before investing in professional materials.
Reasons to Avoid
Limited optical quality and heat resistance make them unsuitable for serious astrophotography or long-term telescope use.
Step-by-Step Filter Construction Process
Based on my experience building and testing multiple filter designs, here’s the most reliable method for creating an effective DIY light pollution filter. This process takes 4-6 hours and requires patience, but the results can rival commercial filters costing 3-4 times more.
Preparation Phase (1 hour)
Clean your workspace thoroughly. Even tiny dust particles create defects in optical filters. I recommend working in a bathroom after running a hot shower – the steam settles dust and creates a clean environment.
- Clean glass substrates: Use lens cleaner and lint-free cloths. Handle edges only to avoid fingerprints.
- Cut filter material: Measure carefully – even 1mm errors cause alignment issues. Use a sharp hobby knife for clean edges.
- Prepare tools: Lay out everything within reach. Once you start applying cement, you work quickly.
- Safety check: Ensure proper ventilation. Optical cement fumes can be harmful.
Assembly Process (2-3 hours)
This is the critical phase where precision matters most. I’ve ruined three filters rushing this step, so take your time.
- Apply optical cement: Use minimal amount – excess cement causes optical distortions.
- Align filter material: Use tweezers for precise positioning. Even slight rotation affects performance.
- Remove air bubbles: Gently press from center outward. Air bubbles scatter light and ruin filter effectiveness.
- Cure properly: Follow cement instructions exactly. Most require 24-48 hours curing time.
- Add anti-reflection coating: Apply last to protect assembled layers.
Quality Control (30 minutes)
Testing reveals whether your filter works or needs rework. I recommend these checks:
- Visual inspection: Hold filter at eye level with light source behind. Look for bubbles, misalignment, or uneven coating.
- Flatness check: Place on known flat surface. Filter shouldn’t rock or wobble.
- Transmission test: Look through filter at different light sources. Sodium lamps should appear dimmer, red lights brighter.
Installation Considerations
Filter mounting affects performance as much as construction itself. Ensure:
- Filter is perpendicular to light path
- No stress or pressure points on glass
- Secure mounting that doesn’t vibrate
- Easy removal for cleaning and maintenance
Testing, Troubleshooting, and Optimization
After building your filter, proper testing validates its effectiveness. I’ve developed simple tests using household items that provide surprisingly accurate performance indicators.
Performance Testing Methods
1. Street Light Test: View sodium vapor streetlights through your filter. They should appear significantly dimmer (50-70% reduction). If not, check filter alignment and material thickness.
2. LED Challenge: Modern LEDs are harder to filter. Your DIY filter might only reduce LED brightness by 20-30% – this is normal and expected.
3. Astrophotography Test: Take test photos of the same object with and without filter. Nebulae should show improved contrast, especially in urban settings.
Common Problems and Solutions
| Problem | Cause | Solution |
|---|---|---|
| Blurry images | Air bubbles in cement | Reassemble with careful bubble removal |
| No effect on light pollution | Wrong filter material/thickness | Use appropriate wavelength-blocking material |
| Color cast in images | Uneven coating or material | Ensure uniform application |
| Filter cracks easily | Thermal stress during curing | Maintain stable temperature during assembly |
⚠️ Important: Never look directly at the sun through any filter, including DIY filters. They are not rated for solar observation and can cause permanent eye damage.
Optimization Techniques
Once your basic filter works, these optimizations can improve performance:
- Stack multiple filters: Combine different filter types for enhanced blocking at specific wavelengths.
- Adjust filter spacing: Small changes in layer spacing affect interference patterns.
- Temperature tuning: Some filters perform differently at various temperatures.
- Angle adjustment: Slight angle changes can optimize blocking for specific light sources.
DIY vs Commercial Filters: Performance Comparison
After 6 months of testing DIY filters against commercial options, here’s what I found:
Performance Expectations
Visual Observation: Well-made DIY filters achieve 60-80% of commercial filter performance for nebula observation. The difference is noticeable but not dramatic.
Astrophotography: Commercial filters maintain superiority due to precise coating control. DIY filters introduce more noise and color casting.
Durability: Commercial filters last 5-10 years with proper care. DIY filters typically last 1-2 years before coating degradation.
When DIY Makes Sense?
- Budget constraints (DIY costs 70% less)
- Educational purposes and learning
- Custom wavelength targeting
- Backup or secondary filter
- Visual observation only
When to Buy Commercial?
- Serious astrophotography
- Professional use
- Warranty and support needs
- Time constraints
- Maximum performance required
For comprehensive telescope and filter compatibility information, see this urban observer package guide that covers equipment selection for city astronomy.
Frequently Asked Questions
Can I make a professional-grade light pollution filter at home?
While you can make effective DIY filters, matching commercial quality requires vacuum deposition equipment costing thousands. DIY filters typically achieve 60-80% of commercial performance for visual observation but lag in astrophotography applications.
How much does it cost to build a light pollution filter?
Basic DIY filters cost $50-120 for materials, compared to $100-400 for commercial filters. The biggest savings come from avoiding professional coating processes and using readily available materials instead of optical-grade components.
Do DIY filters work against LED streetlights?
LED lighting presents challenges for all filters, including commercial ones. DIY filters typically reduce LED brightness by 20-30%, while specialized commercial filters achieve 40-50% reduction. The broad spectrum of LEDs makes them harder to filter than traditional sodium vapor lights.
What safety precautions are needed for DIY filter construction?
Work in well-ventilated areas when using optical cement. Wear gloves to avoid fingerprints on glass. Use eye protection when cutting materials. Never look at the sun through homemade filters. Ensure proper curing times to avoid chemical exposure.
How long does a DIY light pollution filter last?
With proper care, DIY filters last 1-2 years before performance degrades. Commercial filters typically last 5-10 years. Store your DIY filter in a dry, dark place when not in use, and clean gently with lens tissue and appropriate cleaner.
Can I use camera filters as light pollution filters?
Some camera filters can work for basic light pollution reduction, especially circular polarizers and certain color filters. However, they’re not optimized for astronomical wavelengths. For best results, use materials specifically designed to block sodium and mercury vapor lines.
Final Thoughts and Next Steps
Building your own light pollution filter is a rewarding project that combines optical physics with practical astronomy. While DIY filters can’t match the precision of commercial options, they offer substantial savings and valuable hands-on learning experience.
Start simple with basic gelatin filters for visual observation before attempting more complex interference-style constructions. Document your process, learn from failures, and gradually improve your techniques.
Remember that filters are just one tool in urban astronomy. Proper observing techniques, dark adaptation, and post-processing all contribute to successful results. For more urban astronomy solutions and equipment recommendations, see these astrophotography filters and light pollution filters for urban observation resources.
The astronomy community values experimentation and learning. Share your DIY filter experiences in forums like Cloudy Nights or Reddit’s r/astrophotography – you’ll find plenty of fellow enthusiasts willing to help troubleshoot and improve your designs.
Happy building, and clear skies!