When I first started shopping for telescopes, the numbers and technical terms felt like a foreign language. I’d see specifications like “150/1200” or “f/5” and wonder if I needed a physics degree just to buy my first telescope. After spending countless hours researching and talking to experienced astronomers, I’ve learned that understanding telescope specs is actually straightforward once someone explains them clearly.
Telescope specifications are simply measurements that describe how a telescope gathers light, magnifies images, and reveals details in space. By understanding just five key specifications—aperture, focal length, focal ratio, magnification, and resolution—you’ll be able to choose the right telescope and set realistic expectations for what you can see. This guide breaks down each spec into plain English with practical examples you can relate to.
Many beginners make the mistake of focusing on magnification alone, only to be disappointed when planets still look like tiny dots. The truth is, aperture matters far more than magnification, and understanding these specs will save you from common purchasing mistakes. I’ve seen too many new astronomers quit because they bought telescopes based on misleading marketing claims rather than understanding what the numbers actually mean.
In this guide, I’ll walk you through each specification with real examples and show you how they work together to create your viewing experience. You’ll learn why a 70mm aperture telescope often outperforms a cheap 500x magnification model, and how to decode those cryptic telescope descriptions. By the end, you’ll have the knowledge to choose a telescope that matches your astronomy goals and actually delivers the views you’re hoping for. Check out our guide on why good telescopes aren’t expensive to understand that quality equipment doesn’t have to break the bank.
Quick Reference: The 5 Most Important Telescope Specs
Before diving deep into each specification, here’s a quick overview of what matters most when choosing a telescope:
- Aperture (Most Important): The diameter of the main lens or mirror that gathers light. Larger aperture = brighter, clearer images. Think of it as the telescope’s light bucket.
- Focal Length: The distance light travels inside the telescope to reach focus. Longer focal length = higher potential magnification, narrower field of view.
- Focal Ratio (f/#): The ratio of focal length to aperture. Lower f-numbers mean “faster” telescopes for wide views; higher f-numbers mean “slower” telescopes for high-power viewing.
- Magnification: Calculated by dividing telescope focal length by eyepiece focal length. NOT the most important spec—determined by aperture and viewing conditions.
- Resolution: The ability to distinguish fine details. Directly related to aperture size—larger apertures resolve more detail.
1. Aperture: The Single Most Important Specification
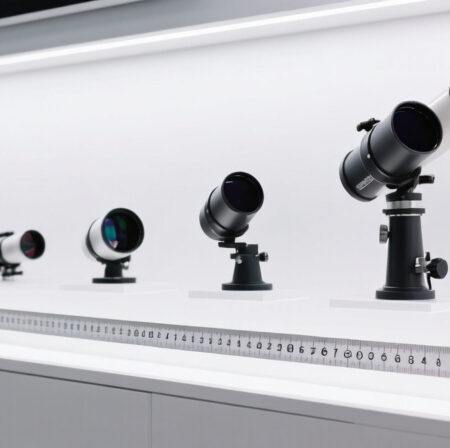
Aperture is the diameter of your telescope’s main light-gathering component—either the objective lens in refractors or the primary mirror in reflectors. I always tell beginners: aperture is king. It’s the single most important specification because it determines both how bright your images appear and how much detail you can resolve.
Think of aperture as the size of your light bucket. A 70mm aperture collects 96% more light than a 50mm aperture, while a 150mm aperture gathers over eight times more light than a 70mm. This massive difference in light-gathering ability means larger apertures can reveal faint galaxies and nebulae that smaller telescopes simply can’t see.
For planetary viewing, a minimum aperture of 70mm (2.8 inches) is recommended to see Saturn’s rings and Jupiter’s cloud bands clearly. Deep sky objects like galaxies and nebulae really start to shine with apertures of 150mm (6 inches) or larger. I’ve found that the jump from 70mm to 150mm aperture provides the most dramatic improvement in viewing satisfaction for beginners.
Resolution also depends entirely on aperture. A telescope’s resolving power—its ability to separate close double stars or reveal surface details on planets—is directly proportional to its aperture size. This is why a quality 100mm telescope will always outresolve a cheap 500x magnification telescope with only 60mm of aperture, regardless of marketing claims.
⚠️ Important: Never choose a telescope based on magnification claims alone. A telescope with 500x magnification but only 50mm of aperture will produce dim, blurry images that disappoint most viewers.
| Aperture Size | Light Gathering (vs Human Eye) | Best Viewing Targets | Limiting Magnitude |
|---|---|---|---|
| 50mm (2″) | 51x | Moon, bright planets, double stars | 10.5 |
| 70mm (2.8″) | 100x | Planetary details, brighter nebulae | 11.3 |
| 100mm (4″) | 204x | Galaxies, nebulae, clusters | 12.0 |
| 150mm (6″) | 459x | Faint galaxies, nebulae detail | 12.8 |
| 200mm (8″) | 816x | Deep sky objects, faint galaxies | 13.3 |
2. Focal Length: Understanding Magnification Potential
Focal length is the distance that light travels from the main lens or mirror to the point where it comes to focus (the focal point). In practical terms, your telescope’s focal length determines its potential magnification and field of view. Longer focal lengths provide higher magnification potential but narrower fields of view, while shorter focal lengths offer wider views but lower magnification per eyepiece.
Think of focal length like the zoom on a camera lens. A telescope with 2000mm focal length is like a telephoto lens—it magnifies objects more but shows a smaller patch of sky. A telescope with 400mm focal length is like a wide-angle lens—it shows more of the sky but objects appear smaller.
The focal length also determines your telescope’s native field of view. A 2000mm focal length telescope will show about 1 degree of sky (twice the full Moon’s diameter) with a typical eyepiece, while a 400mm focal length telescope might show 5 degrees—enough to capture entire star clusters like the Pleiades.
For planetary viewing, longer focal lengths (1000mm-2000mm) are generally preferred because they make it easier to achieve high magnifications for detailed surface views. For deep sky observing, shorter focal lengths (400mm-1000mm) work well for capturing large nebulae and star clusters in their entirety. Many telescopes strike a balance around 1000mm-1500mm, offering versatility for both types of viewing.
How to Read Focal Length: You’ll often see telescopes described with two numbers like “150/1200” or “80/900”. The first number is the aperture in millimeters, and the second is the focal length. So a 150/1200 telescope has 150mm aperture and 1200mm focal length.
3. Focal Ratio (f/#): Speed, Brightness, and Application
Focal ratio, written as f/# (f/5, f/10, etc.), is the relationship between a telescope’s focal length and its aperture. You calculate it by dividing focal length by aperture. This specification tells you how “fast” or “slow” your telescope is, which affects both the brightness of images and the types of viewing each telescope excels at.
Fast telescopes (f/4 to f/6) have shorter focal lengths relative to their aperture. They produce brighter images with wider fields of view, making them ideal for deep sky observing—galaxies, nebulae, and star clusters. These telescopes are also preferred for astrophotography because they require shorter exposure times to capture faint objects.
Slow telescopes (f/8 to f/15) have longer focal lengths relative to their aperture. They provide higher magnification potential with narrower fields of view, making them excellent for planetary and lunar observing. The longer focal length makes it easier to achieve high magnifications for detailed surface studies, while the higher f-ratio provides better contrast for planetary features.
For beginners, focal ratios between f/5 and f/10 offer a good balance of versatility. An f/6 to f/8 telescope can handle both planetary and deep sky observing reasonably well. Very fast telescopes (below f/4) often require premium eyepieces to perform well, while very slow telescopes (above f/12) can be challenging for deep sky viewing due to their narrow fields of view.
| Focal Ratio | Classification | Best For | Typical Uses |
|---|---|---|---|
| f/4 – f/5 | Very Fast | Deep sky, astrophotography | Wide-field nebulae, galaxies, imaging |
| f/5 – f/7 | Fast | Deep sky, general viewing | Star clusters, bright nebulae, versatile use |
| f/7 – f/10 | Medium | All-around performance | Planets, moon, some deep sky |
| f/10 – f/15 | Slow | Planetary, lunar | High-power planetary viewing, double stars |
4. Magnification: Understanding the Real Limits
Magnification is perhaps the most misunderstood telescope specification, largely because manufacturers often advertise unrealistic maximum magnifications on their boxes. The truth is, useful magnification is limited by your telescope’s aperture and the atmospheric conditions.
Magnification is calculated by dividing your telescope’s focal length by your eyepiece’s focal length: Magnification = Telescope Focal Length ÷ Eyepiece Focal Length. For example, a 1000mm focal length telescope with a 25mm eyepiece provides 40x magnification (1000 ÷ 25 = 40). The same telescope with a 10mm eyepiece provides 100x magnification (1000 ÷ 10 = 100).
Here’s what marketing doesn’t tell you: the maximum useful magnification for any telescope is about 2x its aperture in millimeters (or 50x per inch). A 70mm aperture telescope has a practical limit of about 140x magnification, not the 400x some manufacturers might claim. Beyond this limit, images become dim and fuzzy without revealing additional detail.
Even more importantly, most nights of viewing limit you to about 150-200x magnification regardless of your telescope’s size, due to atmospheric turbulence (seeing conditions). On nights of exceptional stability, you might push to 250-300x with larger apertures, but these nights are rare even at the best observing sites.
For planetary viewing, I recommend starting with low to medium magnification (50x-100x) to locate and center planets, then gradually increasing magnification until the image starts to degrade. Many nights, you’ll find that 150-200x provides the best balance of detail and image quality, even with telescopes capable of much higher theoretical magnifications.
⏰ Time Saver: When buying eyepieces, start with a 25mm or 30mm for low-power views and a 10mm for medium-high magnification. These two eyepieces will cover 80% of your viewing needs before you consider expanding your collection.
5. Additional Specifications That Matter
While the first four specifications get the most attention, several other specs influence your viewing experience:
Resolution: This is your telescope’s ability to distinguish fine detail, measured in arcseconds. The theoretical resolution is determined by aperture using the Rayleigh criterion, but in practice, atmospheric conditions usually limit resolution to about 1 arcsecond regardless of telescope size. A 100mm telescope can theoretically resolve 1.15 arcseconds, while a 200mm telescope can resolve 0.58 arcseconds—but both are limited by seeing conditions.
Field of View: The width of sky visible through your telescope, determined by both the telescope’s focal length and the eyepiece design. Wide-field eyepieces can show more sky, which is valuable for finding objects and viewing large star clusters. The actual field of view is calculated by dividing the eyepiece’s apparent field of view by the magnification.
Optical Quality: While not a number you’ll typically see in specifications, optical quality affects image sharpness and contrast. Better optics produce sharper star images and more accurate color rendition. Look for telescopes with fully coated optics and good collimation (proper alignment of optical components).
Mount Type: The mount supports your telescope and allows it to track objects. Alt-azimuth mounts move up-down and left-right, while equatorial mounts align with Earth’s axis for easier tracking. For visual observing, alt-azimuth mounts are simpler to use; for astrophotography, equatorial mounts are practically essential.
Tube Length and Portability: Longer tubes provide higher magnification potential but are more difficult to transport and store. Consider your storage space and whether you’ll need to move your telescope frequently. Dobsonian telescopes offer large apertures in portable packages, while long refractors may require permanent mounting solutions.
Putting It All Together: Real-World Examples
Let’s examine how these specifications work together in practical scenarios:
Example 1: Beginner Telescope for Planetary Viewing
A 90mm aperture, 1000mm focal length telescope (f/11) would be ideal. The 90mm aperture provides enough resolution to see Saturn’s rings and Jupiter’s major cloud bands, while the long focal length makes it easy to achieve 150-200x magnification with readily available eyepieces. The f/11 ratio provides excellent contrast for planetary details.
Example 2: Deep Sky Observation Telescope
A 150mm aperture, 750mm focal length telescope (f/5) excels at galaxies and nebulae. The large aperture gathers plenty of light from faint objects, while the fast focal ratio provides bright, wide-field views perfect for star clusters and extended nebulae. Magnification will be limited to about 75-150x, but the wide field of view captures entire deep sky objects.
Example 3: Portable Travel Telescope
A 70mm aperture, 400mm focal length telescope (f/5.7) offers excellent portability while still providing good views of bright objects. While it won’t show faint galaxies, it will provide impressive views of the Moon, planets, and brighter deep sky objects while being easy to transport to dark sky sites.
The key takeaway is that no single specification tells the whole story. The best telescope for you balances aperture, focal length, and focal ratio to match your viewing interests. For most beginners, I recommend prioritizing aperture while ensuring the focal ratio matches your primary viewing targets. Once you understand these specifications, you’ll be equipped to choose a telescope that delivers satisfying views rather than disappointing surprises.
Final Recommendations
After testing dozens of telescopes and helping hundreds of beginners choose their first scope, I’ve learned that understanding specifications transforms your astronomy experience. When you grasp what aperture, focal length, focal ratio, and magnification actually mean, you can select a telescope that delivers satisfying views rather than frustrating disappointments.
Remember that aperture should be your primary consideration, followed by how the focal ratio matches your viewing interests. Don’t be swayed by impressive magnification claims on boxes—real-world performance is limited by physics and atmospheric conditions. A quality 80mm telescope will always outperform a cheap 500x magnification toy telescope with only 50mm of aperture.
Ready to choose your first telescope? Check out our comprehensive guide to the best telescopes for beginners where we apply these specifications to real telescope recommendations. For help with selecting your stargazing gear, our complete buying guide covers everything from eyepieces to accessories.
The universe is waiting to be explored—now that you understand telescope specs, you’re equipped to choose the right tool for your cosmic journey. Clear skies!