Ever grapple with the idea of installing something big and technical like a satellite dish? I get that; it’s no small task to figure out the nuts and bolts. That’s why I’m here digging into one specific product – the Starlink Ridgeline Mount.
It’s a slick piece that sticks your Starlink dish onto your roof without much fuss. If you’ve got this Starlink kit at home, itching to go up, stick around.
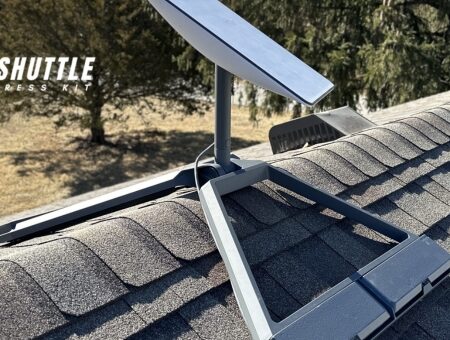
When you’re looking to secure your nifty new internet connection way up on your roof, the Starlink Ridgeline Mount comes in handy. You’ll just need some basic tools – we’re talking about a wrench and maybe a drill – and you’ll have it mounted in no time.
Simply place the mount along the peak of your roof, bolt it down snugly, and align the dish so it has a clear view of that big blue sky—the clearer its sightline to those distant satellites, the better speedy internet will flow into your home. Simple as pie!
| Feature | Description |
|---|---|
| Antenna | Starlink Antenna |
| Compatibility | Starlink V2 |
| Adjustments | Multiple adjustments for optimal angle |
| Material | Thickened alloy steel |
| Rust Resistance | Special treatment for air, water, and corrosion isolation |
| Base | Wide base for stability |
| Water Drainage | Porous design to prevent water accumulation |
| Dimensions | 18.1 x 18.1 x 4.3 inches |
| Weight | 12.71 pounds |
Starlink Internet and the Importance of Mounting Solutions
Starlink, an initiative by SpaceX, is revolutionizing broadband connectivity through its satellite internet service. Targeting a global audience, it aims to bridge the digital divide with high-speed internet access across various regions.

Mounting solutions play a crucial role in this setup, ensuring stable and precise alignment of satellite dishes for optimal signal reception.
The process involves transmitting data between your device and the vast expanse of space using a sophisticated network of satellites and ground stations. This seamless interaction not only facilitates rapid internet connectivity but also underscores the importance of properly installed mounting solutions for uninterrupted service to users worldwide.
Also Read: Starlink Network Troubles? Here’s How to Fix Them!
Installation of Starlink Ridgeline Mount
Installing the Starlink Ridgeline Mount is an efficient way to secure your Starlink dish for optimal internet connectivity.
This installation method is designed for either the peak of a roof or a flat surface, ensuring stability and unobstructed signal reception. Here’s a condensed guide to installing your Ridgeline Mount:
- Step 1: Power Down – Safely disconnect the router by unplugging its AC power cord to shut down your Starlink dish, allowing you to safely detach the Starlink cable.
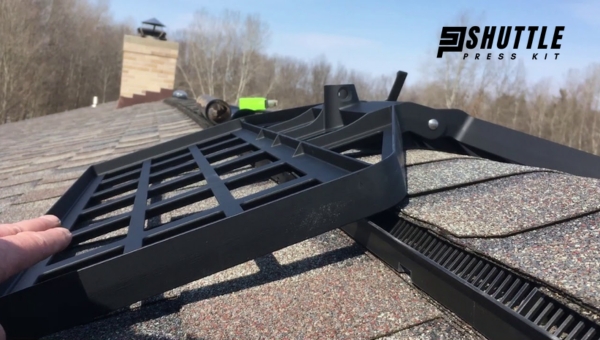
- Step 2: Prepare the Ridgeline Mount – Keeping it folded for easy transport, carry the mount up to your roof without adding any weights yet.
- Step 3: Unfold and Position – Unfold the mount by rotating the central arm knob counterclockwise. Ensure each side tray is flush against your roof’s surface or at its peak, depending on where you decide to install it.
- Step 4: Adjust Mounting Arm – Make sure that the center mounting arm (where your Starlink dish will be attached) is vertically aligned within 5 degrees. Then secure it in place by tightening the central arm knob clockwise.
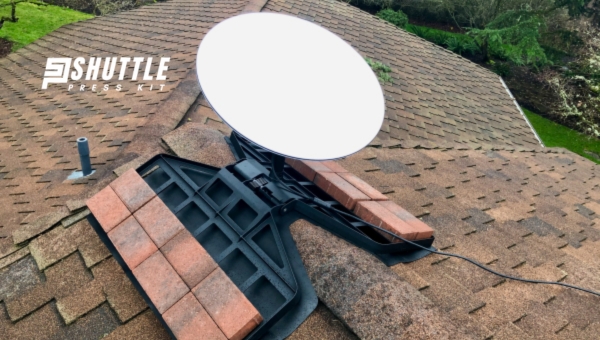
- Step 5: Add Ballast Weights – Transport each of the ballast weights (approximately 13 lbs each) to the roof one at a time and securely insert them into place on top of each tray section for added stability. All four weights should be utilized for this setup.
- Step 6: Cable Management – Detach and then route your Starlink cable from inside out towards where you’ll reinstall it onto the dish, using wall clips if necessary for neatness and security along its path.
- Step 7: Dish Installation – Carefully carry up your Starlink dish using its carry bag, aligning then inserting its mast into the center arm slot of the mounted structure till it snaps securely into its designated spot.
By closely following these steps, you’ll have successfully installed your Starlink’s Ridgeline Mount ensuring that everything is correctly set up for maximum operational efficiency. Remember to reconnect everything inside and allow a few moments for the system to reboot before checking the connectivity status via your gadget’s interface.
Also Read: How to Fix Starlink Disconnected Error? – Quick Solutions
Optimal Placement and Alignment of Starlink Ridgeline Mount
For seamless connectivity and top-notch performance from your Starlink Internet service, the proper placement and alignment of the Starlink Ridgeline Mount are crucial.

This setup aims to avoid signal interference while ensuring a stable installation. Below is a concise guide outlining the necessary steps to achieve this:
- Choose an Open Area: Select a location on your roof that offers an unobstructed view of the sky. This helps in minimizing potential obstacles like trees or neighboring structures that could interfere with the satellite signal.
- Account for Roof Pitch: Whether you have a flat or sloped roof, aim to position the mount along the ridgeline. If installing on a pitched surface, ensure each side tray sits flush against the roof for optimal stability.
- Align The Mounting Arm Properly: Insert the Starlink dish mast into the center mounting arm, adjusting so it remains as close to vertical as possible — ideally within 5 degrees. Proper alignment enhances signal reception quality.
- Secure With Ballast Weights: Stability can be significantly improved by using ballast weights. Ensure all four weights are securely placed and attach them snugly to meet stability requirements (typically around 50 pounds) to hold down and stabilize your setup effectively.
- Cable Management: Route your cables thoughtfully, preferably from where they won’t pose tripping hazards or be subjected to external damage. Employ provided wall clips for securing cables along surfaces neatly and safely.
Adhering strictly to these guidelines not only promotes an efficient installation process but also guarantees you’ll harness optimal performance from your Starlink Internet service through the precise placement and alignment of its Ridgeline Mount.
Ensuring Stability and Durability of the Ridgeline Mount
To guarantee the longevity and reliability of a Ridgeline Mount, it’s crucial to adhere to certain specifications and routine checks.
A correctly installed mount ensures a secure base for any application it’s used for, whether it’s solar panels, HVAC units, or other rooftop installations. Here are key steps to ensure your Ridgeline Mount remains stable and durable over time:
- Secure Mounting: Ensure the mount is securely fastened to the roof surface. For both flat and sloped roofs, confirm that side trays are fully engaged and provide a solid connection, preventing any movement.
- Correct Weight Distribution: Install all four ballast weights as specified during setup. Make sure they’re properly aligned within the mount to evenly spread out the load, stabilizing the structure against shifts or tilts.
- Weatherproof Materials: Choose a Ridgeline Mount made from materials capable of withstanding varied weather conditions. Quality manufacturing will resist damage from temperature fluctuations, wind, and moisture.
- Routine Inspections: Perform regular examinations of the mount for any signs of wear-and-tear or structural issues. Promptly tighten loose components and repair any damage to maintain their integrity over time.
By following these guidelines closely, you’ll extend the functional life span of your Ridgeline Mount while ensuring it remains safely anchored in place regardless of external conditions.
Also Read: Starlink Ethernet Adapter Setup: Complete Installation Guide
Frequently Asked Questions
What is the Starlink Ridgeline Mount used for?
It’s designed to securely attach your Starlink dish to the ridge of a roof, ensuring optimal positioning and signal reception.
How do I ensure my Starlink dish is aligned properly with the Ridgeline Mount?
Alignment involves adjusting the dish’s angle towards the sky, using the Starlink app to find the best orientation for a strong signal.
Can I install the Ridgeline Mount on any type of roof?
It’s specifically built for sloped roofs but check compatibility and structural integrity before installation.
Do I need professional help to install my Ridgeline Mount?
While DIY is possible by following provided instructions, hiring a professional can ensure safe and correct installation.
Also Read: Starlink Gen 3 Router: Your Ultimate Internet Upgrade
Conclusion
The Starlink Ridgeline Mount offers users a straightforward and efficient solution for satellite internet installation. With its user-friendly design, setting up your Starlink dish in an optimal position atop your roof is easier than ever before.
By following the included easy installation steps and ensuring proper alignment with the skies, homeowners can enjoy high-speed internet with minimal fuss.
This hassle-free mounting option eliminates the need for professional help, making it an attractive choice for DIY enthusiasts. Furthermore, its built-in alignment features ensure strong signal reception by guiding users toward the best orientation towards Starlink satellites.