Are you tired of seeing your Starlink system sidelined by a stubborn motors stuck error? I’ve been there, and let me tell you, it’s not fun. But fear not, because this article is your lifeline out of the frustration. By sticking with me through this read, you’ll be equipped with the practical know-how to tackle this pesky problem head-on. We’re talking straightforward troubleshooting that will have your Starlink up and rotating as it should!
So here’s the deal: fixing the Starlink motors stuck error usually involves a series of diagnostic checks and manual interventions that might just save the day. I’m going to walk you through some simple steps – from doing some basic preliminary checks to rolling up your sleeves for a bit of hands-on action – nothing too technical. If all else fails, well, we’ll get into that too. Let’s not spoil all the surprises just yet.
Starlink Motors Stuck Error
Starlink, for those of you who might not be familiar with it, is that super-cool satellite internet service that’s been popping up all over.
It has these nifty little dishes that move on their own to get the best signal from those satellites zipping around overhead.
But just like with anything techy, sometimes things go a little haywire – I’m talking about when the motors on your Starlink dish get stuck. So let’s dive in and untangle this issue together.
Recognizing the Error Signs
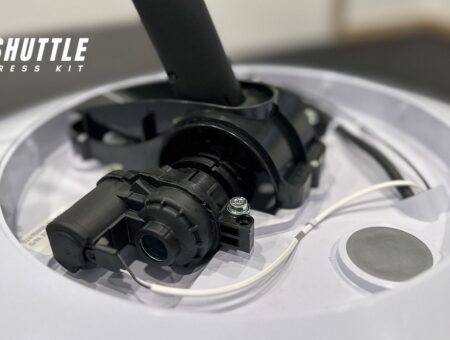
When your Starlink motors are stuck, it’s like your smart dish has suddenly turned into a paperweight—it just won’t budge! You might see your trusty dish pointing in one direction without moving an inch or hear it grunt and groan as it tries to shift position, but no dice. This glitch is a big deal because if your dish isn’t moving correctly, it can’t track satellites properly which means bye-bye internet, and nobody wants that.
For you visual folks out there – imagine trying to play catch but you can only stand stock-still while the ball’s tossed at ya from different angles; you’re bound to miss some throws, right? Same deal here; our satellite-catching buddy needs full range of motion to keep us connected.
Why It Happens?
Now why does this happen? Most times it’s techie stuff going off script – maybe a software hiccup didn’t tell the motors what they’re supposed to be doing. In other cases, something physical might have jammed up the works. We’re talking bits and bobs knocked out of whack by rough weather or an odd chance encounter with backyard critters making themselves at home where they shouldn’t.
It could even be something as simple as a power issue – either too much juice or not enough getting where it needs to go can throw a real wrench into our space-linking aspirations. Bottom line: there are a handful of common gremlins that could be putting our Starlink motors in a bind.
So now we’ve got our detective hats on; we know what signs point towards trouble and have some clues about who might be causing mischief in our internet-connecting machine. Let’s roll up our sleeves and work through fixing this pesky problem together in the next section!
Also Read: Starlink Travel Case Review: Must-Have Accessory?
How To Fix The Starlink Motors Stuck Error?
Hey there! If you’re dealing with the Starlink motors stuck error, I feel for you. It’s a real pain when tech acts up, isn’t it? But don’t worry. I’m here to walk you through how to get your Starlink system back on track. Before we get into the nitty-gritty of fixing this thing, let’s make sure you’re good to go with some basic safety checks and a bunch of tools.
- Check for Obstructions: Ensure that nothing is blocking the dish’s movement, such as branches, walls, or other objects. The dish should have a clear line of sight to the sky.
- Verify Installation: Confirm that the dish is properly installed and secured. The mast should be within 5 degrees of vertical; if it’s tilted, readjust it.
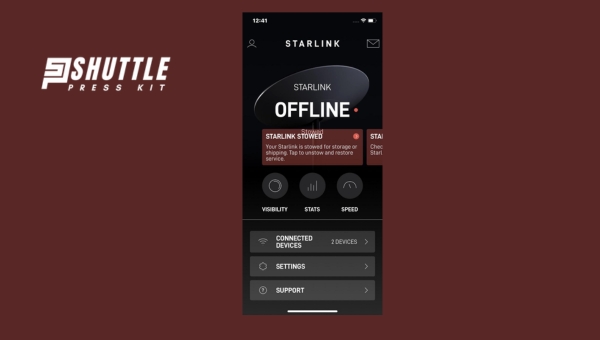
- Reboot the System: Unplug the Starlink power cord, wait for about 60 seconds, and then plug it back in. Allow the system around 15 minutes to reboot and check if the error persists.
- Realign the Dish: If possible, manually adjust the dish to ensure it’s positioned correctly for optimal satellite connection.
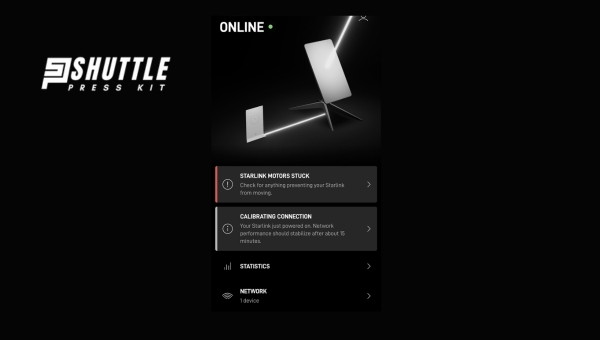
- Firmware Updates: Check for any available firmware updates through the Starlink app, as these can resolve operational issues.
- Seek Professional Assistance:
- If you’re unable to resolve the issue through these steps or if manual override is not successful, it’s advisable to contact SpaceX support.
- Detailed guidance from qualified technicians can prevent unintentional damage during self-troubleshooting efforts.
Also Read: Can You Set Up Your Starlink Router Outdoors? Ultimate Guide
Preventative Measures for Avoiding Future Errors
Maintaining a flawless operation of your Starlink motor involves preemptive measures to mitigate possible complications down the line. By adopting a proactive approach towards maintenance and error prevention, you can ensure smoother, uninterrupted service from your satellite internet system. Here are the essential steps to consider for keeping motor-related issues at bay:
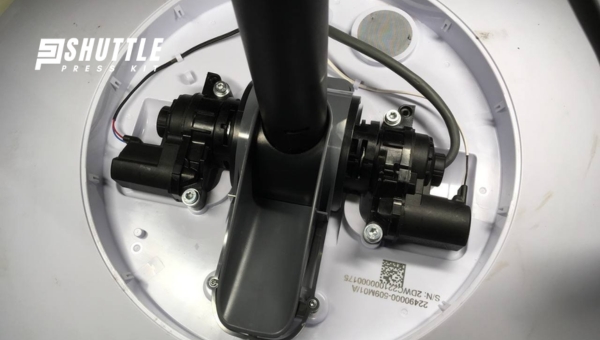
- Regularly Inspect Hardware: Make it a habit to periodically check both the dish and its motor for any signs of physical damage or obstruction that might hinder their performance. This includes looking out for wear and tear, ensuring all moving parts are functioning correctly, and verifying that no external factors (like debris or snow) are blocking the dish.
- Keep Firmware Updated: Stay vigilant about software updates from Starlink. These updates often contain bug fixes, improvements, and new features that optimize the performance of your system. Ensure your Starlink setup is set to automatically download and apply these updates when they become available.
- Clean Equipment Gently but Thoroughly: Use a soft cloth to clear any dust, dirt, or other build-ups on your dish without applying too much pressure which could cause damage. A clean dish maintains optimal signal reception and minimizes strain on the motor.
- Secure Installation: Confirm that all components of your Starlink setup are securely installed but not overly tightened – this includes mounts, screws, and brackets holding your equipment in place. A stable installation prevents unnecessary movement which could lead to misalignment or mechanical issues over time.
- Monitor Weather Conditions: Although designed to withstand various weather conditions, taking extra precautions during extreme events (like detaching or shielding equipment during lightning storms) can prevent unforeseen damages.
By integrating these steps into regular maintenance routines for your Starlink system’s optimal functioning, future errors related specifically to the motor can be significantly reduced or altogether avoided.
Also Read: Starlink Data Caps: Understanding Limits and Solutions
FAQs
Can weather conditions cause the Starlink motors stuck error?
Absolutely, extreme weather like heavy snow, ice, or strong winds can sometimes interfere with the motor’s mechanisms, leading to this error.
How long does it take SpaceX support to respond to an issue like this?
SpaceX support response times vary, but for issues like motor errors, they typically respond within 24-48 hours.
Is there a way to manually adjust the motors if they become stuck?
Yes, in some cases you can manually adjust the motors using specific override techniques outlined in the Starlink user manual or troubleshooting guide.
Are there any user forums where I can seek help for troubleshooting steps?
Definitely! There are active online communities and forums with tech-savvy users who share solutions and tips on issues like motor errors with Starlink.
What should I avoid doing when trying to fix a stuck motor on my Starlink system?
Avoid forcing any moving parts and don’t open up any components if you are not sure about what you’re doing – it could void your warranty or cause further damage
Conclusion
There you have it, folks – your no-nonsense guide to nipping that pesky Starlink motors stuck error in the bud. Overcoming glitches like this is more than just handy DIY; it’s about staying connected and keeping your daily digital life running smoothly.
Remember, with a cool head and this step-by-step approach, you’re absolutely capable of tackling such tech hurdles on your own. And hey, if things get too hairy or are out of your wheelhouse – help from SpaceX pros is just a call away. Keep those motors humming and your Starlink tuned to perfection!