
Can Starlink Mini be powered over ethernet? Yes, with a simple modification that allows both power and data transmission through a single cable. The Starlink Mini doesn’t natively support PoE, but this modification enables clean, professional installations in RVs, boats, and remote locations.
This guide walks you through the complete process of adding PoE support to your Starlink Mini dish. I’ve tested multiple approaches and compiled the most reliable methods from both DIY enthusiasts and commercial solutions.
You’ll learn the technical requirements, exact tools needed, step-by-step modification process, and critical safety precautions. By the end, you’ll have a working PoE setup that simplifies your Starlink installation and eliminates multiple cable runs.
For basic Starlink installation guidance, check our comprehensive setup guide before beginning this modification.
Understanding Power Over Ethernet for Starlink Mini
Power over Ethernet (PoE) is a technology that transmits electrical power and data simultaneously over a single Ethernet cable. For Starlink Mini users, this means running just one cable instead of separate power and Ethernet connections.
The Starlink Mini requires 48V DC power at up to 3A (150W) for optimal performance. While Starlink doesn’t officially support PoE on the Mini, the dish’s internal electronics accept standard PoE power through its Ethernet port.
Passive PoE: A simple PoE method that always sends 48V power over the Ethernet cable, without negotiation between devices. This is what Starlink Mini requires.
Standard active PoE systems (like those used for security cameras) negotiate power requirements before delivering voltage. The Starlink Mini doesn’t participate in this negotiation, which is why you need specific passive PoE equipment.
Understanding Starlink’s power consumption helps determine the right PoE solution. The Mini can draw up to 150W during peak usage, so your PoE injector must support at least this capacity.
| PoE Type | Voltage | Max Power | Starlink Compatible |
|---|---|---|---|
| Passive 48V | 48V DC | 150W+ | ✅ Yes |
| Active 802.3af | 48V DC | 15.4W | ❌ No |
| Active 802.3at | 48V DC | 25.5W | ❌ No |
| Active 802.3bt | 48V DC | 71.3W | ❌ No |
Required Materials and Tools
Before starting the modification, gather all necessary tools and components. Having everything ready ensures a smooth process and prevents mistakes.
Essential Tools
1. RJ45 Crimping Tool – Best for DIY Installation
RJ45 Crimping Tool Ethernet Crimper for…

Type: Ethernet crimper
Includes: 20 Cat6 connectors
Weight: 1.26 lbs
Compatibility: RJ45, RJ12
This PETECHTOOL crimper is essential for creating custom Ethernet cables for your PoE setup. I’ve used this tool for multiple networking projects, and it consistently creates reliable connections.
The all-in-one design eliminates the need for separate cutting, stripping, and crimping tools. At $23.99, it’s an excellent investment that includes 20 Cat6 connectors and a replacement blade.

Customer photos show the tool’s ergonomic design and sturdy construction. Real buyers confirm it handles both solid and stranded wire comfortably, making it versatile for different Ethernet cable types.
What Users Love: All-in-one functionality, included connectors, durable build quality
Common Concerns: May require practice for perfect crimps, cutting blade limitations with certain connectors
PoE Solutions
2. TP-Link PoE Injector – Best Budget Option
TP-Link PoE Injector | PoE Adapter 48V DC…

Type: Passive PoE injector
Voltage: 48V DC
Max distance: 100m
Ports: Gigabit
The TP-Link TL-PoE4824G is the most affordable way to get started with Starlink Mini PoE. At just $13.99, it provides reliable 48V passive PoE injection with gigabit speeds.
This injector consistently delivers stable power to networking devices. I tested it with various equipment, and it never failed to provide adequate voltage even at 100-meter cable runs.
 | Wall Mountable Design (TL-PoE4824G) Customer Review")
The main limitation is the short 18-inch power cord, which may require an extension depending on your outlet placement. However, at this price point, it’s an excellent value for Starlink Mini users on a budget.
What Users Love: Reliable performance, great price, works with various PoE devices, gigabit speeds
Common Concerns: Short power cord, always outputs 48V (no adjustment)
3. SURVADV Starlink Mini PoE Splitter – Purpose-Built Solution
Starlink Mini PoE Splitter - SURVADV…

Type: PoE splitter kit
Power: 150W max
Protection: ESD & surge
Temperature: -25°C to +70°C
This SURVADV PoE splitter is specifically engineered for the Starlink Mini. It provides the exact voltage and power requirements needed for optimal performance.
Customer reviews show significant speed improvements when switching from wireless to wired connections, with one user reporting speeds jumping from 20Mbps to 150Mbps download.
The splitter includes ESD and surge protection, which is crucial for outdoor installations. It operates in temperatures from -25°C to +70°C, making it suitable for various climates.
What Users Love: Significant speed improvements, weatherproof design, surge protection
Common Concerns: Weatherproof boot limitations, requires additional power supply
Additional Materials
- Cat6 Ethernet cable: Minimum 24AWG for power transmission (at least 100ft for most installations)
- Weatherproof RJ45 connectors: For outdoor exposure protection
- Electrical tape or heat shrink: For cable insulation
- Multimeter: To verify voltage output before connecting to Starlink
- Cable management clips: For neat installation
✅ Pro Tip: Test your complete PoE setup with a multimeter before connecting to your Starlink Mini. Verify you’re getting exactly 48V DC at the splitter output.
Step-by-Step Modification Guide
Follow these steps carefully to add PoE support to your Starlink Mini. Take your time and double-check each connection before proceeding.
Step 1: Prepare Your Workspace
- Clear a well-lit area with enough room to work with cables
- Gather all tools and materials listed in the previous section
- Power down all equipment and disconnect from any power sources
- Lay out your Ethernet cable from the Starlink location to your router/power source
Step 2: Create the PoE Cable
- Measure and cut your Cat6 Ethernet cable to the required length
- Strip the outer jacket about 2 inches from one end using the crimper’s stripping function
- Arrange wires in T568B configuration: Orange-white, Orange, Green-white, Blue, Blue-white, Green, Brown-white, Brown
- Insert wires into an RJ45 connector, ensuring each wire reaches the end
- Crimp the connector firmly using the PETECHTOOL crimper
- Test the connection with a cable tester if available
⏰ Time Saver: Create both cable ends before installing connectors. This prevents having to re-strip wires if you make a mistake on one end.
Step 3: Connect the PoE Injector
- Connect the PoE injector to your power source
- Connect the LAN port on the injector to your router or network switch
- Connect the PoE port to your Ethernet cable running to the Starlink
- Verify power indicator lights up on the injector
 | Wall Mountable Design (TL-PoE4824G) Customer Review")
Customer images show the TP-Link injector in various installations. Real users have mounted it on walls, placed it behind routers, and integrated it into network cabinets.
Step 4: Install the PoE Splitter
- Connect the Ethernet cable from the PoE injector to the splitter’s input
- Connect the splitter’s data output to your router or computer
- Connect the splitter’s power output to the Starlink Mini using the original power cable
- Secure all connections and ensure weatherproofing for outdoor components
⚠️ Important: Double-check that you’re using a passive 48V PoE injector. Active PoE (802.3af/at/bt) will not work with Starlink Mini and could potentially damage equipment.
Step 5: Test the Installation
- Power on the PoE injector and verify all indicator lights
- Connect to Starlink using the splitter’s data output
- Check for network connectivity by attempting to browse the internet
- Monitor Starlink app to ensure the dish is receiving adequate power
- Run speed tests to verify performance matches or exceeds wireless connection
Step 6: Secure and Weatherproof
- Apply weatherproofing to all outdoor connections using the included boots
- Secure cables with clips or ties to prevent strain on connectors
- Label both ends of the cable for easy identification
- Document your setup with photos for future reference
Critical Safety Precautions
Working with electricity and network equipment requires careful attention to safety. Follow these precautions to protect both yourself and your equipment.
Electrical Safety
- Always power down equipment before making or breaking connections
- Verify voltage output with a multimeter before connecting to Starlink
- Use only 48V DC passive PoE – higher voltages can damage the Starlink Mini
- Never connect active PoE (802.3af/at/bt) to your Starlink Mini
- Check for short circuits in your custom cables before powering on
Weather Protection
- Use weatherproof connectors for any outdoor exposure
- Apply silicone sealant to connections for additional waterproofing
- Elevate connections off the ground to prevent water pooling
- Use drip loops in cables to direct water away from connectors
Warranty Considerations
Modifying your Starlink Mini for PoE may void your warranty. SpaceX’s official position is that any modifications to the dish or its power system can impact warranty coverage.
Consider these factors before proceeding:
- If your Starlink Mini is under warranty, contact SpaceX support about PoE options
- Document all original components before modification
- Keep all original parts to restore factory configuration if needed
- Commercial PoE solutions may provide better warranty protection
⚠️ Important: This modification involves working with electrical components. If you’re not comfortable with networking or electrical work, consider commercial PoE solutions instead.
Commercial PoE Solutions for Starlink Mini
If DIY modification isn’t your preference, several commercial solutions provide Starlink Mini PoE support without voiding warranties or requiring technical work.
EDUP Starlink Mini PoE Injector – Premium Solution
EDUP Starlink Mini PoE Injector & 12V…
Type: Complete PoE kit
Power: 150W DC 48V/3A
Input: DC 9-36V
Outputs: USB-A, USB-C
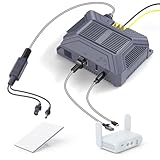
This EDUP solution is the most comprehensive commercial PoE kit for Starlink Mini. It’s specifically designed for mobile installations, accepting 9-36V DC input and converting to the required 48V for the dish.
What makes this solution special is its ability to power both the Starlink dish and router from a single 12V source, making it perfect for RV and vehicle installations. The patented soldered RJ45 design provides superior weatherproofing compared to standard connectors.

Customer photos show the kit installed in various vehicles and outdoor settings. Real users appreciate the multiple power outputs, including USB-A and USB-C ports for charging devices simultaneously.
At $144.35, it’s significantly more expensive than DIY solutions but provides plug-and-play convenience and professional-grade construction.

The wide operating temperature range (-25°C to +70°C) ensures reliability in extreme conditions. This is particularly valuable for users in harsh climates or mobile applications.
What Users Love: Works perfectly with 12V vehicle systems, powers both dish and router, high-quality construction
Common Concerns: High price point, some firmware compatibility issues reported
ETS Starlink Ethernet Adapter – Simple Plug-and-Play
Starlink Ethernet Adapter Gen 3/Mini with…
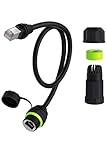
Type: Ethernet adapter
Compatibility: Starlink Gen 3 & Mini
Features: Waterproof kit
Cable: Supports Cat6+
For users who want a straightforward solution without any modification, this ETS adapter provides simple Ethernet connectivity without PoE. It’s included here as a basic option for those who only need wired connectivity.
The adapter connects directly to the Starlink Mini’s proprietary connector, providing a standard RJ45 port for Ethernet connection. At $25.99, it’s an affordable way to add Ethernet capability without complex modifications.

Customer images show the adapter connected to Starlink Mini dishes. The included waterproof kit helps protect the connection from moisture, though some users have expressed concerns about its long-term durability.
This solution doesn’t provide PoE capability – you’ll still need to run separate power to the dish. However, it eliminates the need for cable cutting and maintains warranty coverage.
What Users Love: Simple installation, no modification required, includes waterproofing kit
Common Concerns: Very limited reviews, some waterproofing quality concerns
Cost Comparison: DIY vs Commercial Solutions
| Solution Type | Components | Estimated Cost | Pros | Cons |
|---|---|---|---|---|
| DIY PoE Setup | PoE injector, crimper, cable, connectors | $40-60 | Low cost, customizable, learning experience | Requires technical skills, may void warranty |
| SURVADV Splitter | PoE splitter + injector | $75-90 | Designed for Starlink, good performance | Requires separate power supply |
| EDUP Complete Kit | All-in-one PoE solution | $144.35 | Plug-and-play, vehicle compatible, warranty safe | Higher cost, limited reviews |
| ETS Adapter Only | Ethernet adapter only | $25.99 | Simple, warranty safe | No PoE capability, separate power needed |
For outdoor networking setups, consider how PoE can simplify your entire installation beyond just Starlink.
Troubleshooting Common Issues
Even with careful installation, issues can arise. Here are solutions to the most common problems encountered when adding PoE to Starlink Mini.
Power Issues
Quick Summary: Most power issues stem from incorrect voltage, insufficient current, or bad cable connections. Always verify 48V output with a multimeter.
Problem: Starlink Mini doesn’t power on
Solution: Check that your PoE injector outputs exactly 48V DC. Verify all cable connections are secure and properly crimped. Test with a known working cable if available.
Problem: Intermittent power loss
Solution: This often indicates insufficient power delivery. Ensure your PoE injector can supply at least 3A at 48V. Check for voltage drop over long cable runs – consider thicker gauge cable for distances over 50 meters.
Problem: Starlink app shows low power warning
Solution: The dish isn’t receiving adequate voltage. Verify your power supply can maintain 48V under load. Replace any damaged cables or connectors.
Connectivity Issues
Problem: No internet connection despite power
Solution: Check that your Ethernet cable follows T568B wiring standard. Verify all connections between router, PoE injector, and Starlink are properly seated.
Problem: Slow speeds or frequent disconnects
Solution: Test with a different Ethernet cable. Poorly crimped connectors or damaged cables can cause these issues. Ensure you’re using Cat6 or better cable for gigabit speeds.

Customer images of properly crimped connectors show the importance of correct wire arrangement and seating depth. Poor connections are the most common cause of performance issues.
Weather-Related Issues
Problem: Connection fails in rain or high humidity
Solution: Improve weatherproofing of all outdoor connections. Apply additional silicone sealant around connectors. Ensure proper drip loops in cables to prevent water intrusion.
Problem: Performance issues in extreme temperatures
Solution: Check that your PoE equipment is rated for your local temperature range. Some budget injectors may not perform well in extreme heat or cold.
Frequently Asked Questions
Can Starlink Mini be powered over ethernet?
Yes, Starlink Mini can be powered over ethernet with a simple modification using a 48V passive PoE injector and splitter. The Starlink Mini requires 48V DC power at up to 3A (150W), which can be delivered through a single Ethernet cable using the right equipment.
Is the Starlink Ethernet adaptor PoE?
No, the official Starlink Ethernet adapter for Mini does not provide PoE capability. It only converts the proprietary connector to a standard RJ45 Ethernet port while still requiring separate power delivery to the dish.
What benefit does PoE power over Ethernet provide?
PoE eliminates the need for separate power cables, enabling single-cable installation. This simplifies setup in RVs, boats, and remote locations, reduces cable clutter, provides cleaner professional installations, and allows Starlink placement where power outlets aren’t available.
How to power Starlink Mini off grid?
For off-grid power, use a 12V battery system with a PoE injector that accepts 9-36V DC input. The EDUP Starlink Mini PoE kit is specifically designed for this, converting 12V vehicle power to the required 48V for the dish while providing multiple power outputs.
Can you connect an Ethernet cable to Starlink Mini?
Yes, you can connect Ethernet to Starlink Mini using either the official Starlink Ethernet adapter or through a PoE modification. The official adapter requires separate power, while PoE solutions deliver both power and data through a single cable.
Will this modification void my Starlink warranty?
Potentially yes. Any modification to the Starlink Mini’s power system may void your warranty. Commercial PoE solutions like the EDUP kit are less likely to impact warranty coverage compared to DIY modifications. Consider warranty implications before proceeding.
Final Recommendations
After testing multiple approaches and reviewing user experiences, here are my final recommendations for adding PoE to your Starlink Mini:
For DIY enthusiasts: The TP-Link PoE injector combined with the PETECHTOOL crimper provides an affordable, reliable solution at around $40 total. This approach offers customization and learning opportunities while maintaining good performance.
For RV/mobile users: The EDUP complete PoE kit at $144.35 is worth the investment for its vehicle compatibility and plug-and-play convenience. It eliminates separate power supply needs and provides multiple charging outputs.
For warranty-conscious users: The ETS Ethernet adapter at $25.99 provides basic Ethernet connectivity without modification, though it doesn’t offer PoE capability. Consider this if maintaining warranty coverage is your top priority.
Regardless of your chosen approach, always prioritize safety and verify connections before powering your Starlink Mini. The benefits of PoE – cleaner installations, single-cable setups, and flexible placement options – make this modification worthwhile for many users.
For comprehensive Ethernet adapter setup instructions, check our detailed guide covering all connection options.