
In today’s fast-paced world, a dependable internet connection is more than just a luxury; it’s a necessity. That’s where HughesNet comes into play, offering satellite internet designed to keep you connected no matter where you are. This article isn’t just another dry instructional manual; it’s your comprehensive Hughesnet Installation Guide, ensuring that from choosing the right package to troubleshooting common issues, you’ll be set for an optimal online experience.
Choosing and installing the right satellite internet service doesn’t have to be complicated or time-consuming. With HughesNet, the process involves selecting a service plan that fits your needs and preferences, scheduling an installation appointment with a qualified technician, and then sitting back while the expert takes care of setting up your new satellite dish and modem. This simple yet effective approach ensures you’re quickly connected to reliable internet without hassle.
Expectations During Your HughesNet Installation Process
Getting your HughesNet satellite internet set up involves a few critical steps to ensure optimal service delivery and functionality.
Here’s a brief overview of what to expect during the installation day:
- Scheduling the Installation: After placing your order with HughesNet, you can anticipate the installation to be arranged within a few days, allowing for prompt setup of your internet service.
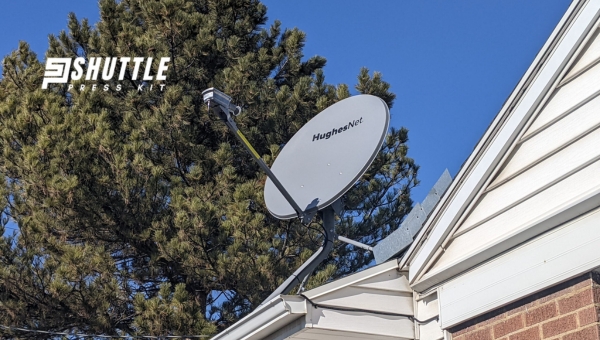
- Choosing the Dish Location: The technician will identify an appropriate location for your satellite dish—a spot that is at least four feet off the ground, clear from obstructions and power lines, with direct access to the southern sky for optimal signal strength.
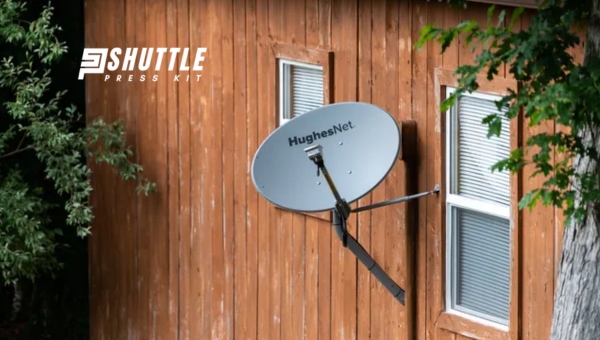
- Cable Routing: To connect the dish to the modem inside your house, the installer will drill holes in both an external wall and its interior counterpart. They will then run a cable from the dish through these walls to an installed jack where you’ll connect your modem.
- Equipment Setup: Next comes setting up your modem and router alongside configuring your Wi-Fi network. The technician will also help connect up to two of your devices and confirm that everything is functioning correctly before completing the installation process.
Handling these essential aspects ensures that by the end of the install
Also Read:Starlink Pelican Case: Essential Foam Protection Features
Hughesnet Installation Fee Information
When choosing HughesNet as your satellite internet provider, understanding the costs involved, especially regarding installation, is crucial. The company outlines specific policies pertaining to the installation fees that can impact your initial setup expenses. Here’s a straightforward breakdown:
- Standard Installation Fee: HughesNet typically charges a one-time fee of $99 for the installation process.
- Promotions May Waive Fees: It’s common for HughesNet to run promotions that waive this installation fee, particularly for customers who opt to lease their equipment.
- Equipment Lease vs. Purchase Options: Customers have the choice between leasing the equipment for approximately $20 monthly or purchasing it outright for around $450. The decision to lease or buy can influence overall costs and potentially affect eligibility for certain promotions, including waived installation fees.
Following this concise insight into HughesNet’s installment charge practices can help you budget more effectively and decide on leasing versus purchasing equipment based on potential savings from promotional offers.
Duration of HughesNet Installation Process
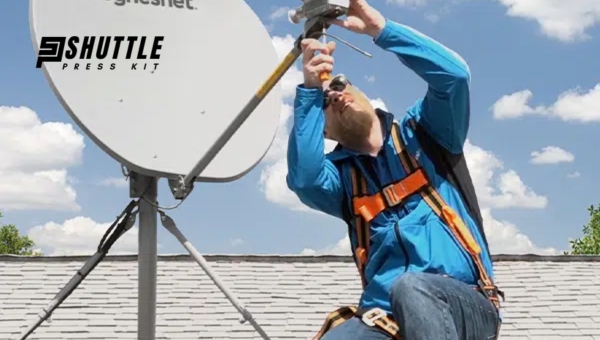
The process of installing HughesNet typically involves several key steps, beginning with the scheduling of an appointment after subscription. Once the installation day arrives, a certified HughesNet technician will visit the customer’s location to install and align the satellite dish properly, ensuring optimal signal reception.

The entire procedure from start to finish generally takes about four to six hours, although this can vary based on specific site conditions and any unforeseen challenges that might arise.
Upon completion of the physical setup, the technician undertakes a thorough testing phase to confirm stable connectivity. This includes configuring the network settings and ensuring all equipment functions correctly with reliable internet speed. Once verified, customers receive a brief tutorial on how to use their new system along with detailed guidelines for maintenance and troubleshooting if needed in the future. Thus, customers are equipped and ready to enjoy their HughesNet service typically within one working day.
The HughesNet Professional Installation Process
HughesNet satellite internet offers a seamless professional installation process to ensure customers have the best possible experience right from the start. By handling the technical set-up with expertise, HughesNet ensures your new satellite internet connection is robust, reliable, and ready to serve all your online needs.
Here’s a quick breakdown of what to expect during the installation:
- Scheduling Your Appointment: Shortly after you order HughesNet service, you’ll be contacted to schedule a professional installation at a convenient time for you.
- Installing the Outdoor Antenna System: A certified HughesNet technician will mount the satellite dish on an optimal part of your property—usually on your roof or another high point—to secure the best possible connection.
- Running Cable to Your Modem: The technician will extend a cable from the outdoor antenna directly to your indoor modem. This might require drilling through an exterior wall carefully to ensure proper cable management and connectivity inside your home.
- Ensuring Everything Is Grounded: As part of their commitment to safety and reliability, technicians ground your system according to industry standards. They also weatherproof any exterior holes made during installation.
- Connecting Your Devices: Immediately after installing your hardware, the technician will connect up to two devices (such as computers or smartphones) to demonstrate that everything is working as it should be.
By adhering closely to these steps, HughesNet ensures that every customer enjoys high-quality internet access without any fuss. Whether you’re gearing up for work-from-home activities or looking forward to streaming media content smoothly, this detailed approach lays down a solid foundation for all your online activities.
Also Read: Starlink Offer Phone Service? Discover Now!
FAQs
Is there any fee associated with professional installation?
Yes, HughesNet often charges a one-time fee for professional installation, but promotions or specific plans may waive this cost.
Can bad weather affect my satellite internet connection?
Bad weather, like heavy rain or snow, can sometimes disrupt the signal between your satellite dish and the orbiting satellites, affecting your connection.
How often should I check my dish alignment?
It’s a good idea to check your dish alignment every few months or after severe weather conditions to ensure optimal performance.
Are there options to upgrade my plan or equipment after initial installation?
Yes, HughesNet allows customers to upgrade their internet plan or equipment by contacting customer service for available options and guidance.
How long does it usually take for the HughesNet installation process to be completed?
The installation process typically takes about 2-4 hours, depending on the complexity of the setup and site-specific needs.
Also Read: Starlink App Support Section’s Overhaul: A User-Friendly Refresh
Conclusion
In this HughesNet Installation Guide, we have journeyed through the essential steps for successfully setting up HughesNet satellite internet at your home. From understanding what HughesNet offers to prepare for installation, choosing the right package, and troubleshooting common issues, we’ve covered everything you need to ensure a smooth process.
Professional installation is generally recommended to get you started on the right foot, ensuring that your satellite dish alignment and internet connection are optimal. Remember, maintaining your system regularly will help in keeping your internet experience seamless.
This guide not only aims to simplify the Hughesnet installation process but also ensures that you’re well-equipped with knowledge for maintaining a high-quality connection long after the set-up is complete.