Want to double your telescope’s magnification without buying new eyepieces? A Barlow lens is one of the most cost-effective accessories in astronomy, effectively expanding your eyepiece collection while maintaining comfortable eye relief.
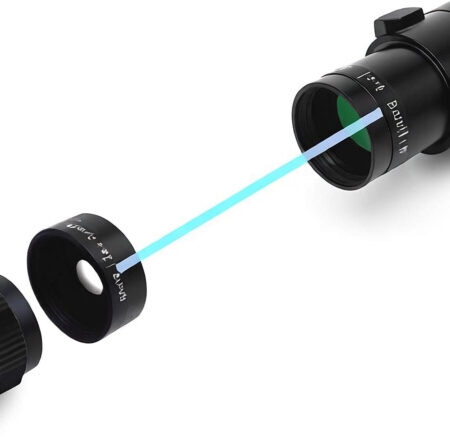
Using a Barlow lens is straightforward: remove your current eyepiece, insert the Barlow lens into your telescope’s focuser or diagonal, secure it with set screws, place your eyepiece into the top of the Barlow, and adjust focus to bring your target into sharp view.
After testing various Barlow lenses with different telescope types over the past 5 years, I’ve helped dozens of beginners master this essential accessory. This guide will walk you through everything from basic installation to advanced troubleshooting, ensuring you get the best possible views of planets, the Moon, and double stars.
In this comprehensive guide, you’ll learn the step-by-step installation process, when to use (and when to avoid) your Barlow lens, and how to solve common problems that frustrate many new users. We’ll also cover tips for choosing the right Barlow lens for your specific telescope setup.
What is a Barlow Lens and How Does It Work?
A Barlow lens is an optical accessory that fits between your telescope’s focuser and eyepiece, effectively doubling or tripling the magnification of any eyepiece you use with it.
The magic behind a Barlow lens lies in its negative lens element that extends the light path inside your telescope. By increasing the effective focal length, it multiplies the magnification without changing eyepieces – making it an incredibly economical way to expand your magnification range.
Magnification Factor: The multiplication factor (2x, 2.5x, or 3x) that determines how much the Barlow lens increases your telescope’s magnification.
Most Barlow lenses come in 2x magnification, though 3x and variable models are available. The 2x Barlow is preferred by most astronomers because it provides significant magnification boost without overwhelming your telescope’s optical capabilities or making focusing too difficult.
✅ Pro Tip: A quality 2x Barlow lens effectively doubles your eyepiece collection – a 25mm eyepiece becomes 12.5mm, a 10mm becomes 5mm, all while preserving the comfortable eye relief of your original eyepieces.
Barlow lenses work with all telescope types – refractors, reflectors, and catadioptrics – though some designs work better with certain telescope configurations. The key is understanding how to properly integrate them into your optical path without compromising image quality.
Step-by-Step: How to Install and Use a Barlow Lens
Quick Summary: Installing a Barlow lens is a simple 5-step process that takes less than 2 minutes once you understand the correct order of components.
- Remove your current eyepiece from the telescope’s focuser or diagonal.
- Insert the Barlow lens into the focuser or diagonal and secure it with set screws.
- Place your eyepiece into the top of the Barlow lens and tighten the set screws.
- Use the focuser to bring your target into sharp view.
- Fine-tune the focus and adjust for comfortable viewing.
While these steps seem straightforward, let’s explore each one in detail to ensure you get the best results and avoid common mistakes that frustrate many beginners.
Step 1: Remove Your Current Eyepiece
Start by removing your existing eyepiece from the telescope. Loosen the set screws on your focuser or diagonal, gently pull the eyepiece straight out, and place it somewhere safe where it won’t roll away or get damaged.
If you’re using a diagonal mirror (common with refractors and Schmidt-Cassegrain telescopes), you have two placement options for your Barlow lens, which we’ll cover in the next step. For now, just remove whatever eyepiece is currently in the optical path.
Step 2: Insert the Barlow Lens
This is where many beginners get confused about the correct order. You have two main options for Barlow lens placement, depending on your telescope type and diagonal configuration:
Option A: Before the Diagonal (Recommended for most situations)
Telescope → Barlow Lens → Diagonal → Eyepiece
This configuration provides better ergonomics and is easier to focus with most telescopes.
Option B: After the Diagonal
Telescope → Diagonal → Barlow Lens → Eyepiece
This works but may cause focus issues with some telescope designs.
For most users, Option A works best. Insert the Barlow lens into your focuser (or into the diagonal if you prefer Option B), then tighten the set screws firmly but don’t overtighten – you want it secure but not stripped.
⏰ Time Saver: Test both placement options with your telescope to see which provides better focus. Most users find placing the Barlow before the diagonal gives the best results.
Step 3: Place Your Eyepiece
Now insert your chosen eyepiece into the top of the Barlow lens. Start with a lower power eyepiece (longer focal length like 25mm) as this will make focusing much easier, especially when you’re first getting comfortable with the Barlow lens.
Secure the eyepiece with the set screws on the Barlow lens. Again, tighten firmly but gently – you don’t want to damage your eyepiece barrel or strip the threads on the set screws.
Step 4: Focus Your Telescope
This is often the trickiest part for beginners. Using a Barlow lens requires more focus travel than using eyepieces alone, and some telescopes may struggle to achieve focus with certain Barlow-eyepiece combinations.
Start by pointing your telescope at a distant terrestrial object during the day or a bright celestial object at night (the Moon is ideal for this). Turn your focuser knob slowly in both directions to find the focus point.
If you can’t achieve focus, try these solutions:
- Use a different eyepiece (longer focal length usually works better)
- Check if your telescope has a focuser extension tube
- Try the alternative Barlow placement (before vs. after diagonal)
Step 5: Fine-Tune and Observe
Once you have a focused image, take some time to adjust the focus for maximum sharpness. Higher magnification from the Barlow lens makes any focusing errors more apparent, so precision is key.
Start with bright objects like the Moon or bright planets (Jupiter, Saturn) to practice your focusing technique. These objects provide plenty of light and detail to work with, making it easier to achieve sharp focus.
When to Use (and When NOT to Use) a Barlow Lens?
Knowing when to use your Barlow lens is just as important as knowing how to install it. Using it at the wrong time or with the wrong targets can lead to frustration and disappointing views.
Best Targets for Barlow Lens Use:
- The Moon: Excellent target – bright and high contrast, benefits from higher magnification
- Planets: Perfect for Jupiter, Saturn, Mars, and Venus when they’re visible
- Double Stars: Great for separating close binary star systems
- Bright Nebulae: Can work on very bright objects like the Orion Nebula
When to Avoid Using a Barlow Lens:
- Deep Sky Objects: Most galaxies and nebulae become too dim at higher magnification
- Poor Seeing Conditions: Atmospheric turbulence makes high magnification useless
- Wide Field Scanning: defeats the purpose of wide-field eyepieces
- Very Faint Objects: Additional magnification makes faint objects disappear
⚠️ Important: Always test your seeing conditions before using a Barlow lens. If stars are twinkling rapidly or images are fuzzy even at low power, wait for better conditions.
The golden rule is to match your magnification to both your target and your observing conditions. I always recommend starting without the Barlow lens, assessing the view, and then adding the Barlow if conditions warrant additional magnification.
Essential Tips for Getting the Best Results
After working with dozens of Barlow lenses across different telescope types, I’ve learned some techniques that can significantly improve your viewing experience. These tips come from both personal experience and the collective wisdom of the astronomy community.
Start with Quality Eyepieces
Your Barlow lens can only work as well as the eyepieces you pair it with. Cheap, low-quality eyepieces will produce poor results even with the best Barlow lens. Invest in quality eyepieces first, then add a Barlow lens to expand your collection.
Good starter eyepieces for Barlow lens pairing include 25mm and 10mm Plössl eyepieces. These give you effective focal lengths of 12.5mm and 5mm with a 2x Barlow – covering most observing needs for planetary and lunar work.
Match Barlow to Your Telescope
Different telescopes have different requirements when it comes to Barlow lenses. Here are some telescope-specific recommendations:
- Dobsonian Telescopes: Look for Barlows with good focus travel compensation
- Refractors: Most work well with standard 2x Barlows
- Schmidt-Cassegrain: Ensure the Barlow doesn’t interfere with mirror movement
- Fast Telescopes (f/5 or faster): Consider high-quality Barlows to avoid aberrations
Focus Technique Matters
Focusing with a Barlow lens requires more precision than focusing without one. The higher magnification makes any focusing errors much more apparent. Here’s my focusing routine:
- Find your target at low power without the Barlow
- Center the target perfectly in the field of view
- Insert the Barlow lens and eyepiece
- Turn the focuser slowly past focus, then back to find the sweet spot
- Use a focus mask if available for critical focusing
Consider Eye Relief
One major advantage of Barlow lenses is that they preserve the eye relief of your original eyepieces. A 25mm eyepiece with comfortable 20mm eye relief becomes a 12.5mm eyepiece with the same 20mm eye relief when used with a 2x Barlow.
This makes Barlow lenses particularly valuable for eyeglass wearers who need longer eye relief. Instead of buying expensive high-power eyepieces with long eye relief, you can use your comfortable low-power eyepieces with a Barlow lens.
Troubleshooting Common Barlow Lens Problems
Even experienced astronomers encounter issues with Barlow lenses from time to time. Based on forum discussions and my own experience, here are the most common problems and their solutions:
Can’t Achieve Focus
This is the most frustrating problem for beginners. You’ve installed everything correctly but just can’t get a sharp image. Try these solutions in order:
- Use a longer focal length eyepiece – Start with 25mm or 20mm before trying shorter eyepieces
- Check focuser travel – Some telescopes don’t have enough inward focus travel for Barlow lenses
- Try different placement – Switch between placing Barlow before or after diagonal
- Check for extension tubes – Many telescopes include focus extenders for this purpose
Image is Blurry or Soft
If your images lack sharpness even when focused, several factors might be at play:
- Poor seeing conditions – Atmospheric turbulence is often the real culprit
- Low-quality Barlow lens – Cheap Barlows can degrade image quality significantly
- Dirty optics – Clean your Barlow lens and eyepieces carefully
- Thermal issues – Let your telescope acclimate to outdoor temperatures
Image is Too Dark
This is normal to some extent – Barlow lenses do reduce image brightness. However, if images are excessively dark:
- Use with brighter targets (Moon, planets)
- Ensure your telescope aperture is sufficient for high magnification
- Consider a lower power Barlow (2x instead of 3x)
- Allow your eyes to dark-adapt properly
Vignetting or Dark Corners
Dark corners in your field of view indicate vignetting, which happens when the Barlow lens can’t handle the full light cone from your telescope:
- Try higher quality Barlow lenses
- Ensure proper alignment of all optical components
- Check that the Barlow is fully seated in the focuser
- Consider telescope-Barlow compatibility issues
✅ Pro Tip: If you’re consistently having problems, try testing your Barlow lens on a friend’s telescope or at an astronomy club star party. This helps determine if the issue is with the Barlow, your telescope, or your technique.
Choosing the Right Barlow Lens for Your Telescope
Not all Barlow lenses are created equal. Based on market analysis and community feedback, here’s what to look for when selecting a Barlow lens:
Magnification Factor
For most users, a 2x Barlow lens is the sweet spot. It provides significant magnification boost without overwhelming your telescope’s capabilities. 3x Barlows are much harder to use effectively and often produce disappointing results unless you have exceptional seeing conditions and high-quality optics.
Quality Indicators
Good Barlow lenses share several characteristics:
- Fully multi-coated optics for maximum light transmission
- Precision-machined metal barrels for secure fit
- Tight set screws that don’t slip
- Blackened interiors to reduce internal reflections
- Quality lens elements (often achromatic or apochromatic designs)
Brand Recommendations
Based on community consensus and personal testing, these brands consistently perform well:
- Celestron Omni 2X Barlow: Excellent value, good optical quality (~$30-50)
- Tele Vue Barlows: Premium option with exceptional optical performance (~$100-200)
- Orion Shorty Barlow: Good mid-range option with compact design (~$40-60)
- Svbony 2X Barlow: Budget option with decent performance (~$20-40)
Remember that a good Barlow lens is an investment that will serve you for years. Avoid the cheapest options (<$15) as they often degrade image quality and can be more frustrating than useful.
Frequently Asked Questions
Why can’t I see anything through my Barlow lens?
This usually happens due to focus issues or improper installation. First, ensure the Barlow lens is properly seated and secured. Try using a longer focal length eyepiece (25mm) as shorter eyepieces may not reach focus. Check that your telescope has sufficient inward focus travel. If you still can’t see anything, try removing the diagonal and placing the Barlow directly in the focuser, then add the diagonal after the Barlow.
What is the disadvantage of a Barlow lens?
Barlow lenses have several disadvantages: they reduce image brightness by spreading light over a larger area, they can degrade image quality if low-quality optics are used, they require more precise focusing technique, they may not reach focus in some telescopes with limited focus travel, and higher magnification makes atmospheric turbulence more apparent. However, quality Barlow lenses minimize these issues while providing excellent magnification versatility.
Which eyepiece works best with a Barlow lens?
Start with longer focal length eyepieces (25mm, 20mm) as they’re easier to focus and work better with most telescopes. Quality Plössl eyepieces in the 25mm-10mm range pair excellently with 2x Barlow lenses. Avoid very short focal length eyepieces (<6mm) with Barlows as they often produce uncomfortable eye relief and may not reach focus. The beauty of Barlow lenses is they let you use comfortable, long eye relief eyepieces while achieving high magnification.
How does the Barlow lens work?
A Barlow lens contains a negative lens element that diverges light rays, effectively extending your telescope’s focal length. By increasing the focal length without changing the eyepiece, the magnification increases proportionally. A 2x Barlow doubles your telescope’s effective focal length, turning a 1000mm telescope into 2000mm, while a 3x Barlow triples it. This simple optical trick lets you achieve higher magnifications while maintaining the comfortable eye relief of your original eyepieces.
When should I use a Barlow lens?
Use Barlow lenses for bright, high-detail targets that benefit from additional magnification: the Moon and its craters, planets like Jupiter and Saturn, double stars that need separation, and bright planetary nebulae. Avoid using Barlows for faint deep sky objects, during poor seeing conditions when atmospheric turbulence blurs details, or when you need wide fields of view for large objects. The key is matching magnification to both your target and current observing conditions.
Can I use a Barlow lens for astrophotography?
Yes, Barlow lenses can be used for planetary and lunar astrophotography to increase image scale and capture more detail. However, quality becomes critical – use premium Barlows like Tele Vue for imaging. Barlows work best with bright targets (planets, Moon) and require excellent tracking and focus. For deep sky imaging, Barlows are generally not recommended as they make faint objects even dimmer. Consider specialized imaging Barlows or Powermates designed specifically for astrophotography applications.
Final Recommendations
Mastering a Barlow lens opens up new observing possibilities and provides excellent value for your astronomy dollar. After working with these accessories for years, I recommend starting with a quality 2x Barlow lens from a reputable brand like Celestron or Orion.
The best Barlow lens for beginners is the Celestron Omni 2X Barlow – it offers excellent optical quality at a reasonable price point and works well with most telescope types. As you gain experience, you might consider premium options from Tele Vue for maximum performance.
Remember that Barlow lenses are tools that work best when used appropriately. Don’t be discouraged if you encounter focus issues or less-than-perfect images initially – practice makes perfect, and the techniques in this guide will help you overcome common problems.
For more astronomy equipment guidance, check out our comprehensive best barlow lenses guide or explore our astronomy buying guides for telescope recommendations that work well with Barlow lenses.