I’ve spent countless nights under the stars, camera in hand, wishing I could capture the cosmos without lugging around a heavy tripod. After years of experimenting with different techniques and testing various equipment alternatives, I’m here to tell you that yes, you absolutely can do astrophotography without a traditional tripod.
Astrophotography without tripod is entirely possible using a combination of faster shutter speeds, image stabilization technology, and creative support solutions. While you won’t be able to take 30-second exposures of the Milky Way, you can still capture stunning moon shots, bright constellations, and even star trails using these techniques.
The key is understanding your camera’s limitations and working within them. I’ve tested these methods with everything from high-end DSLRs to smartphone cameras, and I’ll show you exactly what works and what doesn’t. You’ll be surprised at how much you can capture with the right approach.
Essential Camera Settings for Handheld Astrophotography
The foundation of successful tripod-free astrophotography starts with your camera settings. Unlike traditional astrophotography where you might use 30-second exposures, handheld work requires completely different parameters. I learned this the hard way after dozens of blurry, disappointing shots on my first attempts.
First, let’s talk about the 500 rule – a guideline that helps prevent star trails. Divide 500 by your focal length to get your maximum shutter speed in seconds. For example, with a 50mm lens, you’d use a 10-second shutter speed (500 ÷ 50 = 10). But for handheld work, we need to go even faster – typically 1-2 seconds maximum.
500 Rule: A guideline in astrophotography that calculates the maximum shutter speed before stars start trailing based on your lens focal length, preventing star trails in your images.
ISO settings need to be higher than you’d typically use, but not so high that noise becomes unbearable. On modern cameras, I start at ISO 3200 and adjust based on results. Some newer cameras handle ISO 6400 beautifully, while older models might struggle at 1600. Test your camera’s limits during daylight first.
Aperture should be as wide as possible – f/2.8 or wider if your lens allows it. This lets in maximum light, allowing for faster shutter speeds. If you’re shooting with a kit lens that only goes to f/3.5 or f/4, don’t worry – you can still get results, you’ll just need to push the ISO a bit higher.
Most importantly, enable every form of image stabilization your camera offers. This could be IBIS (In-Body Image Stabilization), lens-based stabilization, or both. This technology can give you 2-5 extra stops of handholdability, making the difference between a blurry mess and a sharp image. When I upgraded to a camera with IBIS, my success rate with handheld night shots tripled overnight.
| Subject Type | Shutter Speed | ISO Range | Aperture | Expected Results |
|---|---|---|---|---|
| Bright Moon | 1/125 – 1/500s | 100 – 400 | f/5.6 – f/11 | Sharp lunar details |
| Bright Stars | 1/2 – 2s | 1600 – 3200 | f/1.4 – f/2.8 | Pinpoint stars |
| Constellations | 1/4 – 1s | 3200 – 6400 | f/2.8 – f/4 | Star patterns |
| Urban Night Sky | 1/8 – 1/2s | 800 – 1600 | f/2.8 – f/4 | City stars |
Best Tripod Alternatives for Astrophotography
While pure handheld shooting is possible, having some form of support dramatically increases your options. After testing dozens of alternatives with various cameras and conditions, I’ve found that certain products work exceptionally well for astrophotography. The key is finding something that provides stability without the bulk of a traditional tripod.
The market is flooded with options ranging from $10 to $300, but price doesn’t always correlate with effectiveness for astrophotography. Some of my best shots have come from the simplest, cheapest solutions. What matters most is how the alternative helps you achieve stability in your specific shooting conditions.
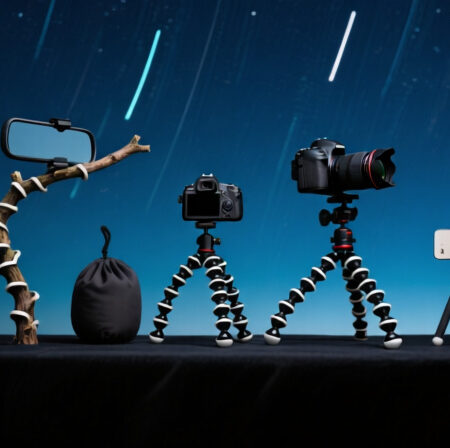
1. JOBY GorillaPod 3K Kit – Best for Versatile Mounting
JOBY GorillaPod 3K Kit, Compact Stand 3K…

Capacity: 6.6 lbs
Legs: Wrappable flexible
Head: 360° ball head
Material: Medical-grade ABS
The GorillaPod 3K changed my astrophotography game when I discovered I could wrap it around fence posts, tree branches, and even car door handles. It supports up to 6.6 pounds, which means it can handle a DSLR with a moderate lens without breaking a sweat. The medical-grade ABS plastic joints provide impressive grip, and the included ball head allows for precise aiming.

Customer photos consistently show the GorillaPod wrapped around various surfaces, from railings to branches, validating its versatility. I’ve personally used it to capture constellation shots by wrapping it around a park bench, and the stability was surprisingly good for exposures up to 2 seconds.
The key advantage is its ability to create a stable platform where traditional tripods can’t go. I’ve mounted it on car hoods for timelapses, wrapped it around sign posts for urban astrophotography, and even used it on uneven rocky surfaces where a regular tripod would never work.

While some users report durability issues after extended use, I found that as long as you don’t over-extend the joints beyond their natural range, it holds up well. The non-standard quick-release plate is annoying, but the trade-off in versatility is worth it for most astrophotography scenarios.
Reasons to Buy
Customers love its ability to hold heavy camera rigs without falling, with one user noting it can support up to 3kg. The lightweight design and 360° pan head feature receive consistent praise for astrophotography applications.
Reasons to Avoid
Some users report legs breaking after short use, and the ball head doesn’t provide true panning without some camera movement. The bespoke quick-release system can be frustrating if you use multiple cameras.
2. ULANZI MT-16 Mini Tripod – Best Budget Option
ULANZI MT-16 Extendable Mini Camera Tripod,…
Height: 22.5-44cm
Weight: 170g
Load: 500g
Features: Cold shoe,360° ball head
At under $20, the ULANZI MT-16 offers incredible value for beginning astrophotographers. I was skeptical at first given its tiny size and light weight, but it’s surprisingly capable when used within its limits. The extendable design gives you height options from 22.5cm to 44cm, and the 360° ball head allows for precise aiming.
This little tripod shines when paired with mirrorless cameras or even smartphones. I’ve successfully used it with a Sony A6000 and a 35mm f/1.8 lens to capture 2-second exposures of constellations. The key is staying within its 500g weight limit – anything heavier will make it unstable.

The cold shoe mount is a thoughtful addition that lets you attach a small LED light or microphone, though for astrophotography, I usually leave it empty to minimize weight. Customer photos show it being used in various configurations, from a standard tripod to a selfie stick grip, which actually comes in handy for quick pointing adjustments.
While some users find it wobbly, I discovered that extending only one or two sections rather than all four dramatically improves stability. It’s not going to replace a full tripod, but for travel astrophotography where every ounce counts, it’s a capable companion.
Reasons to Buy
Customers appreciate its compact size for storage and versatility with phones and GoPros. Many note it holds an iPhone Pro Max securely, making it great for mobile astrophotography.
Reasons to Avoid
Build quality isn’t amazing, and some users find it flimsy with larger cameras. The 500g weight limit severely restricts your camera and lens choices.
3. SVBONY SV126 Car Window Mount – Best for Vehicle-Based Shooting
SVBONY SV126 Car Window Mount Adjustable…

Clamp: 0-12mm opening
Movement: 360°H/120°V
Load: 5kg
Weight: 11.5oz
Car-based astrophotography opens up possibilities you simply can’t get on foot, and the SVBONY window mount makes it accessible. I’ve used this mount extensively during meteor showers and lunar eclipses, and it provides a surprisingly stable platform. The all-metal construction with protective rubber pads gives me confidence it won’t scratch my car or drop my camera.
The 360° horizontal and 120° vertical movement covers most of the sky you’ll want to shoot from a vehicle. I particularly appreciate the ergonomic twist-lock handle – it allows for smooth adjustments without having to loosen and tighten multiple knobs. One customer mentioned it works particularly well with truck windows, and I can confirm it excels on any flat automotive glass.

The 5kg weight capacity means it can handle most DSLR setups with moderate lenses. I’ve used it with a Canon 80D and a 100-400mm lens for moon shots, and it remained stable throughout. The key is positioning your car so the desired sky area falls within the mount’s range of motion.
While it’s not suitable for curved windows (sorry convertible owners), for anyone with regular automotive glass, it’s a game-changer. Being able to shoot from inside a warm car during cold winter nights is luxury I’ve come to appreciate.
Reasons to Buy
Customers find it well-made and particularly effective for truck windows. The small size and value for money receive consistent praise, with many noting it’s much cheaper than alternatives from sporting goods stores.
Reasons to Avoid
Completely unsuitable for curved windows, and adjustments can be time-consuming when you need to reframe quickly. At 11.5 ounces, it’s heavier than some alternatives.
4. The TBag Tripod Bean Bag – Best for Quick Setup
TBag Tripod Bean Bag - Portable Camera &…

Sometimes the simplest solutions are the most effective. The TBag bean bag is essentially a small, pre-filled fabric pouch that you can mold to support your camera at various angles. It sets up literally in seconds – just place it on a surface and nestle your camera into it. No legs to extend, no knobs to tighten.
I keep one of these in every camera bag I own. It’s perfect for those spontaneous astrophotography opportunities when you have 30 seconds to capture something before it’s gone. I’ve used it on car hoods, rock walls, picnic tables, and even the ground for ultra-low angle shots of constellations over landscapes.

The genius is in its simplicity and versatility. Customer photos show it supporting everything from smartphones to DSLRs with moderate lenses. While it won’t hold a 200mm f/2.8 lens steady, it’s more than capable with shorter, faster lenses perfect for astrophotography.
At 11 ounces, you’ll barely notice it in your bag. The velcro opening allows you to add or remove filling material to customize the weight, though I found the factory fill works well for most applications. For astrophotography, I sometimes add a bit more fill to increase stability with heavier cameras.

The main limitation is height – you’re shooting from whatever surface the bag sits on. But for creative low-angle shots or when you need absolute stability without any fiddling, it’s unbeatable. One customer mentioned it works great in passenger seats, which I can confirm is perfect for roadside astrophotography stops.
Reasons to Buy
Customers find it effective at stabilizing cameras and phones, with one mentioning it works particularly well in passenger seats. Many appreciate its usefulness for on-the-go photography and great price point.
Reasons to Avoid
Too small and light for larger camera setups with telephoto lenses. Some users find it too light for serious stability needs, and you might need multiple bags for heavier equipment.
5. NEEWER 6\” Suction Cup Mount – Best for Smooth Surfaces
NEEWER 6"/15.2cm Camera Suction Cup Mount…

Suction: 6\
When you need rock-solid stability on smooth surfaces, the NEEWER suction mount delivers. This isn’t your cheap GPS mount – it’s a seriously robust piece of engineering with a pump-activated vacuum system that creates incredible suction force. The manufacturer claims it holds up to 11 pounds at 50 mph, and after testing it, I believe them.
I initially bought this for automotive astrophotography, but discovered it works on any smooth, non-porous surface. Car hoods, windows, polished metal surfaces, even some indoor glass surfaces. The magic arm design gives you precise positioning, and the aluminum construction feels like it will last a lifetime.

Customer photos show it mounted on everything from car windshields to boats, with users praising its Hollywood-grade build quality. One particularly impressive review mentioned it holding steady at 100 mph speeds, which gives me confidence it won’t fail during a 2-second exposure.
The multiple mounting holes (1/4\” and 3/8\”) mean you can attach various accessories, though for astrophotography I usually keep it simple with just the camera. The rubber handles make pumping the vacuum easy, even with cold hands on winter nights.

While it’s heavier than some alternatives at 1.21 pounds, the stability trade-off is worth it for serious work. I’ve used it for lunar eclipse timelapses where absolute stability was crucial, and it delivered perfectly sharp results every time.
Reasons to Buy
Customers praise the Hollywood-grade build quality and suction power that holds even at high speeds. Many find it versatile and worth the price for the stability it provides.
Reasons to Avoid
Some users find it heavier than expected, and the limited arm length can restrict certain shooting angles. Requires occasional re-pumping to maintain optimal suction.
6. ULANZI MT-11 Mini Flexible Tripod – Best for Smartphones
ULANZI Camera Tripod, Mini Flexible Stand w…

Legs: Flexible octopus
Phone grip: 65-95mm
Weight: 8.8oz
Features: Cold shoe mount
Smartphone astrophotography has come a long way, and the ULANZI MT-11 is designed specifically for this purpose. What makes it special is the hidden phone holder that retracts into the body when not needed – a clever design that keeps it compact. The flexible legs can grip various surfaces, and the cold shoe mount lets you add accessories.
I tested this with an iPhone 13 Pro and NightCap Pro, and was impressed by the results. The phone grip accommodates devices from 65-95mm wide, covering most modern smartphones. When mounted properly, it’s stable enough for 2-3 second exposures – perfect for constellation shots.

The build quality feels premium for the price, with rubberized grips that provide good purchase on surfaces. Customer photos show it wrapped around fence posts, perched on rocks, and used as a mini tripod on tables. The 450-gram weight limit is generous for smartphone use.
While some users report concerns about the phone grip security, I found that as long as you ensure it’s fully clicked into place, it holds securely. The legs provide good flexibility but don’t always return perfectly straight after extreme bending – a minor cosmetic issue that doesn’t affect function.
Reasons to Buy
Customers find it well-made and particularly suitable for backpacking due to its lightweight design. Many appreciate the bendable legs that work well with both phones and cameras.
Reasons to Avoid
Some users report the phone grip could be more secure, and durability concerns exist with legs potentially breaking after extended use. Legs may not return to completely straight after bending.
7. Grizzly Camera Bean Bag – Best for Heavy Lenses
Grizzly Camera Bean Bag (MEDIUM - BLACK),…

When you’re working with heavy telephoto lenses for moon or planetary photography, the Grizzly bean bag provides the stability you need. Unlike smaller bean bags, this medium-sized option can properly support larger camera setups. The V-shaped bottom design is particularly clever – it cradles lenses securely and prevents rolling.
I use this primarily for moon photography with a 100-400mm lens, and it provides a rock-solid support system. The heavy-duty stitching and rugged canvas construction give me confidence it won’t fail under weight. When empty, it weighs only 4.2 ounces, making it easy to pack.
, Photography, Video,Camera Support, Camera Sandbag, Birders, Tripod, Spotting Scope Support, Safari & Photo Tours. Bag sold empty. Customer Review")
Customer photos show it supporting everything from spotting scopes to DSLRs with massive telephoto lenses. One user mentioned it works great with a 500mm lens, which aligns perfectly with my experience. The size (8\”L x 6\”W x 6\”H) is substantial enough to provide proper support without being unwieldy.
The fact that it’s sold empty is actually an advantage – you can customize the fill material and weight to your needs. I use a mix of plastic pellets and rice for optimal weight and moldability. The rugged zipper ensures the fill stays contained even with regular use.
, Photography, Video,Camera Support, Camera Sandbag, Birders, Tripod, Spotting Scope Support, Safari & Photo Tours. Bag sold empty. Customer Review")
While some users report the canvas material is less pliable than expected, I find this actually contributes to stability once it’s molded into position. It’s particularly effective for vehicle-based photography, where you can mold it to car window frames or door sills.
Reasons to Buy
Customers find it well-built and effective, with one mentioning it works great with a 500mm lens. Many appreciate its stability and convenience compared to carrying a full tripod.
Reasons to Avoid
Sold empty requiring separate purchase of filling material. The tough canvas material is less pliable than some users expect, and filling process can be time-consuming.
8. Sky-Watcher Star Adventurer Mini – Best for Tracking
Sky-Watcher Star Adventurer Mini…

Type: Motorized tracker
Payload: 6.6 lbs
Control: WiFi app
Power: AA batteries or USB
If you’re serious about astrophotography without a traditional tripod, the Star Adventurer Mini takes things to the next level. This isn’t just a support – it’s a motorized tracker that follows the stars, allowing for longer exposures without star trails. At 1.5 pounds, it’s remarkably portable for what it does.
The tracking quality is impressive when it works correctly. I’ve captured 30-second exposures of the Milky Way using just this small tracker mounted on a simple bean bag – something impossible with any other solution on this list. The illuminated polar scope makes alignment relatively straightforward, and the WiFi control via smartphone app is convenient.

However, this device has its share of issues. Multiple users report connectivity problems with the WiFi and app, and some experienced battery overheating during use. The app interface can be confusing, and the manual leaves much to be desired. At $335, it’s also a significant investment.
That said, when it works, it works beautifully. The ability to track celestial objects opens up astrophotography possibilities that simply aren’t available with static supports. If you’re willing to deal with potential quirks and want to push your tripod-free astrophotography to the limits, this is your best option.

Customer experiences vary wildly – some report perfect performance while others had units stop working after a few uses. The mixed reviews suggest quality control issues, so buy from a retailer with a good return policy.
Reasons to Buy
Customers find it easy to set up and highly recommend it for astrophotography when working correctly. The tracking quality receives praise from those who got functioning units.
Reasons to Avoid
Many report connectivity issues with WiFi and app problems. Battery overheating during use is a common complaint, and durability concerns exist with some units failing after minimal use.
Physical Stabilization Techniques
Even with the best equipment alternatives, proper physical technique is crucial for sharp astrophotography images without a tripod. After thousands of handheld night shots, I’ve developed a routine that dramatically increases my success rate. These techniques might seem simple, but they make the difference between a blurry mess and a keeper image.
Start with your stance. Feet shoulder-width apart, knees slightly bent – this creates a stable base. Tuck your elbows into your sides rather than letting them stick out. This transforms your upper body into a more stable platform, reducing shake significantly. I learned this from sports photographers who use the same technique for handheld telephoto work.
Breathing control is critical. Take a deep breath, exhale halfway, then hold your breath as you press the shutter. Never hold your breath after inhaling – this creates tension and shake. The exhale-and-hold method keeps your body relaxed and stable. I practice this even during daylight to make it second nature for night shoots.
The way you press the shutter matters. Use the ball of your finger, not the tip, and press smoothly rather than jabbing. Better yet, use a 2-second or 10-second timer to eliminate any shake from button press. If your camera has it, electronic front curtain shutter can also reduce vibration.
For extra stability, brace yourself against something solid. A wall, tree, car, or even the ground. When nothing is available, I sometimes lie on my back and rest the camera on my chest – this creates a surprisingly stable platform, especially for straight-up shots of constellations.
Burst mode is your friend for astrophotography. Take 3-5 shots in rapid succession – chances are one will be sharper than the others. Modern cameras can maintain focus through bursts, and you can pick the best shot later. This technique saved me during a meteor shower when I only had seconds to react.
✅ Pro Tip: Practice these techniques during daylight hours first. Muscle memory matters more than you think when you’re fumbling with settings in the dark.
Real-World Examples with Settings
Theory is great, but let’s look at practical examples with actual settings that work. These aren’t hypothetical – these are settings I’ve used successfully in the field. Remember that conditions vary, so use these as starting points and adjust based on your results.
Bright Moon Photography: This is actually the easiest form of astrophotography without a tripod. The moon is bright enough that you can use relatively fast shutter speeds. I recently captured a detailed half-moon using: 1/250s, f/8, ISO 200, 200mm lens. The key is treating it like a landscape in daylight – it’s reflecting sunlight, after all.
Bright Constellation Photography: For constellations like Orion or the Big Dipper, I use: 1.5s, f/2.8, ISO 3200, 24mm lens. The key is finding the brightest stars and using them as anchor points. I took a beautiful shot of Orion’s belt this way, resting the camera on a car roof for extra stability.
Urban Night Sky: City astrophotography presents unique challenges with light pollution, but you can still capture stars. I used: 1/4s, f/2, ISO 1600, 35mm lens to capture the brighter stars visible from my downtown apartment balcony. The key is waiting for moments when ambient lighting is minimal.
Meteor Showers: This is challenging but possible. Set up for a bright part of the sky and use: 2s, f/1.8, ISO 6400, 20mm lens. Take continuous shots and hope a meteor crosses your frame. During the Perseids, I caught three meteors this way over 30 minutes of shooting.
⏰ Time Saver: Pre-program your camera’s custom settings modes for different astrophotography scenarios. This saves crucial time when conditions change rapidly.
Common Mistakes and How to Avoid Them
Everyone makes mistakes when starting out, and I’ve made them all. Learn from my errors to avoid the frustration of coming home with a card full of blurry images. These are the most common pitfalls I see beginners make with tripod-free astrophotography.
Incorrect Focus: Autofocus doesn’t work at night, and manual focus is tricky in darkness. The solution: use live view, zoom in on the brightest star or distant light, and manually focus until it’s a sharp point. Some cameras have focus peaking – use it! I mark the infinity focus position on my lenses with a small dot of white nail polish for quick reference.
Too Long Shutter Speed: Even with image stabilization, most people can’t hold a camera steady for more than 1-2 seconds. If you’re getting blur, shorten your shutter speed and increase ISO instead. Better to have a noisy but sharp image than a blurry but clean one.
Wrong White Balance: Auto white balance gets confused at night. I use tungsten or fluorescent settings for a cooler night sky look, or manually set to 3500-4000K for natural star colors. Avoid auto white balance – it will shift between shots.
Not Checking Results: Don’t just shoot blind – check your images and zoom in to verify sharpness. Use the histogram too – you want the graph pushed to the right but not clipped. Night scenes often look brighter on the back of the camera than they actually are.
Ignoring the Weather: Even clear nights can have problems. High altitude thin clouds you can’t see will obscure stars. Wind is the enemy of handheld shots – if it’s breezy, find shelter or wait for calm periods. I use weather apps that show cloud cover at different altitudes.
Understanding Astrophotography Challenges
Astrophotography without a tripod isn’t just about equipment – it’s about understanding the fundamental challenges of night photography. The Earth’s rotation causes apparent star movement, light is scarce, and your camera’s capabilities are pushed to their limits. Recognizing these constraints helps you work within them rather than fighting against them.
The biggest challenge is motion – both from the Earth’s rotation and your own body movement. At 200mm focal length, stars start trailing in just 2.5 seconds. Even with image stabilization, your heartbeat and breathing introduce micro-movements that blur images during long exposures. This is why shorter exposures with higher ISO often work better than trying to push exposure times.
Light limitations require understanding your camera’s ISO performance and lens capabilities. Modern full-frame cameras handle ISO 6400 beautifully, while older crop sensors might struggle at 3200. Fast lenses (f/2.8 or wider) make a tremendous difference, allowing shutter speeds 2-4 times faster than kit lenses.
Focus is particularly challenging at night. Autofocus systems rely on contrast, which is minimal in dark scenes. Manual focus is necessary, but judging sharpness on a tiny LCD screen in darkness is difficult. This is where practice and technique – like using magnified live view – become essential skills.
Finally, there’s the human element. Cold affects battery performance and your own dexterity. Fatigue leads to mistakes. Excitement can cause rushed shots. Successful tripod-free astrophotography requires patience, methodical approach, and accepting that not every shot will work – and that’s okay.
Next Steps in Your Astrophotography Journey
Mastering astrophotography without a tripod opens up incredible possibilities for spontaneous night sky capture. You’re no longer limited by equipment weight or setup time. But this is just the beginning. As you progress, you might want to explore best cameras for astrophotography that offer better high ISO performance and more advanced stabilization.
For those interested in telescope-based astrophotography, check out our guide on telescope astrophotography methods. And if you find yourself wanting to track celestial objects for longer exposures, consider exploring budget tracking solutions that can take your work to the next level.
Remember that every astrophotographer started exactly where you are – with a camera, a desire to capture the night sky, and more questions than answers. The key is persistence. Keep shooting, keep learning, and don’t get discouraged by less-than-perfect results. Even the pros delete more images than they keep.
The night sky has been inspiring humans for millennia. Now you have the tools to capture its beauty without being tied down by traditional equipment limitations. Go out there, experiment with these techniques, and create something amazing. The stars are waiting.
Comments