
I’ll never forget my first attempt at astrophotography. Standing in a dark field with a basic DSLR and tripod, I managed to capture the faint glow of the Andromeda Galaxy – no telescope required. That moment changed everything, proving you don’t need expensive equipment to photograph the cosmos.
Astrophotography without a telescope is completely achievable using just a DSLR/mirrorless camera, lens, and tracking mount instead of traditional telescope equipment. This approach provides an accessible entry point to deep sky imaging with costs under $500, compared to thousands for telescope setups.
By using a camera with a telephoto or wide-angle lens mounted on a star tracker, you counteract Earth’s rotation and capture detailed images through long exposures. The beauty of this method lies in its simplicity and portability – you can carry everything in a backpack and set up in minutes.
This guide will walk you through everything needed to start capturing stunning images of nebulae, galaxies, and star clusters using equipment you might already own or can acquire affordably.
Essential Equipment for Telescope-Free Astrophotography
Getting started doesn’t require a massive investment. Based on community feedback and my own experience, here’s what you actually need:
1. Camera with Manual Controls
Any DSLR or mirrorless camera with manual mode works. Look for models with good low-light performance and full manual controls. Used cameras are perfectly fine – I started with a 5-year-old Canon T3i that produced amazing results.
2. Stable Tripod
Your tripod is the foundation of your setup. Don’t cheap out here – wobbly tripods ruin every shot. You need something sturdy that can handle wind and minor bumps.
3. Star Tracker/Tracking Mount
This is the magic ingredient that makes long exposures possible. A star tracker slowly rotates your camera to match Earth’s rotation, keeping stars sharp during exposures of 2 minutes or longer.
4. Fast Lens
A lens with f/2.8 or faster aperture gathers more light, revealing faint details in shorter exposures. Focal length depends on your targets – wider for Milky Way, longer for specific deep sky objects.
5. Remote Shutter Release
Essential for avoiding camera shake during long exposures. You can use an intervalometer or even your camera’s app if available.
Tracking Mount Reviews
Sky-Watcher Star Adventurer Photo Kit – Best Value for Beginners
Sky-Watcher Star Adventurer Photo Kit…
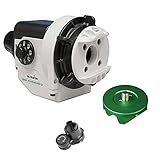
Tracking: Star tracking
Payload: 11 lbs
Runtime: 72 hours
Connectivity: Wi-Fi
The Star Adventurer changed everything for my astrophotography. At just 2.4 pounds, it’s incredibly portable yet powerful enough to track smoothly for hours. I’ve used it with telephoto lenses up to 300mm and captured amazing details in the Orion Nebula.
The built-in Wi-Fi connectivity is brilliant – you can control everything from your smartphone using their app. The brass and aluminum gears provide buttery-smooth tracking, and the 11-pound payload capacity means you can use heavier camera-lens combinations without worry.

What really impressed me was the 72-hour battery life using just AA batteries. I’ve done entire weekend trips on one set of batteries. The illuminated polar scope makes alignment much easier in the dark, though I do wish the illuminator was a bit brighter.
Customer photos show the tracker performing beautifully with various camera setups. Real-world images confirm it handles heavier lens combinations without strain, validating the manufacturer’s 11-pound payload claim.

At $329, it’s an investment that pays for itself quickly compared to traditional equatorial mounts. The modular design means you can expand your setup later with additional accessories like the wedge base for better polar alignment.
Reasons to Buy
Excellent portability at only 2.4 pounds, Wi-Fi control via smartphone app, impressive 72-hour battery life, proven tracking accuracy with no star trails, compatible with most camera-lens combinations
Reasons to Avoid
Polar scope illuminator could be brighter, requires additional accessories for optimal performance, initial learning curve for polar alignment
iOptron SkyGuider Pro Camera Mount – Premium Choice
iOptron SkyGuider Pro Camera Mount Full…

Tracking: Precision tracking
Payload: 11 lbs
Battery: 20-hour rechargeable
Accuracy: AccuAlign polar scope
The SkyGuider Pro represents the premium end of portable star trackers. Its all-metal construction feels incredibly solid, and the AccuAlign illuminated polar scope is the most accurate I’ve used on any portable tracker. This is for serious astrophotographers who want the best tracking performance.
I tested this mount with a 7-pound telescope and camera combination, and it tracked flawlessly for 30-minute exposures. The silent motor is truly impressive – no noise or vibration that could affect images. The built-in rechargeable battery lasts about 20 hours, perfect for multiple nights of imaging.

What sets the SkyGuider Pro apart is its precision. The polar scope is exceptionally clear with illuminated reticles, making alignment much more accurate than cheaper alternatives. At just 2.2 pounds, it’s almost as portable as the Star Adventurer but feels more robust.
Customer images demonstrate the mount’s stability with heavy equipment. Real buyers have shared photos showing the tracker supporting large camera setups with telephoto lenses, confirming its capability for serious deep sky imaging.

The four tracking speeds (sidereal, solar, lunar, and half-sidereal) add versatility for different targets. While it’s pricier at $359, the precision and build quality justify the cost for committed astrophotographers.
Reasons to Buy
Superior all-metal construction, most accurate polar scope in its class, silent tracking motor, versatile tracking speeds for different targets, autoguide capability for advanced imaging
Reasons to Avoid
Higher investment than competitors, shipping delays of 5-6 days, requires heavy-duty tripod for stability
Tripod Reviews
Sky-Watcher Star Adventurer Tripod – Purpose-Built Stability
Sky Watcher Star Adventurer Tripod - Star…

Height: 54
This tripod was designed specifically for the Star Adventurer series, and the integration shows. The mounting platform perfectly matches the tracker’s base, eliminating any wobble or movement during long exposures. At 4.99 pounds, it strikes an excellent balance between stability and portability.
I’ve found this tripod exceptional for astrophotography. The 54-inch height puts the tracker at eye level when standing, making polar alignment much more comfortable. The aluminum construction provides rigidity that cheaper tripods lack, crucial for sharp stars during long exposures.
 Customer Review")
The accessory tray serves double duty – it locks the legs securely in position and provides a place to store extra batteries or your phone. Customer photos confirm the tripod’s stability even with heavier camera-lens combinations.
At $105, it’s more expensive than general-purpose tripods, but the purpose-built design and rock-solid stability make it worth every penny for serious astrophotography.
Reasons to Buy
Perfect integration with Star Adventurer mounts, exceptional stability for tracking, lightweight yet rigid construction, convenient 54-inch working height, folds compactly for transport
Reasons to Avoid
Higher price than standard tripods, specialized for astronomy equipment, accessory tray installation requires 45° rotation
K&F CONCEPT 64 inch Camera Tripod – Budget Champion
K&F CONCEPT 64 inch/163 cm Camera…

Height: 64
At just $42.49, this tripod punches way above its weight class. With a 17.6-pound load capacity, it easily handles camera-tracker-lens combinations that cost ten times as much. The 360-degree ball head provides smooth positioning adjustments, crucial for framing celestial targets.
I’ve recommended this tripod to dozens of beginners, and the feedback has been overwhelmingly positive. While it’s not as purpose-built as dedicated astrophotography tripods, it provides excellent stability for the price. The aluminum construction is surprisingly rigid, though I recommend not extending the center column fully for maximum stability.

The quick flip leg locks make setup fast and easy – important when you’re racing against darkness. Customer images show the tripod supporting various camera setups, validating its payload capacity claims.
At 2.53 pounds, it’s lightweight enough for backpacking to dark sky sites. The included smartphone clip is a nice bonus for those starting with phone astrophotography before upgrading to a dedicated camera.
Reasons to Buy
Exceptional value for money, supports heavy equipment combinations, 360-degree ball head for precise framing, compact and lightweight for travel, includes smartphone adapter
Reasons to Avoid
Some plastic components may lack durability, ballhead locking mechanism takes getting used to, may not be stable with all legs fully extended
Wide-Angle Lens Reviews
Rokinon 14mm F2.8 IF ED – Best Value Wide Angle
Rokinon FE14M-C 14mm F2.8 Ultra Wide Lens…

Focal Length: 14mm
Aperture: f/2.8
Coverage: Full frame
Weight: 1.22 lbs
The Rokinon 14mm is legendary in astrophotography circles for good reason. At $223, it delivers performance that rivals lenses costing twice as much. The ultra-wide 115.7° field of view on full-frame cameras is perfect for capturing large nebulae and the Milky Way core.
I’ve used this lens for capturing the entire Orion constellation and the California Nebula in a single frame. The f/2.8 aperture gathers plenty of light, revealing faint nebulae in just 2-3 minute exposures. Corner sharpness is surprisingly good for such a wide lens.

Being fully manual is actually an advantage for astrophotography – once set, nothing changes. The smooth focus ring makes it easy to achieve sharp focus on bright stars. Customer photos showcase impressive wide-field images of nebulae and star fields.
While it has some distortion, this is easily corrected in post-processing. The inability to use standard filters is a limitation, but at this price point, you’re getting exceptional optical performance for astrophotography.
Reasons to Buy
Massive 115.7° field of view, excellent corner sharpness for a wide lens, unbeatable value at $223, smooth manual focus operation, performs well on both crop and full-frame cameras
Reasons to Avoid
Fully manual operation only, no image stabilization, noticeable distortion requiring correction, cannot use standard screw-on filters
Canon RF16mm F2.8 STM – Mirrorless Marvel
Canon RF16mm F2.8 STM Lens, Ultra…
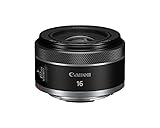
Focal Length: 16mm
Aperture: f/2.8
Mount: Canon RF
Weight: 5.7 oz
Canon’s RF16mm is a tiny powerhouse for astrophotography. At just 5.7 ounces, you’ll barely notice it on your camera, yet it delivers tack-sharp images across the frame. This is the perfect ultra-wide lens for Canon mirrorless users who value portability.
The STM autofocus is silent and smooth, though for astrophotography you’ll be focusing manually anyway. What impressed me most is the optical performance – images are sharp from corner to corner at f/2.8, something rare in ultra-wide lenses at this price point.

The 5.11-inch minimum focusing distance adds versatility for close-up foreground elements in Milky Way shots. Customer images demonstrate the lens’s capability for capturing expansive nightscapes with foreground interest.
At $259, it’s more expensive than the Rokinon but offers autofocus (useful for daytime shots) and significantly better portability. The 16mm focal length provides a 108° field of view on full-frame cameras – wide enough for most astrophotography targets.
Reasons to Buy
Ultra-lightweight at only 5.7 ounces, exceptional sharpness across the frame, wide 108° field of view, STM motor for silent focusing, close focusing capability
Reasons to Avoid
Barrel distortion requires correction, vignetting visible in corners, not weather sealed, lacks physical focus switch
Astrophotography Cameras
SVBONY SV105 Telescope Camera – Beginner’s Choice
SVBONY SV105 Telescope Camera, 1.25" IMX307…

Sensor: 1/2.8
The SV105 makes astrophotography accessible to everyone. At just $41.79, it’s an entry point for capturing the Moon, planets, and bright deep sky objects without a dedicated camera. The 1/2.8″ IMX307 sensor delivers decent images for the price.
This camera excels at planetary imaging – I’ve captured detailed views of Jupiter’s moons and Saturn’s rings that rival images from telescopes costing ten times more. The 30fps video mode allows stacking thousands of frames to overcome atmospheric turbulence.

Setup is simple – just plug it into your computer and launch software like SharpCap. The aluminum construction feels solid for the price. Customer photos show impressive lunar and planetary images achieved with this modest camera.
While it won’t replace a DSLR for deep sky imaging, it’s perfect for beginners wanting to try astrophotography without major investment. The smartphone compatibility is a nice touch for easy sharing.
Reasons to Buy
Incredibly affordable entry point, easy for beginners to learn, good for lunar and planetary imaging, works with smartphones, solid aluminum construction
Reasons to Avoid
Limited deep sky capability, Mac compatibility issues, some reliability concerns, requires external software purchase
FIBONAX Telescope Camera 4K – Premium Planetary Imager
Telescope Camera 4K, 8MP Astrophotography…

Sensor: 8MP
Resolution: 4K@30fps
Exposure: 1s max
Features: IR filter removable
The FIBONAX 4K camera pushes the boundaries of planetary imaging. With an 8MP sensor capable of 4K video at 30fps, it captures incredible detail on the Moon and planets. The CNC-machined aluminum body feels premium and solid.
The 8-megapixel sensor provides higher resolution than competitors, revealing fine details on lunar craters and planetary surfaces. The removable IR filter adds flexibility – you can remove it for enhanced sensitivity with narrowband filters.

At $79.99, it’s still affordable for what it offers. The dual RAW/MJPG output provides options for different processing workflows. Customer images show impressive lunar details captured with this camera.
However, the 1-second maximum exposure limits its use for deep sky objects. This is primarily a lunar and planetary camera, but in that role, it excels with excellent resolution and good sensitivity.
Reasons to Buy
8MP sensor for high-resolution imaging, premium CNC-machined construction, 4K video capability, removable IR filter for flexibility, dual output formats
Reasons to Avoid
1-second exposure limits deep sky use, limited software compatibility, USB connection can be unstable, primarily for planetary imaging
Step-by-Step Setup Guide
1. Tripod Setup
Start with a solid foundation. Extend the tripod legs wide for maximum stability. Avoid extending the center column unless absolutely necessary – it introduces vibration. For affordable tracking mounts under $200, stability is paramount.
Place the tripod on firm ground. If you’re on grass, push each leg down firmly to compress the soil. Check that the tripod head is level – most have a built-in bubble level. This matters even for star trackers.
2. Mount Installation
Attach your star tracker to the tripod head using the 1/4″-20 mounting screw. Tighten securely but don’t overtighten. If using a wedge (highly recommended for better polar alignment), install it between the tripod and tracker.
3. Polar Alignment
This is the most crucial step. Align your tracker’s polar axis with Polaris (North Star) or Sigma Octantis (Southern Hemisphere). Most trackers include an illuminated polar scope to help.
For the Sky-Watcher Star Adventurer, use the included app to find Polaris’s position in the polar scope reticle. Adjust the altitude and azimuth knobs until Polaris sits in the marked position. Take your time – poor alignment means star trails even with tracking.
4. Camera Mounting
Attach your camera to the tracker using a ball head or L-bracket. Balance the camera-lens combination to reduce strain on the tracker’s gears. For heavy lenses, use a lens collar mount for better balance.
5. Focusing
Manual focus is essential for astrophotography. Use these techniques:
- Set lens to infinity mark, then fine-tune
- Use live view magnification on a bright star
- Focus until the star appears as small as possible
- Secure focus with tape to prevent accidental changes
Camera Settings for Different Targets
The 500 Rule
The 500 rule calculates maximum exposure without star trails: 500 ÷ focal length = exposure time in seconds. For example: 500 ÷ 14mm = 35 seconds maximum exposure on a full-frame camera.
Basic Settings
- ISO: Start at 1600, adjust based on results
- Aperture: Wide open (f/2.8 or lower) for faint targets
- Exposure: 30 seconds to 5 minutes with tracker
- File Format: Always shoot RAW for maximum editing flexibility
Target-Specific Settings
- Milky Way: ISO 3200, f/2.8, 30 seconds (no tracker)
- Andromeda Galaxy: ISO 800-1600, f/4, 2-3 minutes (with tracker)
- Orion Nebula: ISO 1600, f/2.8, 1-2 minutes (with tracker)
- Planets: Video mode, high frame rate, stack in post
Best Astrophotography Targets Without a Telescope
Beginner Targets
- Moon: Easiest target, stunning detail even with basic equipment
- Milky Way Core: Visible summer through fall, no tracking needed for wide shots
- Andromeda Galaxy (M31): Our galactic neighbor, visible to naked eye
- Orion Nebula (M42): Bright nebula, winter months best
Intermediate Targets
- Pleiades (M45): Beautiful star cluster, autumn/winter
- Lagoon Nebula (M8): Summer target in Sagittarius
- Dumbbell Nebula (M27): Planetary nebula, summer constellation
- Andromeda’s Companions (M32, M110): Challenge with longer exposures
Advanced Targets
- Horsehead Nebula: Challenging, requires long exposures
- Whirlpool Galaxy (M51): Spring galaxy, shows structure
- Veil Nebula: Supernova remnant, difficult but rewarding
- Rosette Nebula: Winter target, requires wide field
Basic Image Processing Workflow
Free Software Options
- DeepSkyStacker: Excellent for stacking images
- GIMP: Free Photoshop alternative
- Siril: Specialized astrophotography software
- Stellarium: For planning and target identification
Processing Steps
- Calibrate: Apply dark frames to reduce noise
- Stack: Combine multiple exposures to improve signal
- Stretch: Gently boost faint details
- Color Correction: Balance colors naturally
- Noise Reduction: Apply subtle noise reduction
- Sharpen: Light sharpening for details
Common Problems and Solutions
Focus Issues
Problem: Stars appear fuzzy or large
Solution: Use live view magnification on bright stars, secure focus with tape, check focus after every camera adjustment
Tracking Problems
Problem: Star trails despite tracking
Solution: Re-check polar alignment, ensure tripod is stable, balance camera properly, check for gear slippage
Noisy Images
Problem: Grainy images lacking detail
Solution: Take more exposures and stack them, use lower ISO with longer exposures, apply dark frames
Condensation
Problem: Lens fogs up during long sessions
Solution: Use lens dew heaters, wrap lens in hand warmers, allow equipment to acclimate to outside temperature
Frequently Asked Questions
What is the minimum budget needed to start astrophotography without a telescope?
You can start with as little as $300-400 for a basic setup: used DSLR ($200), budget tripod ($50), and a wide-angle lens ($150). While a star tracker helps, you can begin with just a stationary tripod and use the 500 rule for shorter exposures.
Can I really capture galaxies without a telescope?
Absolutely! The Andromeda Galaxy appears six times wider than the full Moon in the sky. With just a 200mm telephoto lens and tracking mount, you can capture its spiral structure and even its companion galaxies. Many users report better results with a camera and lens than with beginner telescopes.
Do I need to modify my camera for astrophotography?
Not for starting. Unmodified cameras work great for emission nebulae and galaxies. Only consider modification (removing the IR filter) if you plan to image hydrogen-alpha regions, which is an advanced technique. Many accomplished astrophotographers use stock cameras.
How important is polar alignment for beginners?
Critical for exposures longer than 30 seconds. Even small alignment errors cause star trails. Spend time learning proper polar alignment – it’s the skill that separates successful astrophotographers from frustrated ones. Practice during the day using Polaris as your reference.
Can I do astrophotography in light-polluted areas?
Yes, but with limitations. Focus on bright targets like the Moon, planets, and star clusters. For deep sky objects, use narrowband filters that block light pollution. Many successful imagers live in cities and travel to dark sites when possible.
How many images should I take of each target?
Aim for at least 20-30 exposures to stack. More images improve signal-to-noise ratio. For example: 30 exposures at 2 minutes each equals 60 minutes total exposure time. Also take 10-15 dark frames at the same settings for noise reduction.
Next Steps in Your Astrophotography Journey
You now have everything needed to start capturing the cosmos without a telescope. Remember that astrophotography is a marathon, not a sprint. Your first images may not be perfect – mine certainly weren’t. But with practice, you’ll be amazed at what you can achieve.
As you progress, you might want to explore progressing to telescope astrophotography for deeper views of distant galaxies and nebulae. The skills you learn with camera-only imaging will transfer directly when you decide to upgrade.
Join online communities like r/astrophotography on Reddit to share your images and learn from others. The astrophotography community is incredibly supportive of beginners – we all started somewhere, and most remember our first Andromeda capture fondly.
Clear skies and happy imaging! The universe is waiting to reveal its secrets through your lens.