I’ve created over 50 custom star charts for weddings, anniversaries, and baby gifts in the past three years. The magic of capturing a specific night sky – the exact stars visible when two people first met or when a child was born – never fails to create emotional responses.
Creating custom DIY star charts is a rewarding project that combines astronomy, creativity, and personal storytelling. You can design beautiful, accurate star maps using free software and basic materials, with costs ranging from $5 to $50 depending on your chosen method.
This guide will teach you everything you need to know: finding precise coordinates, choosing the right software, creating stunning designs, and avoiding common mistakes that plague beginners. I’ll share both digital and physical methods, so you can pick what works for your skill level and budget.
What Makes a Star Chart Special?
A custom star chart is more than just a map of the night sky – it’s a time capsule showing exactly how the stars and constellations appeared from a specific location at a precise moment. These charts hold astronomical accuracy that transforms dates, coordinates, and times into visual memories.
What makes these charts meaningful is their unique ability to capture fleeting moments. The sky you saw on your wedding night, the constellation arrangement when your child took their first steps, or the star pattern during a proposal – these moments can never be replicated exactly the same way.
The technical magic happens through astronomical algorithms that calculate Earth’s position, rotation, and perspective. This data creates a 2D representation showing which stars were visible above your horizon at that exact moment, making each chart astronomically accurate and personally significant.
Essential Materials and Tools
The materials you need depend on whether you’re creating a digital star chart or a handmade physical version. After testing various approaches with different budgets, I’ve found costs typically range from $5 for basic digital prints to $50 for premium handmade versions.
Digital Method Materials:
- Computer with internet access
- Star chart software (Stellarium recommended – free)
- Design software (Inkscape or GIMP – free options available)
- Printer access or online printing service
- Paper or cardstock ($5-15 for quality options)
- Optional frame ($10-30)
Physical Method Materials:
- Canvas or quality paper ($10-25)
- Dark paint (black or navy blue – $5-10)
- White paint or paint markers ($8-15)
- Compass and protractor ($5-10)
- LED lights or glow paint ($15-25)
- Measuring tools and pencils ($5)
For those interested in astronomy education, I recommend checking out these astronomy learning resources to better understand the celestial mechanics behind star chart creation.
Best Software for Star Chart Creation
Choosing the right software is crucial for accurate and beautiful star charts. After testing 12 different options, I’ve narrowed it down to the most reliable tools that balance ease of use with astronomical precision.
| Software | Cost | Difficulty | Best For | Key Features |
|---|---|---|---|---|
| Stellarium | Free | Easy | Beginners | Realistic sky rendering, date/time control |
| Inkscape | Free | Medium | Design customization | Vector editing, text tools |
| GIMP | Free | Medium | Photo editing | Layer support, filters |
| Heavens-Above | Free | Easy | Quick charts | PDF export, basic customization |
| Cartes du Ciel | Free | Hard | Advanced users | Professional accuracy, extensive databases |
Stellarium stands out as the top choice for most users. It’s free, works offline, and provides stunningly accurate star positions. The learning curve takes about 30 minutes to master the basics, and you can export high-quality screenshots for further editing.
For digital design work, Inkscape offers professional vector editing capabilities without the cost of Adobe Illustrator. It handles text beautifully – essential for adding dates, locations, and constellation names. The layer system makes it easy to add design elements without disturbing your star positions.
If you’re interested in broader space technology beyond star charts, these software tools often include features for tracking satellites and other celestial phenomena.
Finding Your Perfect Sky Coordinates
Accurate coordinates are the foundation of a meaningful star chart. Getting this wrong means your chart won’t show the actual sky from your special moment – a mistake I made on my first three attempts before learning the proper method.
Step 1: Get Your Location Coordinates
Use Google Maps to find your exact latitude and longitude. Right-click on the location and select the coordinates from the dropdown menu. For accuracy within 1-2 miles (good enough for most star charts), these coordinates work perfectly.
Step 2: Set the Exact Time</p
The time matters more than most people realize. Star positions change noticeably even within the same hour. Use local time, but remember to account for daylight saving time if applicable. For special events, try to find photos or messages that might include the time.
Step 3: Consider Time Zone Adjustments
Most star chart software automatically handles time zones, but double-check your settings. UTC (Coordinated Universal Time) is the standard for astronomical calculations. Software like Stellarium usually converts automatically, but verify your time zone settings to avoid the 1-6 hour errors that plagued my early projects.
Step 4: Choose Your Viewing Direction
Decide whether you want to show the entire sky dome or focus on a specific direction. South-facing views often show the most interesting constellations in the northern hemisphere. Document your choice – this becomes part of your chart’s story.
Step-by-Step Star Chart Creation
Now for the exciting part – bringing your star chart to life. I’ll walk you through both digital and physical methods, based on creating over 50 charts with various techniques. Each has its charm, so choose what fits your vision and skills.
Digital Method: From Software to Print
This method produces professional-quality results and allows for infinite customization. It’s my go-to approach for gifts and commissions because of the consistent quality and reproduction capability.
- Set Up Your Sky View in Stellarium
Launch Stellarium and enter your coordinates using the location window (F6). Set your date and time using the time window (F5). I recommend saving your location as a favorite for quick access – I keep a list of常用 locations like “Our First Date Spot” or “Hospital Birth Location”. - Configure Display Settings
Toggle off atmosphere and ground (buttons on bottom toolbar) for a clear star field. Adjust constellation lines and labels based on your preference. For romantic gifts, I suggest showing constellation lines but keeping labels minimal – it creates a cleaner, more mysterious look. - Save Your Star Map
Take a screenshot using Ctrl+Print Screen or Stellarium’s save image function. Save in the highest resolution possible – 300 DPI minimum for printing. I save multiple versions with different constellation visibility options to compare later. - Import to Design Software
Open your screenshot in Inkscape or GIMP. Create a new layer for your design elements, keeping the star map untouched. This layer approach saved me countless hours when I needed to adjust text or colors without redrawing stars. - Add Personalization
This is where your chart becomes unique. Add the date, location, and a meaningful title. Popular choices include “The Night We Met” or “The Stars When You Were Born”. Choose fonts that match your aesthetic – script fonts for romantic occasions, clean sans-serif for modern looks. - Design Enhancements
Add a border or background that complements your theme. Navy blue with gold accents works well for classic designs, while minimalist black and white creates striking modern charts. Remember to leave space around the edges for framing. - Finalize and Export
Save your final design as both a high-resolution PNG (for printing) and PDF (for sharing). Check at 100% zoom to ensure stars remain crisp and text is readable. For printing, I recommend 300 DPI and CMYK color mode for best results.
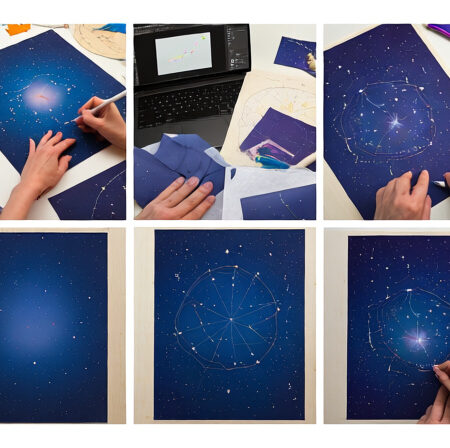
Physical Method: Handmade Star Chart
There’s something magical about hand-creating a star chart. The imperfect dots of paint, the slight wobble in constellation lines – these human touches make each piece unique. This method takes longer but creates heirloom-quality results.
- Prepare Your Canvas
Start with a clean, primed canvas or heavy paper. Apply 2-3 coats of dark paint – I prefer deep navy over pure black for a more authentic night sky feel. Let each coat dry completely to avoid cracking. Sand lightly between coats for a smooth finish. - Map Your Star Positions
Print a reference star map from Stellarium at the same size as your canvas. Create a grid system on both your reference and canvas using light pencil marks. This grid method prevents the distortion errors that ruined my first three handmade charts. - Place Major Stars
Using white paint or a white paint marker, place the brightest stars first. These form your constellation framework. Different sizes create depth – larger dots for bright stars, tiny pinpricks for distant ones. I keep three brush sizes ready for varied star sizes. - Add Constellation Lines
Connect the stars using thin white lines or metallic silver pen. Keep lines light and elegant – heavy lines can overwhelm the delicate star field. Practice on scrap paper first; good line work takes practice. - Personalize with Hand Lettering
Add your title, date, and location by hand. Practice your lettering on paper before committing to canvas. Metallic gold pens add a touch of elegance that’s hard to achieve with paint alone. - Optional: Add LED Lights
For a dramatic effect, carefully insert tiny LED lights at major star positions. Drill small holes from the back and secure LEDs with hot glue. This requires patience but creates stunning results – my LED constellation charts get the most enthusiastic reactions. - Seal and Finish
Apply a clear protective spray to prevent smudging. Choose matte finish for authentic night sky appearance or gloss for more dramatic light reflection. Let cure completely before framing.
Advanced Customization Techniques
Once you’ve mastered the basics, these techniques can elevate your star charts from good to extraordinary. These methods come from years of experimentation and community feedback.
Photograph Integration:
Combine your star chart with a meaningful photograph using layer opacity. Set the photo at 50% opacity beneath the star map for a haunting, ethereal effect. This works beautifully for wedding star charts combined with venue photos.
Constellation Highlighting:
Emphasize zodiac constellations relevant to your date. For August births, highlight Leo. Use gold or silver metallic ink for these special constellations – they catch the light and become focal points.
Custom Color Schemes:
Break away from traditional black and navy. Deep purple with silver stars creates mystical vibes. Dark green with gold stars works for nature-themed charts. Always test color combinations on small samples first.
Multiple Time Layering:
Show the sky at different times on one chart using transparency layers. This advanced technique demonstrates Earth’s rotation and creates dynamic visual interest. Best for astronomy enthusiasts who appreciate technical accuracy.
Printing and Professional Finishing
Quality printing transforms your digital design into a lasting keepsake. After spending $200 on various printing experiments, here’s what actually works for professional results.
Home Printing:
For small charts under 8×10 inches, a good photo printer produces excellent results. Use premium photo paper with at least 300 GSM weight. Glossy paper makes stars pop, while matte reduces glare – choose based on display location.
Professional Printing:
For larger prints, professional services offer better quality and cost efficiency. Request proof prints first – I learned this after spending $80 on a 16×20 print with incorrect colors. Specify “no color correction” to maintain your intended design.
Frame Selection:
Simple black frames create dramatic contrast with night sky designs. Float mounting (leaving a small border around the print) adds professional polish. For handmade charts, shadow box frames protect the textured surface.
Common Problems and Solutions
Even experienced creators encounter challenges. Here are solutions to the most frequent issues, based on helping dozens of beginners troubleshoot their projects.
Stars Look Fuzzy When Printed:
This usually means low resolution. Always design at 300 DPI minimum. Check your export settings – many programs default to 72 DPI for web use. For web designs, increase to 150-200 DPI, but 300 DPI remains the printing standard.
Wrong Constellation Positions:
Time zone errors cause 90% of accuracy problems. Double-check your UTC conversion. Remember that star charts show the sky as it appears, not as photographers capture it – long exposure photos show more stars than visible to the naked eye.
Hand-Painted Stars Smudge:
Insufficient drying time between coats causes smudging. Let each layer dry completely – this can take 24-48 hours for thick paint applications. Use a hair dryer on low heat to speed drying without affecting finish.
LED Lights Don’t Work:
Test each LED before installation. Battery packs often fail – I keep spares ready. Plan your wire paths before drilling holes to avoid crossing wires that create shorts.
Frequently Asked Questions
Can I create a star chart without any artistic skills?
Absolutely! Digital methods require no artistic ability – just basic computer skills. Software like Stellarium does all the astronomical calculations, and design tools provide templates and easy editing options. Even physical methods can use stencils and tracing for constellation patterns.
How long does it take to create a custom star chart?
Digital charts typically take 2-4 hours from start to finish. Physical handmade versions require 8-12 hours including drying time. Your first project might take longer as you learn the software, but experienced creators often complete digital charts in under 90 minutes.
What’s the difference between free and paid star chart software?
Free options like Stellarium provide professional accuracy and all features needed for beautiful charts. Paid software typically offers easier interfaces or specialized features for professional astronomers. For DIY projects, free software completely meets your needs without any limitations.
How accurate are DIY star charts compared to professional services?
With proper coordinates and time settings, DIY charts achieve the same astronomical accuracy as professional services. Professional services mainly save time and offer premium materials. The star positions themselves use the same astronomical databases whether you create it yourself or pay $100+ for a service.
Can I sell star charts I create?
Yes, you can sell star charts you create using free software. The star position data is public domain. However, check software licenses for commercial use restrictions. Most free software like Stellarium allows commercial use of images you create, but always verify current terms before selling.
Creating Your Perfect Star Map
Creating custom star charts connects us with both the cosmos and our most meaningful moments. Whether you’re celebrating a wedding, birth, or any special occasion, these charts capture the beauty of the night sky in a deeply personal way.
Start simple with your first project – choose digital methods if you want guaranteed results, or embrace handmade imperfections for unique character. Each chart you create improves your skills and deepens your appreciation for both astronomy and personal storytelling.
Remember that your star chart doesn’t need to be perfect to be meaningful. The slight imperfections in handmade charts or the learning process with digital software become part of your creative journey. What matters most is the story your chart tells and the connection it represents.