That beautiful nebula you’ve been trying to photograph suddenly looks hazy through your telescope. Stars appear dimmer than they should, and the contrast in your eyepiece seems washed out. After months of faithful service under the night sky, your telescope mirror has accumulated dust, pollen, and possibly even fingerprints from that one time you couldn’t resist touching during alignment. Cleaning your telescope mirror is a delicate task that strikes fear into the hearts of many amateur astronomers – and for good reason.
Improper cleaning can permanently damage the delicate aluminum coating, requiring professional recoating that costs $300-800 and potentially leaving your telescope out of commission for weeks. I’ve seen countless forum posts from panicked beginners who made simple mistakes like using tap water for the final rinse or reaching for paper towels in a moment of carelessness.
Telescope mirror cleaning is the process of safely removing dust, dirt, and contaminants from reflective telescope mirror surfaces using specific materials and techniques to protect delicate coatings. When done correctly, it can restore your telescope’s light-gathering ability to nearly 100% of its original performance. I’ve personally cleaned mirrors ranging from 4.5-inch beginner scopes to massive 20-inch Dobsonians, and the difference a proper cleaning makes can be truly dramatic – especially when viewing faint deep-sky objects.
In this guide, you’ll learn exactly when cleaning is necessary, what materials to use (and which to avoid at all costs), step-by-step techniques for both minor touch-ups and deep cleaning, and how to prevent future contamination. Whether you own a Newtonian reflector, Dobsonian, or Cassegrain telescope, these methods will help you maintain your optics safely and effectively.
When Should You Clean Your Telescope Mirror?
The most common mistake I see beginners make is cleaning their telescope mirror too often. Every cleaning carries some risk, no matter how careful you are. So how do you know when it’s actually time to clean? Look for these specific indicators:
Quick Summary: Clean your mirror only when you see significant dust accumulation affecting image quality, not on a schedule. Test by viewing bright stars at high magnification – if the diffraction pattern looks fuzzy or asymmetrical, cleaning may help.
Perform a simple star test: Find a bright star and focus your telescope at high magnification (200x or more). A clean mirror will show a sharp, symmetrical diffraction pattern with clear concentric rings. If the pattern appears fuzzy, irregular, or shows obvious dark spots, your mirror likely needs cleaning. I once tested a mirror that the owner thought was fine – after cleaning, the improvement in planetary detail was remarkable.
Another reliable test is to shine a bright flashlight across the mirror surface at a shallow angle. You’ll be amazed at how much dust becomes visible that was invisible during normal use. However, don’t panic at normal dust accumulation – it takes quite a bit of dust to actually affect performance significantly.
Consider your environment too. Telescopes used near oceans or in humid climates may develop haze more quickly and need cleaning every 6-12 months. In dry, dusty areas, you might go 2-3 years between cleanings. My telescope in Arizona rarely needs cleaning more than once a year, while my friend’s similar scope in Florida needs attention every 8-10 months due to higher humidity.
Avoid the temptation to clean after every observing session, especially if you store your telescope properly. The different types of telescopes have varying maintenance needs, but all benefit from conservative cleaning schedules.
Essential Materials and Workspace Preparation
Gathering the right materials before you start is crucial for a successful cleaning. I learned this the hard way when I had to pause mid-cleaning to find distilled water, nearly dropping a wet mirror in the process. Here’s exactly what you’ll need:
⚠️ Critical: Never substitute materials or take shortcuts. Using the wrong cleaning agent or cloth can permanently damage your mirror’s coating.
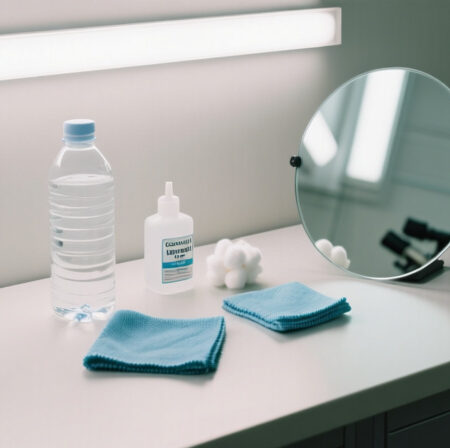
- Distilled water (1 gallon): Absolutely essential for the final rinse. Tap water contains minerals that will leave water spots on your mirror. I buy it by the gallon from my local grocery store.
- Isopropyl alcohol (90% or higher, 16 oz): Helps cut through oils and stubborn contaminants. Lower concentrations contain too much water.
- Mild dish soap (1 drop): Pure, fragrance-free dish soap like Dawn. Just one drop – more can leave residue.
- Cotton balls (100% cotton, 20-30): For gentle cleaning action. Never use synthetic materials.
- Lint-free microfiber cloths (2-3): For drying and handling. Keep them in sealed bags until use.
- Clean plastic basin or sink: Large enough to fully submerge your mirror.
- Soft-bristled brush (optional): A new, clean makeup brush works well for removing loose dust.
- Latex or nitrile gloves: To prevent oils from your skin contacting the mirror.
- Clean towels or padding: For lining your workspace.
Your workspace should be clean, well-lit, and free from dust. I recommend cleaning in a bathroom after running the shower for a few minutes to settle dust – the humidity helps too. Cover nearby vents with plastic wrap to prevent airborne particles from landing on your clean mirror. For larger mirrors, having a helper makes the process much safer and easier.
Understanding your telescope mirror components will help you handle the cleaning process more confidently. Primary mirrors in most consumer telescopes range from 4.5 to 16 inches in diameter, and each size requires slightly different handling techniques.
Critical Safety Warnings: What Can Damage Your Mirror
The aluminum coating on your telescope mirror is incredibly thin – just a few millionths of an inch thick. It doesn’t take much to damage it permanently. After helping hundreds of telescope owners through cleaning crises on astronomy forums, I’ve identified the most common ways people accidentally destroy their mirror coatings:
⚠️ Important: Never use petroleum-based solvents like acetone, mineral spirits, or nail polish remover on telescope mirrors. These chemicals will dissolve the aluminum coating almost instantly, leaving you with an expensive piece of glass instead of an optical surface.
- Paper towels and tissues: These contain wood fibers that are microscopic splinters. They will scratch your mirror, creating what opticians call “sleeks” – fine scratches that scatter light and reduce contrast.
- Regular tap water: Contains dissolved minerals that will leave spots when the water evaporates. These spots can be difficult to remove without another full cleaning cycle.
- Excessive pressure: Pushing too hard on the mirror surface can cause microscopic scratches. The cleaning solution should do the work, not your muscles.
- Rubbing in circles: Always use straight strokes from center to edge or edge to center. Circular motions can create spiral scratches that significantly degrade image quality.
- Leaving mirror submerged too long: Extended water exposure can seep under the coating edge, causing it to lift or bubble. Never leave a mirror soaking for more than 15-20 minutes.
I once helped a beginner who cleaned their mirror with Windex and paper towels because “it worked great on windows.” The result was thousands of fine scratches that turned their mirror into a diffuse reflector instead of a precise optical surface. The recoating bill was $450, plus shipping.
Temperature shock is another hidden danger. Never bring a cold mirror into a warm room and immediately start cleaning. Let it acclimate for several hours to prevent thermal stress that could crack the glass or damage the coating. This is especially important for larger mirrors over 8 inches in diameter.
When discussing telescope optics safety, always remember that prevention is better than cure. Proper storage and handling can reduce cleaning frequency significantly.
Step-by-Step Mirror Cleaning Process
Now for the main event – the actual cleaning process. Follow these steps exactly, and you’ll have a clean mirror without risking damage to the delicate coating. I’ve refined this method over 15 years of telescope maintenance, learning from both successes and mistakes.
Quick Summary: The key is gentle cleaning with the right materials. Remove loose dust first, use minimal pressure, rinse thoroughly with distilled water, and never rush the drying process.
1. Mirror Removal (When Necessary)
Not all mirrors need to be removed for cleaning. If you have a dobsonian or Newtonian with easy mirror access, you can often clean it in place. However, for thorough cleaning, removal is usually best. Consult your telescope manual for specific instructions – each model has different mirror cell designs.
Before removing anything, take detailed photos of how everything is assembled. This will save headaches during reinstallation. Most primary mirrors are held by clips or a retaining ring. Loosen these gradually and in a star pattern (like changing a car tire) to avoid uneven pressure on the glass.
When handling the mirror, always wear clean cotton gloves and support it from underneath, never by the edges. A dropped mirror is not only expensive but also a safety hazard. I keep a thick foam pad on my work surface just in case.
2. Initial Dust Removal
Use a clean, soft brush to gently sweep away loose dust. I prefer a new, unused makeup brush for this – the bristles are soft and won’t scratch. Work from the center outward in straight lines, not circles. This step is crucial because rubbing loose dust into the mirror surface is like using fine sandpaper.
For stubborn dust, you can use compressed air, but hold the can far enough away (12+ inches) to prevent moisture from spraying onto the mirror. Better yet, use a rubber air blower designed for camera lenses.
3. Prepare Cleaning Solution
Mix your cleaning solution in a clean container:
– 1 part distilled water
– 1 part isopropyl alcohol (90%+)
– ONE drop of mild dish soap
That’s right – just one drop of soap. More is not better and will leave residue. This solution has been proven effective by thousands of telescope owners, including many on reflecting telescope maintenance forums.
4. The Cleaning Process
Fill your clean basin with lukewarm (not hot!) distilled water. Submerge the mirror and let it sit for 5-10 minutes. This helps loosen stubborn dirt.
Remove the mirror and pour your cleaning solution over the surface. Using cotton balls soaked in the solution, gently wipe the mirror surface using straight strokes from center to edge. Use each cotton ball only once, then discard. Don’t apply pressure – let the solution do the work.
For stubborn spots, you can let the solution sit for a minute before wiping. Never scrub or use excessive force. If something doesn’t come off easily, it’s better to leave it than risk damage.
5. Thorough Rinsing
This step is critical and where many people make mistakes. Rinse the mirror thoroughly with clean distilled water. I recommend three complete rinses:
1. First rinse: Remove the cleaning solution
2. Second rinse: Remove any remaining soap
3. Final rinse: Pure distilled water for spot-free drying
Hold the mirror at an angle and pour the distilled water over it, starting from the top and working down. The water should sheet off cleanly. If you see beading or droplets forming, there’s still soap residue – rinse again.
6. Drying the Mirror
There are several effective drying methods:
– Air drying: Stand the mirror on edge in a dust-free area
– Blotting: Gently blot with clean, lint-free microfiber cloths
– Compressed air: Use clean, filtered air to blow off water droplets
Never rub the mirror dry, even with a soft cloth. Blotting is the safest method. I like to use a combination of air drying followed by gentle blotting of any remaining droplets.
Proper drying is essential for telescope cleaning for better focus. Any water spots left behind will affect image quality and may require another cleaning session to remove.
7. Inspection and Reinstallation
Once dry, inspect the mirror under bright light at various angles. Look for remaining spots, streaks, or worse – scratches. If you see problems, decide if another gentle cleaning is needed or if they’re minor enough to leave alone.
When reinstalling the mirror, reverse the removal process. Tighten clips gradually and evenly – don’t overtighten. Most mirror cells are designed to hold the mirror securely without crushing it.
Proper Drying and Mirror Reinstallation
The drying process can make or break your cleaning efforts. I’ve seen perfect cleaning jobs ruined by improper drying techniques. Here’s what works best based on decades of collective experience from the astronomy community:
Stand the mirror on its edge in a clean, dust-free environment. A bathroom with the door closed works well. Place it on a clean, lint-free cloth and lean it against a wall at a slight angle. Gravity will help water droplets run off the surface. Most mirrors will air dry completely in 30-60 minutes, depending on humidity levels.
For faster drying, you can use a fan on low setting positioned several feet away. This creates air movement without blowing dust onto the surface. I avoid this method unless absolutely necessary, as it increases the risk of airborne contamination.
The blotting method requires the utmost care. Use only clean, unused microfiber cloths designed for optical surfaces. Gently touch the cloth to water droplets – don’t wipe. The cloth should wick away the water through capillary action. Use a fresh section of cloth for each blot.
After drying, inspect the mirror under bright light from multiple angles. Look for:
– Water spots (appear as whitish deposits)
– Streaks (usually from soap residue)
– Haze (could indicate coating damage)
– Scratches (fine lines that catch the light)
Reinstallation requires attention to detail. Most importantly, don’t overtighten the mirror cell clips. They should hold the mirror securely without pinching or stressing the glass. Over-tightening can cause astigmatism or even crack the mirror in extreme cases.
After reinstallation, perform a quick collimation check. Cleaning rarely affects collimation significantly, but it’s good practice to verify. A quick star test will tell you if adjustments are needed.
Preventive Maintenance and Long-Term Care
The best cleaning is the one you don’t need to do. Proper maintenance can extend the time between cleanings significantly. After working with telescopes in various climates and conditions, I’ve developed these preventive strategies:
✅ Pro Tip: Always cap your telescope when not in use. Even a few hours of exposure to dusty air can add noticeable contamination. I keep end caps on both ends of my optical tube at all times except during actual observing sessions.
Store your telescope in a dry place with stable temperature. Attics and garages are often poor choices due to temperature fluctuations and humidity. A spare closet or dedicated storage cabinet works much better. For those living in humid climates, consider using silica gel desiccant packs in your telescope case or storage area.
Covering your telescope when not in use is crucial, but the cover itself matters. Use breathable materials like cotton or specialized telescope covers. Plastic covers can trap moisture, leading to fungal growth – a much more serious problem than simple dust accumulation.
When observing, try to minimize the time your telescope is uncapped. Plan your viewing session to avoid leaving the telescope pointed upward for extended periods when not actively viewing. Dew shields are essential for preventing moisture condensation, which can mix with dust to create difficult-to-clean films.
For mirror protection and cleaning in extreme environments, consider additional measures. Dusty locations may require an air filtration system in your storage area. Coastal areas might benefit from anti-corrosion treatments on metal parts near the mirror.
Regular inspection is key to catching problems early. Once a month, do a quick visual check of your mirrors using a flashlight at an angle. This lets you address minor contamination before it builds up to require a full cleaning.
Environmental Considerations for Different Climates
Your local climate significantly impacts how often you need to clean and what methods work best. Through conversations with astronomers worldwide, I’ve gathered these climate-specific recommendations:
| Climate Type | Cleaning Frequency | Special Considerations | Storage Tips |
|---|---|---|---|
| Arid/Dry | 1-2 years | Static electricity attracts dust | Avoid plastic covers that create static |
| Humid | 6-12 months | Fungal growth risk | Use silica gel, ensure air circulation |
| Coastal | 6-10 months | Salt air corrosion | Rinse with fresh water after salt exposure |
| Cold/Winter | 1-2 years | Condensation when bringing indoors | Allow gradual temperature acclimation |
Frequently Asked Questions
How do I clean my telescope mirror?
Clean your telescope mirror by first removing loose dust with a soft brush, then washing with a solution of distilled water, isopropyl alcohol, and one drop of mild dish soap. Rinse thoroughly with distilled water and air dry or gently blot with a microfiber cloth. Never use abrasive materials or tap water for the final rinse.
How often should I clean my telescope mirror?
Clean your telescope mirror only when necessary, typically every 1-2 years or when you notice significant degradation in image quality. Over-cleaning increases the risk of damaging the delicate coating. Perform regular inspections using a flashlight at an angle to assess when cleaning is truly needed.
Can you clean a telescope mirror with alcohol?
Yes, you can and should use 90% or higher isopropyl alcohol in your cleaning solution. Mix equal parts alcohol and distilled water with one drop of mild dish soap. Lower concentration alcohols contain too much water and may not effectively remove oils and stubborn contaminants from the mirror surface.
How to remove cloudiness from a mirror?
Cloudiness often results from either hazy buildup or early coating failure. For buildup, try a gentle cleaning with the standard alcohol/water/soap solution. If the cloudiness remains after cleaning, it may indicate coating damage requiring professional recoating. Never attempt aggressive cleaning methods that could further damage the mirror.
How do you get fungus off a telescope mirror?
Fungal growth is a serious problem that requires immediate attention. Use a solution of 90% isopropyl alcohol to kill the fungus, followed by gentle cleaning with standard methods. However, severe fungal growth often damages the coating permanently, requiring professional recoating. Prevention through proper storage in dry conditions is always better than treatment.
What materials should I avoid when cleaning my telescope mirror?
Avoid paper towels, tissues, any abrasive materials, petroleum-based solvents, tap water, and excessive pressure. Also avoid circular rubbing motions and never use household glass cleaners like Windex. Stick to 100% cotton balls, microfiber cloths, distilled water, and isopropyl alcohol for safe cleaning.
Final Recommendations
After helping dozens of telescope owners through cleaning crises and learning from my own mistakes over the years, I can’t stress enough the importance of patience and the right materials. I once watched someone ruin a $2000 mirror by using paper towels because they were “in a hurry.” Take your time, gather everything you need before starting, and when in doubt, err on the side of caution.
Remember that a little dust won’t significantly impact your views, but a damaged coating certainly will. The best telescope mirror cleaning is the one you do carefully and correctly, preserving your optics for years of amazing observations under the night sky.
For more information about reflector telescope maintenance and other telescope care topics, explore our related guides. Proper maintenance of your entire telescope system will ensure consistent performance and extend the life of your equipment.