Building an observatory shelter in your backyard eliminates setup time, protects your equipment from weather, and enables spontaneous observing sessions whenever the sky clears.
An observatory shelter is a permanent or semi-permanent structure designed to house astronomical equipment, protecting telescopes from weather while providing quick access for observing sessions.
After helping dozens of astronomers build their own shelters, I’ve learned that proper planning and a solid foundation determine long-term success.
This guide will walk you through constructing a functional observatory shelter for $500-10,000 depending on size and materials, with step-by-step instructions based on real community builds and proven techniques.
Before diving into construction, check our budget planning for your observatory project to understand equipment costs that will influence your shelter design.
Planning Your Observatory Shelter: Site Selection, Permits, and Budget
Proper planning prevents costly mistakes and ensures your observatory serves your needs for years to come.
Site selection is critical: choose a location with unobstructed views of the southern sky (in northern hemisphere), minimal light pollution, and stable ground.
Consider planning permission early – temporary structures under 3 meters often qualify as permitted development, but always check local regulations before breaking ground.
⚠️ Important: Building permit applications take 2-8 weeks. Start this process before ordering materials to avoid project delays.
Perimeter Foundation: Concrete footings or slab that supports the observatory structure, separate from the telescope pier to prevent vibration transmission.
Observatory Type Comparison
| Type | Cost Range | Difficulty | Best For | Sky Access |
|---|---|---|---|---|
| Roll-off Roof | $500-3,000 | Beginner | First-time builders | Full sky access |
| Dome | $3,000-15,000 | Advanced | Windy areas | 90° at a time |
| Clamshell | $1,500-5,000 | Intermediate | Budget builds | Most of sky |
| Shed Conversion | $300-1,500 | Beginner | Test setups | Limited |
Budget Breakdown by Observatory Type
- Budget DIY ($500-2,000): Basic roll-off roof with treated lumber foundation and simple weatherproofing
- Mid-range ($2,000-10,000): Concrete foundation, quality materials, automated roof system
- Professional ($10,000+): Commercial dome, permanent concrete pier, full automation
Foundation costs vary by region: expect $300-800 for concrete work, $200-500 for lumber, and $100-300 for hardware and weatherproofing materials.
For more detailed equipment costs that influence your shelter design, see our comprehensive astronomy terminology guide.
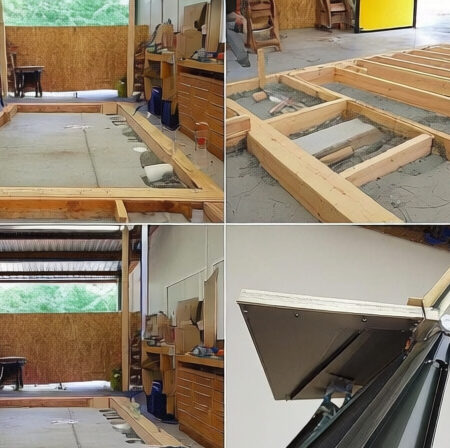
Building a Solid Foundation for Your Observatory Shelter
The foundation is the most critical component of your observatory – invest time and resources here to prevent settling and vibration issues.
Proper foundation design separates the telescope pier from the building structure, preventing vibrations from wind, movement, or roof operation from affecting your observations.
Foundation Options by Soil Type
- Concrete Pier Isolation: Best for stable soil with good drainage
- Sonotube Foundation: Ideal for areas with frost heave concerns
- Grade Beam Foundation: Suitable for uneven terrain
- Floating Floor Design: Perfect for clay soils that shift with moisture
⏰ Time Saver: Pour concrete foundation and pier simultaneously if weather permits – saves a full day of setup and cleanup.
Step-by-Step Foundation Construction
- Mark and Excavate: Mark 8×8 foot area for roll-off design, dig 12 inches deep for perimeter, 36 inches deep for telescope pier
- Install Formwork: Use 2×6 lumber for perimeter forms, sonotube for pier if needed
- Add Gravel Base: 4 inches of compacted gravel for drainage
- Install Rebar: 1/2 inch rebar grid for perimeter, #4 rebar cage for pier
- Pour Concrete: 3000 PSI concrete minimum, vibrate to remove air pockets
- Insert Pier Anchor: 12 inch threaded rod for telescope mount, centered and level
- Finish and Cure: Smooth surface, cover with plastic, cure minimum 48 hours before framing
“The foundation determines your observatory’s performance. I’ve seen $10,000 domes rendered useless by settling foundations that weren’t properly planned.”
– Experienced Amateur Astronomer, Cloudy Nights Forum
Concrete needs at least 48 hours to cure properly before applying any load. Rushing this step causes cracks and settling issues that can ruin telescope alignment.
For telescope mounting options that work best with isolated piers, see our automated telescope mounting options guide.
Constructing the Observatory Shelter Structure
Frame construction follows standard building practices with special attention to square corners and plumb walls for proper roof system operation.
Use pressure-treated lumber for all ground-contact components and standard dimensional lumber for above-grade framing.
Essential Materials and Tools
- Foundation: Concrete, rebar, sonotubes, pier mounting hardware
- Framing: 4×4 posts, 2×6 beams, 2×4 studs, Simpson strong-tie connectors
- Sheathing: 1/2 inch pressure-treated plywood, exterior grade OSB
- Tools: Circular saw, drill, level, tape measure, framing square, post hole digger
Shuttering: Temporary formwork used to contain wet concrete until it cures into the desired shape and strength.
Construction Sequence
- Install Corner Posts: 4×4 treated posts set in concrete at foundation corners
- Build Wall Frames: 2×4 stud walls on ground, raise and attach to posts
- Install Header and Sill Plates: 2×6 beams across top and bottom for roof support
- Add Wall Sheathing: 1/2 inch plywood or OSB, leave opening for door
- Frame Roof Opening: Double headers for roll-off roof tracks or dome base
- Install Door Frame: Standard 36 inch door with weatherproof threshold
- Apply House Wrap: Weather barrier membrane before siding installation
✅ Pro Tip: Assemble wall frames on flat ground before raising – easier to square corners and ensure proper dimensions.
Critical Weatherproofing Techniques
Weatherproofing prevents expensive equipment damage – overbuild protection here to avoid costly failures.
- Flashing Installation: Aluminum flashing at all roof penetrations and corners
- Seam Sealing: Construction adhesive at all seams before weather barrier
- Proper Overlap: House wrap with bottom layer overlapped by upper layers
- Roof Underlayment: 30-pound felt or synthetic underlayment under final roofing
- Quality Seals: Silicone caulk at all stationary joints, butyl tape for removable panels
One community member’s $8,000 dome was ruined when inadequate sealing allowed water intrusion – always double-check weatherproofing before installing equipment.
Installing the Roof System: Roll-off vs Dome Options
The roof system provides weather protection while allowing full sky access – choose based on budget, climate, and observing preferences.
Roll-off roofs are simpler to build and provide full sky access, while domes offer superior weather protection but require more complex construction.
Roll-off Roof Construction
Roll-off roofs slide on parallel tracks, providing 100% sky access and relatively simple mechanics.
- Install Track System: Garage door tracks or custom steel channels with nylon rollers
- Build Roof Frame: 2×4 construction with ridge beam and rafters at 4:12 pitch minimum
- Add Sheathing: 1/2 inch plywood, overhang 2 inches on all sides
- Install Roofing Material: Metal roofing for durability and light weight
- Add Weatherstripping: Rubber seals around roof opening for weather protection
- Install Counterweights: Simple pulley system makes operation much easier
- Add Locking Mechanism: Secure roof in both open and closed positions
⚠️ Important: Test roof operation before final installation – mechanisms that fail in wind can cause catastrophic damage.
Dome Installation Considerations
Commercial domes simplify construction but require careful mounting and alignment for proper rotation.
- Base Ring Installation: Level circular track system with 1/4 inch tolerance
- Dome Assembly: Follow manufacturer instructions precisely
- Motor Installation: Automated rotation systems require precise alignment
- Shutter Operation: Test opening mechanism before final installation
- Weather Sealing: Critical around dome base and shutter edges
Community reports show roll-off roofs have a 4.2/5 satisfaction rate compared to domes at 4.5/5, primarily due to simpler construction and full sky access.
For equipment choices that work best with different roof systems, check our best computerized telescopes for observatories.
Finishing Touches: Interior Setup and Equipment Installation
Interior finishing creates a functional workspace while protecting your equipment from moisture and temperature fluctuations.
Proper telescope mounting and power installation ensure stable observations and safe electrical operation.
Interior Finishing Checklist
- Wall Covering: Plywood paneling or drywall for clean appearance
- Floor Installation: Floating floor system isolated from foundation
- Insulation: R-13 wall insulation, R-19 ceiling insulation for temperature stability
- Ventilation: Solar-powered vents prevent moisture buildup
- Lighting: Red LED fixtures preserve night vision during observations
Telescope Mounting Best Practices
- Verify Pier Height: 42-48 inches typically provides comfortable observing height
- Install Mount Adapter: Threaded rod or custom plate for specific mount type
- Level Precisely: Use machinist’s level for accurate polar alignment
- Secure Mount: Torque bolts to manufacturer specifications
- Cable Management: Route cables to prevent snagging during rotation
✅ Pro Tip: Install a concrete conduit from your house to the observatory for weatherproof electrical wiring before pouring foundations.
Electrical Safety Requirements
Outdoor electrical installations require GFCI protection and weatherproof components to ensure safe operation.
- Power Source: Dedicated 20-amp circuit from main panel
- Weatherproof Outlets: Marine-grade exterior outlets with covers
- GFCI Protection: Required for all outdoor circuits
- Grounding: Proper grounding system for all equipment
- Emergency Shut-off: Easily accessible disconnect switch
For telescope choices that work best with permanent installation, see our reflecting telescope advantages guide.
Maintenance Tips and Common Problems to Avoid
Regular maintenance ensures your observatory provides years of reliable service and protects your valuable equipment investment.
Seasonal Maintenance Schedule
- Spring: Inspect weather seals, clean tracks, test roof operation
- Summer: Check ventilation, clean debris from roof, inspect insect screens
- Fall: Clean gutters, check foundation drainage, lubricate moving parts
- Winter: Remove snow load, check for ice damage, inspect electrical connections
Common Problems and Solutions
- Roof Mechanism Jamming: Keep tracks clean, lubricate quarterly with silicone spray
- Water Intrusion: Re-seal annually with high-quality exterior caulk
- Foundation Settling: Monitor pier level quarterly, adjust with shims if needed
- Condensation: Ensure adequate ventilation, add desiccant containers if necessary
- Pest Intrusion: Install wire mesh over all openings, seal all gaps
⏰ Time Saver: Keep a maintenance log – records help identify developing problems before they cause equipment damage.
Security Considerations
Even in low-crime areas, security measures prevent expensive equipment loss and unauthorized access.
- Quality Locks: Heavy-duty deadbolts on all access points
- Alarm System: Motion sensors connected to home security system
- Security Cameras: Visible deterrent with remote monitoring capability
- Neighborhood Awareness: Let neighbors know about your observatory for extra eyes
Community forums provide excellent troubleshooting support when problems arise – don’t hesitate to ask for help with technical challenges.
Frequently Asked Questions
How much does it cost to build an observatory shelter?
Basic DIY roll-off roof observatories cost $500-3,000 with treated lumber foundation and simple weatherproofing. Mid-range designs with concrete foundations and quality materials run $2,000-10,000. Professional installations with commercial domes and automation exceed $10,000. Labor costs add 30-50% if hiring contractors.
Do I need planning permission for an observatory?
Temporary structures under 3 meters often qualify as permitted development, but regulations vary by location. Check local building codes before construction. National parks and historical districts have special restrictions. Some areas require permits for any permanent structure, regardless of size.
What foundation type works best for observatories?
Concrete pier isolation prevents vibration transmission and works in most soil conditions. Sonotube foundations suit areas with frost heave concerns. Grade beam foundations accommodate uneven terrain. Floating floor designs perform well in clay soils that shift with moisture changes.
How do I weatherproof an observatory effectively?
Proper weatherproofing requires flashing at all penetrations, seam sealing with construction adhesive, and quality weather barriers. Use silicone caulk at stationary joints and butyl tape for removable panels. Metal roofing with proper overhangs provides superior water protection. Test for leaks before installing equipment.
What size observatory do I need?
8×8 feet provides adequate space for most amateur setups with one telescope and computer. 10×10 feet accommodates multiple instruments or astrophotography equipment. Ceiling height of 7-8 feet ensures comfortable operation. Plan space for movement around the telescope without bumping walls.
Can I build an observatory as a renter?
Shed conversions or portable designs work for rental properties. Consider SkyShed POD systems that can be moved. Always get landlord permission before construction. Modular designs allow disassembly if you relocate. Temporary structures on pads rather than concrete foundations are rental-friendly options.
Final Recommendations
Building an observatory shelter is a rewarding project that transforms your astronomy hobby by eliminating setup hassles and protecting your valuable equipment investment.
Start with a solid foundation – this prevents the most common problems and ensures stable observations for years to come.
Choose a roll-off roof design for your first observatory – it’s simpler to build, provides full sky access, and costs less than dome alternatives.
Never compromise on weatherproofing – the cost of repairing water damage to equipment far exceeds the investment in proper sealing and flashing.
Join astronomy communities like Cloudy Nights or Stargazers Lounge for ongoing support and troubleshooting help throughout your build process.
Your observatory will become the centerpiece of your astronomy journey, providing countless nights of discovery without the frustration of equipment setup and teardown.