Struggling to find celestial objects in your telescope? You’re not alone – I spent countless frustrating nights during my first year of astronomy trying to locate targets through an unaligned finderscope.
Aligning your finderscope is simple: center a distant object in your main telescope using the lowest power eyepiece, then adjust the finder’s thumbscrews until the same object appears centered in the finder’s view.
This guide will walk you through everything you need to know, from understanding different finder types to troubleshooting common problems that plague amateur astronomers.
Whether you’re a complete beginner with your first telescope or an experienced observer looking to refine your setup, these techniques will save you hours of frustration and get you observing faster.
Understanding Your Finderscope
A finderscope is your telescope’s navigation system – a small auxiliary scope or sighting device that provides a wide field of view to help locate celestial objects before observing them through your main eyepiece.
Finderscope: A small auxiliary telescope or sighting device mounted on your main telescope that provides a wide field of view to help locate celestial objects before observing them through the main eyepiece.
The alignment between your finder and main telescope is crucial because an unaligned finder will point to different objects than your main telescope, making it impossible to use for locating celestial targets effectively.
There are three main types of finderscopes you’ll encounter, each with specific alignment considerations and advantages for different observing situations.
Red Dot Finders
Red dot finders like the Celestron StarPointer project an LED dot onto a transparent window, showing exactly where your telescope is pointing without magnification. These are excellent for beginners due to their intuitive operation and wide field of view.
When I started astronomy, I found red dot finders most forgiving for initial alignment mistakes, though they require careful brightness adjustment to avoid washing out faint stars.
Optical Finderscopes
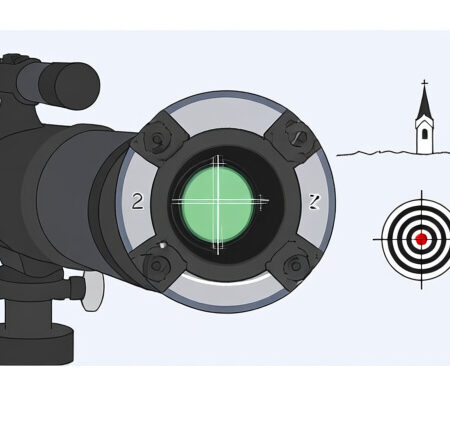
Traditional optical finderscopes are miniature telescopes with crosshair reticles, typically offering 6-10x magnification. The 5×24 finderscope on the Sarblue Mak70 represents this category perfectly.
These finders excel at locating faint objects and provide precise targeting, though they require you to understand image orientation – especially important for Newtonian telescope users who see upside-down images.
Right Angle Finders
Right Angle Correct Image (RACI) finders use prisms to provide comfortable viewing at 90 degrees with correct image orientation. These are particularly valuable for intermediate telescope setups where ergonomics matter.
After struggling with neck strain using straight-through finders on my Dobsonian, I upgraded to a RACI finder and found it transformed my observing comfort during long sessions.
| Finder Type | Best For | Magnification | Pros | Cons |
|---|---|---|---|---|
| Red Dot Finder | Beginners, wide-field scanning | None | Intuitive, wide field, lightweight | Limited precision, battery dependent |
| Optical Finder | Faint object location | 6-10x | Precise, shows faint stars | Narrower field, image orientation issues |
| Right Angle Finder | Comfort, precise work | 8-10x | Comfortable viewing, correct image | Heavier, more expensive |
Before You Begin: Essential Preparation
Proper preparation makes alignment dramatically easier and more accurate. Having the right tools and setup conditions prevents common frustrations that plague beginners.
Essential Tools Checklist
- Low Power Eyepiece: Use your telescope’s lowest power eyepiece (25mm or similar) for the widest field of view
- Distant Target: Identify a stationary object at least 200-300 yards away
- Small Screwdriver: For adjusting finder bracket mounting screws
- Spare Batteries: For illuminated finders (LED or battery-powered models)
- Comfortable Chair: For steady viewing during alignment process
✅ Pro Tip: Always align your finderscope during daylight hours using terrestrial targets. Night alignment with stars is significantly more difficult for beginners.
Choosing the Perfect Alignment Target
The best targets for daytime alignment share three key characteristics: they’re distant, stationary, and have clear, defined points for precise centering.
From my experience teaching astronomy club members, telephone poles, church steeples, and distant tree tops work best. Avoid moving objects like cars or poorly defined targets like blank walls.
The ideal target distance depends on your finder’s magnification. For red dot finders, objects 100+ yards away work well. For optical finders with 6-10x magnification, I recommend targets 300+ yards away to minimize parallax error.
Setup Best Practices
Before beginning alignment, ensure your telescope is on a stable mount and the finder bracket is securely attached. Loose mounting brackets are a primary cause of alignment drift during observing sessions.
Position your telescope so you can comfortably access both the main eyepiece and finder without moving the mount. This stability is crucial for maintaining alignment throughout the process.
Step-by-Step Daytime Alignment Process
Quick Summary: Center a distant daytime target in your main telescope using low power, then adjust your finder’s thumbscrews until the same target appears centered in the finder’s view. Verify with a second target for accuracy.
Follow this proven process for precise finderscope alignment that will hold throughout your observing session. These steps work for all finder types with minor adaptations noted.
- Install Your Lowest Power Eyepiece: Start with your telescope’s lowest power eyepiece (typically 25mm or 30mm focal length). This provides the widest field of view, making it easier to locate and center your target.
- Point Telescope at Target: Move your telescope until your chosen distant target appears in the main eyepiece. Don’t worry about perfect centering yet – just get the target in view.
- Center Target in Main Telescope: Use your telescope’s slow-motion controls to center the target precisely in the main eyepiece. For best results, position the target at the exact intersection of your eyepiece’s crosshairs or center of view.
- Check Finder View: Look through your finderscope without moving the telescope. Note where the target appears in the finder’s field of view – it likely won’t be centered yet.
- Adjust Finder Thumbscrews: Gently turn the finder’s adjustment thumbscrews to move the finder’s view until the target is centered. Make small adjustments and alternate between screws for precise control.
- Verify Alignment: Look back through your main eyepiece to confirm the target remains centered, then check the finder again. The target should now be centered in both views.
- Test with Second Target: Point your telescope at a different distant target and verify it appears centered in both the main eyepiece and finder. This confirms accurate alignment across the sky.
Fine-Tuning Techniques
After the basic alignment, spend a few minutes fine-tuning for maximum precision. I’ve found that slight adjustments to the finder bracket position can improve alignment stability, especially for telescopes that are frequently moved.
For optical finders, adjust the focus until the crosshairs are sharp and clear. Blurred reticles make precise alignment difficult, particularly in low-light conditions.
Red dot finder users should adjust brightness settings to match ambient light. During daytime alignment, increase brightness to overcome daylight glare, then reduce it for nighttime observing to prevent washing out faint stars.
Finder-Specific Alignment Techniques
While the basic alignment process applies to all finderscopes, each type has specific considerations and techniques for optimal results.
Red Dot Finder Alignment
Red dot finders require特别注意 attention to brightness settings and parallax considerations. The projected dot should be visible against both bright daytime targets and faint nighttime stars.
⏰ Time Saver: When aligning red dot finders, place a piece of white paper behind your target to improve dot visibility during daytime alignment.
Common red dot finder issues include battery drain and dot visibility problems. I always carry spare batteries in my observing kit – a dead finder battery has ruined more than one observing session.
For precise alignment, ensure the red dot is focused at infinity. Some models have adjustable focus that can become misaligned during transport, causing the dot to appear blurry or offset.
Optical Finder Alignment
Optical finderscopes require attention to image orientation and focus settings. The inverted or mirror-image views can confuse beginners, so understanding your finder’s orientation is crucial.
Straight-through optical finders show upside-down images in Newtonian telescopes and mirror-reversed images in refractors. Right-angle finders provide correct image orientation but require different positioning during alignment.
Focus your optical finder carefully during daylight alignment. The crosshairs should be sharp and distinct when looking at distant objects. Misfocused finders make precise centering difficult, especially under dark skies.
Right Angle Finder Considerations
Right angle finders offer ergonomic advantages but require specific alignment techniques. The 90-degree viewing angle means you’ll need to position yourself differently during the alignment process.
These finders typically have illuminated reticles powered by small batteries. Check the illumination during daylight alignment – you may need to increase brightness for daytime use and decrease it for nighttime observing.
Right angle correct image (RACI) finders are particularly valuable for beginner telescopes as they eliminate the confusion of inverted images that can frustrate new astronomers.
Common Alignment Problems and Solutions
Even experienced astronomers encounter alignment issues. Based on community forums and my personal experience, these are the most common problems and their solutions.
Finder Losing Alignment Repeatedly
If your finderscope won’t hold alignment, first check that the finder bracket is securely tightened to the telescope tube. Loose mounting brackets are the primary cause of alignment drift.
Examine the thumbscrews that hold the finder in its bracket. Over time, these can wear down, allowing movement even when tightened. Consider replacing worn thumbscrews with higher-quality versions or adding nylon lock nuts for security.
For persistent issues, check the dovetail bracket itself. Some manufacturers use softer aluminum that can deform over time, allowing the finder to shift position. Upgrading to a more robust mounting system often solves chronic alignment problems.
Running Out of Adjustment Range
When your finder’s adjustment screws are maxed out but the target still isn’t centered, the finder’s initial position is too far off. Loosen the finder bracket mounting screws and physically reposition the finder closer to the correct alignment.
“I was running out of adjustment on my finderscope no matter what I tried. The solution was simply loosening the entire finder bracket and shifting it about half an inch before retightening.”
– Cloudy Nights Forum Member
This common problem occurs when finders are removed for transport and remounted in slightly different positions. Marking the bracket position with a small piece of tape can help maintain consistent positioning.
Difficulty Centering Crosshairs
For optical finders, centering crosshairs precisely can be challenging, especially with faint targets. Choose targets with clear, distinct edges like power line insulators, church steeples, or distant road signs.
During nighttime alignment, use bright planets or the Moon instead of faint stars when initially setting up. These bright targets make crosshair centering much easier before moving to fainter objects.
If your finder’s crosshairs appear broken or damaged, replacement reticles are available for most major brands. Some optical finders even allow user-installable replacement crosshairs.
Red Dot Visibility Issues
Red dot finders can be challenging during both day and night. For daytime alignment, increase brightness to maximum and aim at targets with high contrast against the sky.
At night, reduce brightness to the minimum level that remains visible. Overly bright dots wash out faint stars and make alignment difficult. Some red dot finders have automatic brightness sensors that can be finicky – manual control often works better.
If your red dot appears distorted or irregular, check for condensation inside the viewing window. This can occur when bringing telescopes from cold outdoor temperatures into warm indoor spaces. Allow the finder to acclimate gradually to prevent moisture issues.
Maintaining Perfect Alignment
Proper maintenance ensures your finderscope remains aligned and functional for years of reliable service. These practices will save you time and frustration during observing sessions.
Regular Alignment Checks
Check your finder alignment before each observing session, even if you haven’t moved your telescope. Temperature changes and minor bumps can shift alignment over time.
I keep a quick alignment routine: spend two minutes checking alignment on a distant tree or telephone pole before sunset. This habit has saved me from discovering alignment problems under dark skies when fixes are much harder.
For telescopes that are permanently mounted, alignment checks can be less frequent, but monthly verification is still recommended to catch any gradual drift.
Transport and Storage Tips
When transporting your telescope, consider removing the finderscope or securing it carefully. Many finderscopes get knocked out of alignment during transport to dark sky sites.
If you remove your finder for transport, mark its position on the mounting bracket with a small pencil mark or piece of tape. This helps restore the approximate alignment when remounting.
Store your telescope with lens caps on both the main telescope and finderscope. This prevents dust accumulation and protects the optics from damage.
Seasonal Maintenance
Perform a thorough maintenance check twice yearly. Clean finder optics gently with lens tissue and appropriate cleaning solution – never use harsh chemicals or rough materials.
Check all mounting hardware for tightness and replace any corroded screws or fittings. Apply a small amount of lithium grease to threaded components to ensure smooth operation.
For illuminated finders, check battery contacts for corrosion and replace batteries annually, even if they still work. Dead batteries at critical moments are one of astronomy’s most frustrating experiences.
⚠️ Important: Never attempt to observe the Sun through any finderscope or telescope without proper solar filters. Permanent eye damage will occur instantly.
Frequently Asked Questions
How do you align a finderscope telescope?
Center a distant daytime target in your main telescope using low power, then adjust your finder’s thumbscrews until the same target appears centered in the finder’s view. Verify with a second target for accuracy.
What’s the best target for finderscope alignment?
Choose stationary objects at least 200-300 yards away with clear, defined points. Telephone poles, church steeples, and distant tree tops work best. Avoid moving objects or poorly defined targets.
Why does my finderscope keep losing alignment?
Loose mounting brackets or worn thumbscrews are the most common causes. Ensure the finder bracket is securely tightened and check for worn adjustment screws that may need replacement.
Can I align my finderscope at night?
While possible, nighttime alignment is much more difficult for beginners. Use bright planets or the Moon instead of faint stars. Daytime alignment using terrestrial targets is strongly recommended.
How tight should the finder thumbscrews be?
Firm enough to hold position without slipping, but not so tight that they damage the finder tube or strip threads. Make adjustments gradually and avoid overtightening.
What if I run out of adjustment on my finderscope?
Loosen the finder bracket mounting screws and physically reposition the finder closer to correct alignment before retightening. This common issue occurs when finders are remounted in slightly different positions.
Final Alignment Tips and Next Steps
Perfect finderscope alignment is a skill that improves with practice. Don’t be discouraged if your first attempts take time – even experienced astronomers occasionally struggle with alignment.
The key principles to remember are: use distant targets, start with low power in the main telescope, make small adjustments, and always verify with a second target. These fundamentals apply regardless of your equipment or experience level.
As you become more comfortable with alignment, you’ll develop your own techniques and shortcuts. Some observers I know can align their finders in under two minutes using familiar landmarks from their observing location.
Related Resources
For more telescope setup guidance, explore our Celestron NexStar 4SE review which covers computerized alignment systems, or read about telescope alignment basics to understand how finder alignment fits into overall telescope setup.
Remember that finderscope alignment is just one aspect of amateur astronomy learning. Each alignment session teaches you more about your equipment and the night sky, building skills that will serve you throughout your astronomy journey.
Happy observing, and may your finderscopes always be true!
Comments