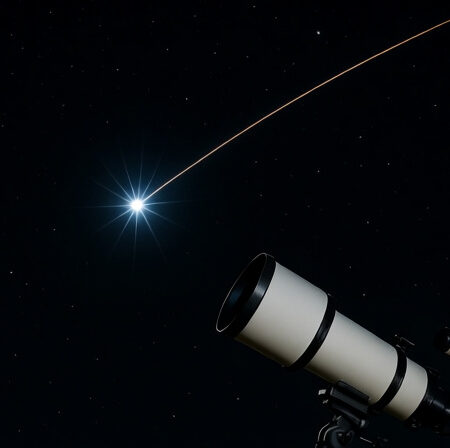
Yes, you can see satellites with a telescope. While it’s challenging due to their speed and small apparent size, many satellites are visible through telescopes with the right equipment and techniques. The International Space Station and other large satellites can show impressive detail even through modest telescopes.
Satellites visible through telescopes are human-made objects orbiting Earth that reflect sunlight, ranging from bright space stations to faint communication satellites. These objects appear as moving points of light that can be tracked across the night sky with proper preparation.
Satellite observation connects observers with human space presence and provides engaging targets for telescope viewing. I’ve spent countless hours tracking satellites, and there’s something uniquely thrilling about catching the International Space Station drifting across your field of view.
In this guide, I’ll walk you through everything you need to know about observing satellites, from the basic requirements to advanced tracking techniques. You’ll learn which satellites are most visible, what equipment works best, and how to successfully capture these fast-moving objects in your telescope.
What Satellites Can You See With A Telescope?
Different satellites vary dramatically in visibility based on their size, altitude, and reflective properties. Large satellites like the ISS can show impressive detail through telescopes, while smaller communications satellites may only appear as faint points of light.
| Satellite Type | Visibility Level | Best Magnification | Observation Notes |
|---|---|---|---|
| International Space Station | Very Bright (Magnitude -3 to -6) | 50-100x | Solar panels and modules visible at higher power |
| Hubble Space Telescope | Bright (Magnitude 2 to 3) | 75-150x | Small but detailed, challenging to track |
| Starlink Satellites | Variable (Magnitude 3 to 6) | 25-75x | Best observed shortly after launch as “train of lights” |
| Iridium Satellites | Bright Flares (Magnitude -8 to -2) | Any | Visible during brief, predictable flares |
| Geostationary Satellites | Faint (Magnitude 10 to 14) | 100x+ | Requires large telescopes, appear as stationary points |
International Space Station (ISS)
The International Space Station is the brightest and easiest artificial satellite to observe. At approximately 356 feet long and 240 feet wide, it reflects enough sunlight to reach magnitude -6 under optimal conditions, making it brighter than Venus.
Through a telescope at 50-100x magnification, you can distinguish the station’s solar panels and main modules. I’ve found that a 35mm eyepiece on a 2000mm focal length telescope (57x magnification) provides an excellent balance between detail and tracking ease. At this power, the ISS appears as a bright T-shaped object with distinct solar panels extending from the central modules.
The ISS completes an orbit every 90 minutes, providing multiple viewing opportunities each night when conditions are right. The best viewing occurs when the station passes overhead within 2 hours of sunset or sunrise, when the sky is dark but the station remains sunlit.
Starlink Satellites
Starlink satellite observation has become increasingly popular as SpaceX continues deploying this massive constellation. Newly launched Starlink satellites appear as a “train of lights” moving across the sky in formation, creating a spectacular display for observers.
Initially, these satellites shine brightly at magnitude 2-3 shortly after deployment. Over several weeks, they gradually climb to their operational altitude of 342 miles and become much fainter, typically reaching magnitude 4-6. The best viewing period is within the first few weeks after launch when they’re still ascending and relatively close together.
For Starlink observation, I recommend using lower magnification (25-50x) and a wide field of view. This makes it easier to keep multiple satellites in view simultaneously as they move across your eyepiece. A rich-field telescope with a 2-3 degree field of view works particularly well for observing these satellite trains.
Hubble Space Telescope
The Hubble Space Telescope presents a challenging but rewarding target for experienced observers. At 43.5 feet long and 14 feet wide, it’s much smaller than the ISS but still visible to amateur telescopes at magnitude 2-3.
Observing Hubble requires precise timing and tracking skills. Because it orbits at 340 miles altitude and moves at 17,500 mph, it crosses the sky quickly. I’ve found that 75-150x magnification works best, but you’ll need smooth manual tracking or a motorized mount to keep it in view.
Hubble appears as a bright point of light without the visible solar panels that distinguish the ISS. The lack of extended solar panels makes it more challenging to identify, but its predictable orbit and brightness make it achievable with practice.
Geostationary Satellites
Geostationary satellites orbit at 22,236 miles altitude, remaining fixed above the same point on Earth’s surface. These satellites appear as faint points of light that don’t move relative to the stars, making them stand out when you scan the sky at low magnification.
Observing geostationary satellites requires larger telescopes (6-inch aperture or more) and dark skies. At magnitude 10-14, they’re near the limit of amateur equipment. I recommend using at least 100x magnification and carefully scanning the celestial equator where these satellites cluster.
What makes geostationary satellites interesting is their fixed position. While all other objects appear to drift west due to Earth’s rotation, these satellites remain stationary, creating a distinctive pattern that helps you identify them.
What Telescope Do You Need To See Satellites?
The right telescope setup makes all the difference in satellite observation success. While you can see some satellites with binoculars or small telescopes, certain features dramatically improve your satellite viewing experience.
Aperture Requirements
Telescope aperture (the diameter of the main lens or mirror) determines how much light you can gather and how faint an object you can see. For satellite observation:
- Minimum: 60mm aperture can show the ISS and bright satellites
- Recommended: 80-100mm aperture provides better views of medium-brightness satellites
- Advanced: 150mm+ aperture needed for faint geostationary satellites
I’ve found that an 80mm refractor or 6-inch reflector provides the best balance of portability and performance for general satellite observation. These apertures gather enough light to show most visible satellites while remaining manageable for tracking.
Magnification Guidelines
Unlike observing planets or deep-sky objects where higher magnification is usually better, satellite observation requires finding the right balance:
- Low Power (25-50x): Best for initial acquisition and tracking Starlink trains
- Medium Power (50-100x): Ideal for ISS details and general satellite observation
- High Power (100x+): Only for large satellites with motorized tracking
Start with low magnification to locate the satellite, then increase power once you have it centered in your field of view. Remember that higher magnification narrows your field of view, making tracking more difficult.
Mount Types
The telescope mount determines how smoothly you can track satellites across the sky:
- Alt-Azimuth Mount: Simple to use, good for beginners, but requires manual tracking in both directions
- Equatorial Mount: Can be motorized to compensate for Earth’s rotation, better for longer observation sessions
- GoTo Mount: Computer-controlled, can be programmed to track satellites automatically
For serious satellite observation, I recommend a computerized telescope for satellite tracking. These mounts can be programmed with satellite orbital parameters and track them automatically, dramatically improving your success rate.
Field of View Importance
Field of view (FOV) determines how much sky you can see through your eyepiece at once. For satellite observation, wider fields are generally better:
- Wide Field (2-3 degrees): Best for finding and tracking satellites
- Medium Field (1-2 degrees): Good balance for most satellites
- Narrow Field (under 1 degree): Challenging for tracking but shows more detail on large satellites
To calculate your telescope’s field of view, divide your eyepiece’s apparent field of view by the magnification. For example, a 25mm Plössl eyepiece with 52° apparent field at 50x magnification provides just over 1° of true field.
How To Track Satellites With Your Telescope?
Tracking satellites requires practice and the right techniques. These fast-moving objects cross the sky quickly, so you need to be prepared before they appear.
Manual Tracking Methods
Manual tracking works well for beginners with basic equipment. Here’s the technique I’ve developed through years of practice:
- Prepare Your Telescope: Set up at least 30 minutes before the satellite pass to allow temperature stabilization
- Locate the Approach Path: Use a star chart or app to identify where the satellite will first appear
- Start with Low Magnification: Use your lowest power eyepiece for the widest field of view
- Lead the Target: Aim slightly ahead of where the satellite will appear and wait
- Track Smoothly: Once centered, move the telescope smoothly along the predicted path
- Increase Magnification: Once comfortable tracking, switch to higher power for details
The key to manual tracking is keeping your movements smooth and deliberate. Practice makes perfect—I recommend starting with the ISS since it’s bright and moves relatively slowly compared to other satellites.
Viewing Conditions
Atmospheric conditions significantly affect satellite visibility. Here’s what I’ve found works best:
- Clear, Dark Skies: Moonless nights away from city lights provide the best contrast
- Stable Atmosphere: Minimal turbulence helps maintain sharp views
- No Clouds: Even thin high-altitude clouds can obscure faint satellites
- Avoid Light Pollution: Urban lighting can reduce visibility of faint satellites
For observing faint satellites like geostationary ones, you’ll need dark skies. However, bright satellites like the ISS are visible even from cities if you know where and when to look.
Timing Strategies
Satellite observation is all about timing. Most satellites are only visible during specific windows:
- Evening Passes: 1-2 hours after sunset when the sky is dark but satellites remain sunlit
- Morning Passes: 1-2 hours before sunrise under the same conditions
- Midnight Passes: Only possible for satellites in very high orbits
I recommend checking satellite prediction websites or apps for your specific location. They’ll tell you exactly when and where satellites will appear, eliminating guesswork.
Common Challenges
Even experienced observers face challenges when tracking satellites. Here are the most common issues and solutions:
- Tracking Too Fast: Start with low magnification and practice following stars across the sky
- Losing the Satellite: Don’t panic—switch back to low power and reacquire it
- Incorrect Timing: Always verify satellite passes from multiple sources
- Equipment Limitations: Accept that not all satellites will be visible with your equipment
Remember that satellite observation has a learning curve. Don’t be discouraged if you miss several passes before successfully tracking your first satellite.
Best Tools For Satellite Observation
Modern satellite observation relies heavily on digital tools for predictions and tracking. These resources can dramatically improve your success rate.
Mobile Apps
Smartphone apps have revolutionized satellite observation, providing real-time predictions and tracking information:
- ISS Detector: Free app with ISS predictions and augmented reality tracking
- Satellite Tracker: Comprehensive app covering thousands of satellites
- GoSatWatch: Advanced features for serious satellite observers
- Star Walk: General astronomy app with satellite tracking features
I use ISS Detector for its simplicity and accuracy, but advanced observers might prefer the additional features in Satellite Tracker. Most apps use your phone’s GPS to provide location-specific predictions.
Websites
Online resources provide detailed satellite predictions and tracking information:
- Heavens-Above: Comprehensive satellite tracking with detailed predictions
- Nasa Spot The Station: Official ISS sighting opportunities
- CALSKY: Advanced astronomical predictions including satellites
- Space-Track: Official US satellite tracking database
Heavens-Above is my go-to resource for its accuracy and comprehensive coverage. It provides detailed pass predictions, brightness estimates, and sky charts showing satellite paths.
Software Tools
Desktop software offers more advanced features for serious satellite observers:
- Stellarium: Free planetarium software with satellite tracking
- Cartes du Ciel: Advanced planetarium with extensive satellite support
- TheSkyX: Professional software with telescope control capabilities
These programs can interface with computerized telescopes, automatically pointing them at satellites as they cross the sky. This integration makes tracking much more reliable, especially for faint satellites.
Can You Photograph Satellites Through A Telescope?
Photographing satellites through a telescope is challenging but achievable with the right equipment and techniques. I’ve successfully captured images of the ISS and bright satellites using these methods.
Equipment Requirements
For satellite photography, you’ll need:
- Telescope with Tracking Mount: Motorized mount essential for keeping satellites in frame
- DSLR or Mirrorless Camera: Manual control over exposure and focus
- T-Ring Adapter: Connects camera to telescope
- Remote Shutter Release: Prevents vibration during exposure
A computerized mount with satellite tracking capabilities makes photography much easier. Alternatively, you can use a high-speed manual tracking technique where you pan the telescope to follow the satellite during exposure.
Photography Techniques
Successful satellite photography requires specific techniques:
- Manual Focus: Focus on a bright star before the satellite pass
- High ISO Settings: Start with ISO 800-1600 for bright satellites
- Fast Shutter Speed: 1/125 to 1/500 second to freeze motion
- Continuous Shooting: Use burst mode to increase capture chances
- Practice Tracking: Rehearse the tracking motion before the actual pass
For the ISS, I’ve had good success with 1/250 second exposures at ISO 1600. Faster satellites may require even shorter exposures to prevent motion blur.
Video Recording
Video recording can be easier than still photography for capturing satellites:
- Record at High Frame Rates: 30-60 fps provides multiple chances to capture the satellite
- Extract Frames Later: Select the best frames from the video recording
- Stacking Software: Combine multiple frames to improve image quality
Many modern cameras offer 4K video recording, which provides excellent resolution for extracting still frames of satellites.
Frequently Asked Questions
How to identify a satellite in the night sky?
Satellites appear as steady points of light moving in straight lines across the sky. Unlike airplanes, they don’t have flashing lights, and unlike meteors, they move much slower and don’t burn out. Most satellites travel from west to east and take 2-5 minutes to cross the sky.
Can you see the space station with a telescope?
Yes, the International Space Station is easily visible through telescopes and appears as a bright T-shaped object with distinct solar panels. At 50-100x magnification, you can clearly see its modular structure. The ISS is typically visible 2-4 times per night from most locations.
Can you see Starlink satellites with your eyes?
Yes, Starlink satellites are visible to the naked eye, especially shortly after launch when they appear as a “train of lights” moving across the sky. Over time, they spread out and become fainter, but individual satellites can still be seen from dark locations.
How rare is it to see the Starlink satellites?
Starlink satellites are visible quite frequently, with multiple passes visible each night from most locations. The “train” effect is most dramatic within the first few weeks after launch. As the constellation grows, sightings become increasingly common.
Is it possible to see the ISS with a telescope?
Absolutely! The ISS is one of the brightest satellites and shows impressive detail through telescopes. Even small telescopes can reveal its shape, while larger instruments can show individual modules and solar panels. The ISS moves quickly, so tracking requires practice or a motorized mount.
How can you tell if you’re seeing a satellite?
Satellites move steadily in straight lines across the sky, unlike airplanes which have flashing lights or meteors which streak and burn out. Satellites don’t change brightness dramatically (except for Iridium flares) and maintain consistent speed. Check satellite tracking apps to confirm if satellites are passing over your location.
Final Recommendations
Satellite observation through telescopes is a rewarding hobby that connects you directly with humanity’s presence in space. After years of tracking satellites, I still feel a thrill each time I catch the ISS drifting through my eyepiece.
For beginners: Start with the ISS using a small telescope or binoculars. Its brightness and predictable passes make it the perfect first satellite target.
For intermediate observers: Expand to include Hubble, Starlink trains, and Iridium flares. These targets provide variety and help develop your tracking skills.
For advanced observers: Challenge yourself with geostationary satellites and satellite photography. These pursuits require larger telescopes and more sophisticated techniques but offer incredible rewards.
Remember that satellite observation takes practice. Don’t be discouraged by missed passes or tracking difficulties—each observation improves your skills. The key is preparation, patience, and persistence.
With the right equipment, techniques, and timing, you can unlock the fascinating world of satellite observation. The night sky is filled with these human-made marvels, and with this guide, you’re ready to start exploring them through your telescope.
Comments