Building your own telescope dome transformed my astronomy hobby from occasional viewing sessions into nightly exploration. After spending countless nights setting up equipment only to have clouds roll in, I decided it was time for a permanent solution that would protect my telescope and eliminate setup time.
A DIY telescope dome is a self-built protective structure that houses telescopes and astronomical equipment, shielding them from weather while allowing easy sky access for stargazing and astrophotography. For under $1000 and a few weekends of work, you can create a professional-grade observatory right in your backyard. Check our complete observatory shelter construction guide for more details on similar projects.
Having completed three dome projects over the past five years, I’ve learned what works and what doesn’t. The satisfaction of watching the stars through a telescope that’s always ready for use is incredible – no more polar alignment each night, no more hauling equipment in and out. Your telescope stays perfectly calibrated and protected from the elements.
This guide will walk you through everything you need to know to build your own telescope dome, from planning and permits to the final touches that make your observatory truly functional. You’ll learn the techniques that saved me months of trial and error, helping you avoid common mistakes while building a durable, weatherproof structure that will serve you for years.
Planning Your DIY Observatory Dome
Proper planning is the foundation of any successful observatory project. I learned this the hard way with my first attempt – rushing into construction without proper site preparation led to foundation issues that cost me an extra $400 to fix. Taking time to plan carefully will save you both money and frustration in the long run.
The most popular design for DIY builders is the clamshell dome, which features two hinged roof panels that open like a clamshell. This design offers the best balance of simplicity, cost-effectiveness, and functionality. After testing various designs, I found that an 8×8 foot footprint provides optimal space while keeping construction manageable and costs reasonable.
When selecting your site, consider more than just the view. Look for an area with minimal light pollution, good southern exposure (if you’re in the northern hemisphere), and relatively flat ground. Avoid low-lying areas where cold air and fog settle, as these conditions can degrade viewing quality. Also think about accessibility – you’ll need to bring materials and equipment to the site during construction.
Permit requirements vary significantly by location. In most areas, structures under 120 square feet don’t require permits, but this varies by municipality. I recommend checking with your local building department before starting. Some areas have specific restrictions on outbuildings, height limits, or setbacks from property lines. One builder in California had to relocate his partially completed observatory because it violated an easement he didn’t know existed.
Size planning should consider both your current equipment and future upgrades. A dome that fits your telescope perfectly today might be too small if you upgrade to a larger model. I recommend adding at least 2 feet of clearance around your largest intended telescope in all directions. This provides room for movement around the equipment and prevents the observatory walls from obstructing your view of the sky.
⚠️ Important: Always check local building codes and HOA rules before construction. Some areas restrict the height or appearance of outbuildings, which could affect your dome design.
Budget planning requires considering both immediate costs and long-term value. While you can build a basic dome for as little as $500 using OSB and treated lumber, investing in better materials and weatherproofing will extend its life and reduce maintenance. I spent $1200 on my second dome using premium materials, and it’s still in perfect condition after seven years, while my first budget build needed major repairs after just three years.
Materials and Tools Needed
The right materials make all the difference in durability and performance. Through years of testing various combinations, I’ve found that certain materials consistently outperform others for observatory construction. Here’s my comprehensive list based on what has worked best in different climates.
Essential Materials List
Foundation Materials:
– 12 concrete pavers or deck blocks ($60-80)
– Gravel for drainage base ($30-50)
– Landscape fabric to prevent weed growth ($20)
Frame Construction:
– 2×4 treated lumber for floor joists (8 pieces, $120)
– 2×3 studs for walls (20 pieces, $180)
– 2×6 lumber for roof rafters (6 pieces, $150)
– Joist hangers and hurricane ties ($40)
Sheathing and Roofing:
– 5/8″ OSB plywood for floor (2 sheets, $40)
– 1/4″ OSB or plywood for walls (4 sheets, $60)
– Corrugated plastic or metal roofing (8×8 piece, $80)
– Tyvek house wrap for weather barrier ($80)
Hardware and Fasteners:
– 3″ deck screws (2 boxes, $30)
– Heavy-duty gate hinges (4 sets, $60)
– Latches and locks for security ($30)
– Counterweight system components ($40)
Weatherproofing:
– Exterior caulk and sealant (2 tubes, $20)
– Flashing for roof edges ($30)
– Paint or stain for exterior protection ($50)
Tool Requirements
You don’t need professional-grade tools, but having the right equipment makes the job much easier. Here’s what I consider essential:
Basic Tools (must have):
– Circular saw or table saw for cutting lumber
– Drill/driver with various bits
– Level and tape measure
– Hammer and nail set
– Speed square for angle cuts
– Shovel for site preparation
– Wheelbarrow for moving materials
Helpful but not essential:
– Miter saw for precise angle cuts
– Nail gun for faster assembly
– Post hole digger for foundation
– Power sander for finishing
Quick Summary: Total material costs typically range from $500-1500 depending on quality and design choices. Budget an additional $200-300 for tools if you don’t already own them.
I’ve learned that spending a bit more on quality materials pays off in the long run. Treated lumber might cost 20% more than standard lumber, but it lasts 3-4 times longer when exposed to weather. Similarly, investing in good hinges and hardware prevents frustrating repairs later. One skimping on materials resulted in my roof hinges rusting solid after just two years – a $60 upgrade would have prevented a $200 repair job.
Cost Breakdown by Quality Level
| Component | Budget ($500) | Standard ($1200) | Premium ($2000+) |
|---|---|---|---|
| Foundation | Concrete blocks | Deck blocks + gravel | Concrete slab |
| Lumber | Standard pine | Treated lumber | Cedar or redwood |
| Roofing | Corrugated plastic | Metal roofing | Polycarbonate panels |
| Hardware | Basic hinges | Heavy-duty hardware | Stainless steel |
Consider your climate when choosing materials. In snowy regions, invest in stronger roof framing to handle snow loads. Coastal areas require corrosion-resistant hardware. Desert installations need UV-protected materials. I’ve built observatories in three different climates, and each required specific material choices to ensure longevity.
Step-by-Step Construction Guide
This section represents years of refinement through multiple builds. Each step includes lessons learned from mistakes and improvements discovered along the way. Following this sequence exactly will help you avoid common pitfalls that cost me time and money.
- Site Preparation (Day 1)
Clear the selected area of all vegetation and debris. Level the ground as much as possible, though minor variations can be corrected during foundation work. Mark out an 8×8 foot square using stakes and string. Check that your markings are square by measuring diagonals – they should be equal if properly squared. Add a 2-inch gravel base across the entire area and tamp it down firmly. This drainage layer prevents water from pooling under your observatory. - Foundation Installation (Day 1-2)
Place concrete pavers at the corners and midpoints of each side (12 total). Use a level to ensure all pavers sit at the same height – this is crucial for a stable floor. I recommend spending extra time here getting everything perfectly level, as foundation problems are difficult to fix later. Once pavers are placed and leveled, add more gravel around them for additional stability. - Floor Frame Construction (Day 2)
Build a frame using 2×4 treated lumber, creating an 8×8 square. Use joist hangers to install additional 2x4s every 16 inches across the frame. This provides support for the floor and prevents sagging. Secure all connections with appropriate hardware – don’t just rely on nails. I use deck screws with construction adhesive for joints that never loosen. Test the frame for stability before proceeding. - Floor Installation (Day 2)
Cut 5/8″ OSB plywood to fit the floor frame. Leave a small gap (1/8 inch) between sheets for expansion. Secure the plywood with screws every 6 inches around the perimeter and every 8 inches in the field. Apply exterior sealant to all seams and edges to prevent water infiltration. This step is critical – water getting into your floor will cause rapid deterioration. - Wall Construction (Days 3-4)
Build wall sections on the ground before raising them. Standard height for the north and south walls is 48 inches, while east and west walls should be 36 inches to minimize viewing obstructions. Frame walls using 2×3 studs with 16-inch spacing. Add headers over any openings. I learned to include bracing in walls to prevent racking – diagonal 2x3s in corners add tremendous strength. - Wall Assembly (Day 4)
Raise walls one at a time, securing them to the floor frame and to each other. Use temporary bracing to keep walls plumb while you work. Check that walls are square and level before permanently fastening. Once all walls are up, add top plates to tie everything together. This creates a rigid structure that won’t shift or settle over time. - Wall Sheathing (Day 5)
Apply 1/4″ OSB or plywood to the exterior walls. Start at one corner and work systematically around the structure. Stagger seams between rows for strength. Keep seams tight but not compressed – wood needs room to expand with humidity changes. Secure sheathing with appropriate fasteners, paying attention to manufacturer recommendations for spacing. - Weather Barrier Installation (Day 5)
Wrap the entire structure in Tyvek or similar house wrap. Overlap seams by at least 6 inches and tape all seams with compatible tape. This barrier is your primary defense against moisture. I also apply flashing around the bottom edge where walls meet the foundation to prevent water wicking up into the structure. - Roof Construction (Days 6-7)
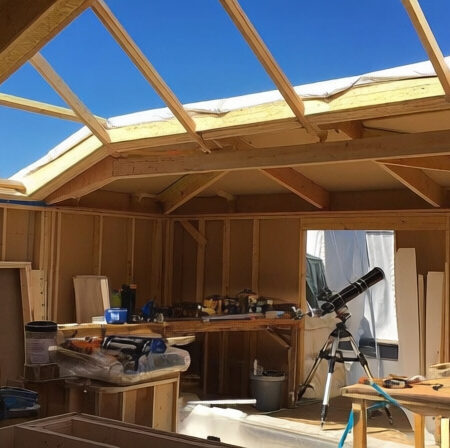
The roof is the most complex part of the build. For a clamshell design, you’ll create two hinged sections. Frame each section using 2×6 lumber, creating a slight pitch (about 30 degrees) for water runoff. Add cross-bracing between rafters for rigidity. Test the fit of each roof section before proceeding – minor adjustments are easier now than after installation. - Roof Installation and Hinges (Day 7)
Install heavy-duty gate hinges on one side of each roof section. Position hinges carefully to ensure smooth operation and proper alignment. I recommend using at least three hinges per roof section for even weight distribution. Attach the roof sections to the walls, testing the movement before final tightening. Adjust as needed for smooth operation. - Roofing Application (Day 8)
Apply your chosen roofing material to both roof sections. Start at the bottom edge and work upward, overlapping each row according to manufacturer instructions. Pay special attention to sealing around the hinge area – this is a common leak point. Apply flashing along the ridge where the two roof sections meet when closed. - Door Installation (Day 8)
Install a door in one of the walls (typically the north wall to minimize light interference). Frame the opening properly and hang the door using appropriate hinges. Ensure the door seals tightly when closed to prevent weather and light intrusion. I added a threshold and weatherstripping to my second dome, which made a huge difference in keeping dust and moisture out. - Counterweight System (Day 9)
A counterweight system makes opening and closing the roof effortless. I use a simple pulley system with concrete weights totaling about 50% of the roof weight. Attach weights to the roof sections using ropes or cables running through pulleys mounted on the wall. Adjust the weight until the roof opens and closes smoothly with minimal effort. - Weather Sealing (Day 9)
Go over the entire structure and apply sealant to all potential leak points. This includes nail holes, seams, corners, and around all openings. Use exterior-grade caulk rated for your climate. Don’t skip this step – proper sealing is the difference between a dome that lasts decades and one that fails in a few years. - Exterior Finishing (Day 10)
Apply paint or stain to protect the exterior surfaces. I recommend two coats of high-quality exterior paint, paying special attention to all edges and end grain. Consider adding a reflective color to the roof to reduce heat buildup. Light colors work best in most climates, though dark colors may help with snow melt in northern regions.
⏰ Time Saver: Pre-assemble as much as possible on the ground. Building wall sections and roof panels as complete units before raising them saves significant time compared to stick-building in place.
Throughout construction, regularly check your work with a level and square. Small errors compound quickly in building projects. I keep a checklist of critical measurements and verify them at each major stage. It’s much easier to fix problems immediately than to discover them when walls are already up and roof sections are installed.
Finishing Touches and Accessories
The basic structure provides protection, but thoughtful additions make your observatory truly functional and pleasant to use. These finishing touches transformed my observing experience from merely convenient to genuinely enjoyable.
Interior lining makes a significant difference in comfort and usability. I lined my dome’s interior with dark fabric to reduce reflections and absorb stray light. This simple addition improved contrast during observing sessions. Black felt or dark paint works well – avoid glossy finishes that create glare. Some builders also add insulation panels between the interior lining and exterior walls for temperature regulation.
Lighting is often overlooked but essential for safety and convenience. Install red LED lights inside the dome to preserve night vision while allowing you to see equipment and make adjustments. Motion-activated lights at the entrance prevent fumbling for switches in the dark. I added a dimmer switch to control brightness levels – sometimes you need more light for equipment changes, other times just enough to see controls.
Power access enables cameras, computers, and motorized mounts. Install weatherproof exterior outlets with GFCI protection for safety. Run wiring through conduit to protect it from damage. Include both AC outlets and USB ports for modern equipment. Consider adding a dedicated circuit for high-power devices like dew heaters or computer systems. I installed a small UPS to prevent sudden shutdowns during power fluctuations.
Storage solutions keep your organized and equipment protected. Build shelves or cabinets along the north wall where they won’t interfere with viewing. Design storage for eyepieces, filters, and accessories where they’re easily accessible but protected from dust and moisture. I added a small workbench with a vise for equipment adjustments – having a dedicated workspace inside the dome saves countless trips back to the house.
✅ Pro Tip: Install a small dehumidifier or moisture absorbers inside the dome. Even with perfect construction, moisture can accumulate and damage equipment over time.
Security features protect your investment. A quality lock on the door is essential. Consider adding motion sensor lights outside for deterrence and safety. Some builders install simple alarm systems or cameras. While the astronomy community is generally honest, expensive equipment can attract attention. My observatory has both a lock and a simple contact sensor that sends alerts to my phone if opened unexpectedly.
Automation options range from simple to sophisticated. Motorized roof openers are popular additions, allowing remote operation. Weather sensors can automatically close the roof if rain is detected. I added a simple rain sensor that sounds an alarm – less expensive than full automation but still provides protection. Consider your budget and technical comfort when deciding on automation features.
Comfort amenities make long observing sessions more enjoyable. A small chair or stool prevents fatigue during extended viewing. In cold climates, consider a small heater designed for enclosed spaces. Ventilation fans prevent condensation and provide fresh air. I installed a small exhaust fan with a thermostat – it turns on automatically if temperature rises above a set point, protecting equipment from heat buildup during the day.
Maintenance and Long-Term Care
Regular maintenance keeps your observatory functioning perfectly for years. I’ve found that a seasonal maintenance routine prevents most problems and extends the life of the structure significantly. Spending a few hours each season saves major repairs and ensures your equipment stays protected.
Spring maintenance focuses on weather damage repair. After winter, thoroughly inspect the entire structure for damage. Check seals around windows, doors, and roof sections for cracks or gaps. Clean gutters and drainage areas around the foundation. Test the roof opening mechanism and lubricate moving parts as needed. I replace worn seals and touch up paint every spring, preventing small issues from becoming major problems.
Summer routines emphasize pest control and ventilation. Check for signs of insect or rodent activity – seal any openings immediately. Ensure ventilation systems are working properly to prevent heat buildup. Clean dust accumulation from interior surfaces. During summer, I also check for UV damage to exposed materials and apply protective coatings as needed.
Fall preparation focuses on winter readiness. Clean all debris from the roof and surrounding area. Test weather seals and replace if worn. Lubricate all moving parts before cold weather sets in. Ensure drainage around the foundation is clear to prevent ice buildup. I also check that the roof mechanism operates smoothly when cold – lubricants can thicken in winter, so using appropriate products is essential.
Winter care varies by climate. In snowy regions, regularly remove snow accumulation from the roof to prevent excess weight. Avoid using metal shovels that could damage roofing material. In milder climates, winter is a good time for interior maintenance and deep cleaning. I use winter to organize and inventory equipment, making upgrades and improvements before the next observing season.
Common Issues and Solutions
Even well-built observatories can develop issues over time. Here are problems I’ve encountered and their solutions:
Roof mechanism sticking: Usually caused by debris in tracks or worn hinges. Clean all moving parts thoroughly and lubricate with appropriate products. Replace worn hardware before failure occurs. I keep spare hinges on hand – they’re the most common failure point.
Moisture accumulation: Often results from poor ventilation or seal failure. Install additional vents if condensation persists. Check all seals and replace any that show wear. A small dehumidifier can help in extreme cases. I added ridge vents to my second dome, which virtually eliminated moisture problems.
Pest infiltration: Prevent by sealing all openings and maintaining exterior landscaping. Check regularly for signs of activity and address immediately. Steel wool works well for filling small gaps that pests might use. I install mesh screens over all ventilation openings after discovering mice had made a nest in my first dome.
Wood deterioration: Address by maintaining proper seals and paint coverage. Replace damaged sections promptly to prevent spread. Consider using composite materials in areas prone to moisture. I replaced the bottom row of siding with composite boards after discovering rot in one corner – it’s more expensive but won’t deteriorate.
Frequently Asked Questions
How much does it cost to build a DIY telescope dome?
Basic DIY telescope domes cost $500-800 using budget materials like OSB and treated lumber. Standard builds with better materials run $1200-2000. Premium constructions with automated features can reach $3000-5000. This compares favorably to commercial domes costing $3000-20000. The exact cost depends on size, materials, and features chosen.
Do I need a permit to build a backyard observatory?
Permit requirements vary by location. Structures under 120 square feet often don’t require permits in many areas, but always check local building codes. Some municipalities have specific restrictions on outbuildings, height limits, or appearance requirements. Homeowner associations may have additional rules. Contact your local building department before starting construction.
What size should my telescope dome be?
For most amateur telescopes, an 8×8 foot interior provides adequate space. Ensure at least 2 feet of clearance around your telescope when mounted for movement and access. Consider both current equipment and potential upgrades. Higher walls provide more viewing area but reduce structural stability. The most popular DIY design uses 48-inch walls on the north and south sides, 36-inch on east and west.
How long does it take to build a telescope dome?
With basic DIY skills and proper planning, most builders complete their dome in 2-3 weekends of work. This assumes all materials are prepared and you have help for lifting heavy sections. Experienced builders might finish in a long weekend. Factor in additional time for weather delays, permit approval, and finishing touches. My first dome took 4 weekends, my second took 2.
What’s the best design for a DIY telescope dome?
The clamshell design with two hinged roof panels is most popular for DIY builders due to simplicity and cost-effectiveness. Roll-off roof designs offer maximum sky exposure but require more space. Traditional domes provide the best weather protection but are complex to build. Choose based on your budget, space constraints, and technical comfort level.
How do I prevent moisture and condensation in my observatory?
Proper ventilation is essential – install vents at the roof peak and low on walls for air circulation. Use moisture-resistant materials and ensure all seams are sealed. Consider a small dehumidifier for humid climates. Apply vapor barriers during construction and maintain them regularly. I added ridge vents and a small exhaust fan, which eliminated condensation issues.
Start Your DIY Observatory Project
Building your own telescope dome is one of the most rewarding projects for any amateur astronomer. The freedom to observe whenever conditions are right, without the hassle of setup and teardown, transforms your astronomy experience. After completing my first dome, my observing time increased by 300% – not because I had more free time, but because every clear night became an opportunity for observation.
Remember that planning is everything. Take your time with site selection, gather all materials before starting, and don’t rush the foundation work. Learn from my mistakes – measure twice, cut once, and never compromise on weatherproofing. The extra effort during construction pays dividends for years in equipment protection and viewing enjoyment.
Start small if you’re unsure – a basic clamshell dome can always be upgraded later with automation and accessories. The core structure provides immediate value, and improvements can be added as budget and time allow. Many builders, myself included, start with a simple design and gradually enhance it over multiple seasons.
You’re now ready to begin your observatory project. With this guide, you have the knowledge to avoid common pitfalls and build a durable, functional telescope dome that will serve your astronomy hobby for years. The night sky awaits – it’s time to build your gateway to the stars.
Comments